


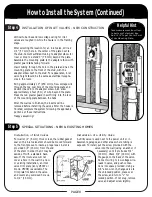

The power unit should be mounted on an outside wall
to minimize the length of the exhaust line. Mount the
unit at a height that will provide convenient access to
the dirt receptacle, or about 6 feet (1.8 m) from the
floor to the top of the wall-mounting bracket which
holds the power unit. For proper ventilation and access,
the wall-mounting bracket must be at least 14" (355
mm) from ceiling and 14" (355 mm) from a side wall.
To mount on a masonry wall, use the wall-mounting
bracket as a template to locate two holes on a mortar
joint or on the surface of a cement block. Drill the two
marked holes 1" (25 mm) deep using a 1/4" (6.4 mm)
masonry drill bit.
To anchor, insert a 1/4" (6.4 mm) plastic anchor in
each hole. Secure the mounting bracket to the wall with
two 1" No. 12 (?5.5 x 25 mm) sheet-metal screws.
In anchoring to a wood or plaster wall, locate the wall-
mounting bracket on a stud. Securely anchor bracket to
stud with two No. 14 x 1 1/2" (?6.3 x 38 mm) screws
through the two vertical holes.
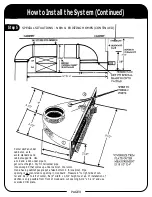
Hang Power Unit and Install Exhaust Line
The manufacturer recommends that a muffler be
installed with all power units. Mufflers are sold separate-
ly. Install the muffler vertically in the exhaust line with-
in the building, and extend the exhaust line outside.
The connection of the intake line and wiring to the
power unit will be completed after the balance of the
system is installed
.Electrical Requirements
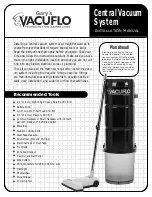
All Vacuflo Power Units are supplied with a power supply
cord for connection to a grounded receptacle. All wiring
must meet local codes. Warning: When using the system,
electric shock might occur if used on a wet surface.
Grounding Instructions
This appliance must be grounded. If it should malfunc-
tion or breakdown, grounding reduces the risk of elec-
tric shock by providing a path of least resistance for
electric current. This appliance is equipped with a cord
having an equipment-grounding conductor and ground-
ing plug. The plug must be plugged into an appropriate
outlet that is properly installed and grounded in accor-
dance with all local codes and ordinances.
WARNING!
Electric shock is a risk when the equipment-grounding
conductor is improperly connected. Check with a quali-
fied electrician or service person if you are in doubt as
to whether or not the outlet is properly grounded. Do
not modify the plug provided with the appliance—if it
will not fit the outlet, have a proper outlet installed by a
qualified electrician. This appliance is for use on a nomi-
nal 120-volt circuit. Make sure that the appliance is con-
nected to an outlet having the same configuration as the
plug. No adapter should be used with this appliance.
INSTALLATION OF THE POWER UNIT - NEW & EXISTING HOMES
How to Install the System
Step 1
INSTALLATION OF INLET VALVES –
EXISTING HOMES
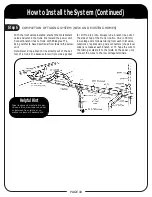
Step 2
Helpful Hint
Probe for obstructions by insert-
ing a sufficient length of tubing
into the wall before cutting the
inlet valve hole.
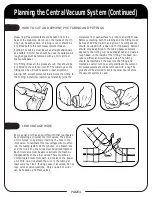
The hole in the wall for the inlet valve should be locat-
ed between studs—clear of obstructions such as plumb-
ing, wiring, heating ducts, etc. NOTE: Minimum stud
depth for sufficient clearance of the adapter elbow is 2
3/4" (70 mm).
Determine the exact location of an inlet valve and locate
a point on the floor directly below vertical center of the
desired location. For appearance, the height of the inlet
valves should be centered with the height of electrical
receptacles. Drill a small pilot hole (against the wall)
through the flooring and sub-flooring. The straight sec-
tion of a wire coat hanger cut at an angle makes a good
pilot hole drill bit. (Be careful not to snag carpeting.)
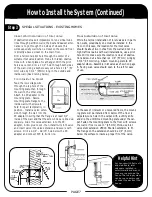
From beneath the floor, this pilot hole will serve as a
guide point from which you can measure over approxi-
mately 2 1/2" (63 mm) to locate and drill a 2 1/4" (57
mm) diameter hole in the center of the sole plate.
Before cutting the 2 1/4" x 3 3/4" (57 mm x 95 mm)
hole in the wall for the inlet valve, drill the 2 1/4" (57
mm) diameter hole up through the sole plate. Using a
flashlight, inspect the interior of the wall to make sure
there are no obstructions. It is also advisable to probe
for obstructions by inserting a sufficient length of tub-
ing into the wall
BEFORE
cutting the inlet valve hole.
PAGE 5