

System Interface and Operation
IR Remote Controller
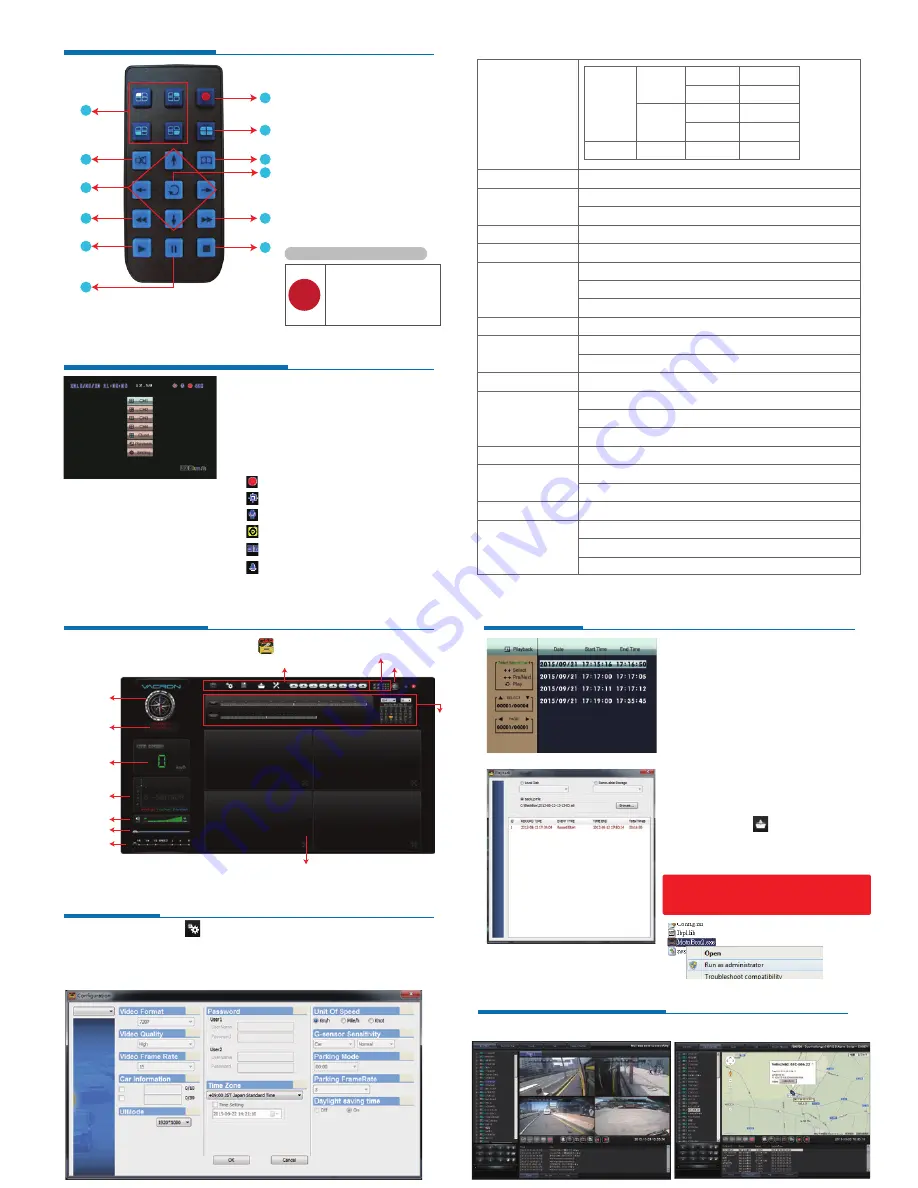
CARBOX Player on PC
Playback Mode
√
Check the battery’s positive and
negative polarity.
√
Check the battery if run out.
√
Check the sensor of remote
control if be obscured.
√
Check if there are fluorescent
lamps are used nearby.
?
Remote control inspection
Execute player software CarBox2.exe
GPS Direction / GPS Latitude & Longitude / Speed for GPS models.
GPS Direction
GPS Latitude &
Longitude
G-Sensor
Volume
Play Bar
Play Speed
Speed
Google Map
Playb
ack Dat
e Selection
1~4 CH
Control Interface
4ch / 9ch
About 3G Client complete remote monitoring operations, please refer to the operating
manual.
*Support windows operating system
1
2
3
4
6
5
7
8
10
11
12
9
(1)Display Description
(2)Icon Description
• Press Ch1~Ch4 button or select on menu for
single display.
• Press quad split screen button for 4Ch display.
• Press menu button to enter menu option.
• Press play button to enter playback mode.
• : Recording
• : GPS Connecting
• : Voice Recording On
• : Event Recording On
• : 3G Connection On
• : Alarm Trigged
1. 1CH Screen Display
2. Force Recording Button
3. 4CH Screen Display
4. Mute
5. Menu
6. Arrow
7. Confirm Button
8. Backward(Not Working)
9. Forward
10. Playback/Play
11. Pause
12. Stop/Left
(3) OSD Menu Operation and Parameters Setup Description
Select 1~4CH to adjust Bright, Contrast and Color
The time setting will be automatically calibrated by GPS signal.
If no GPS signal, time and date can be set manually.
Select show speed and speed unit setting on live view display or Not.
Input range:A~Z and 0~9
1. Setup channel mode when system starts.
2. Select extensional time after ACC Off
3. Sound recording ON/OFF
Setup the mode after alarm trigged.
1. Low voltage protection(trigged at ACC mode)
2. Notice of SD CARD protecting.
3G function ON/OFF,show setting information at present(Optional)
Once the function is activated, when the car collision happened,
『Force Recording』mode will be automatically triggered, to prevent
complete recording event not be overwritten.
Select necessary files to backup.
After restore default setting, machine will be restarted and cleaned
original setting.
Recording data will also be formatted at same time
Save the firmware update program into USB device and use USB
device to update firmware. When update firmware please keep
power supply. It will restart automatically after finishing update.
Video Setting
Time Setting
GPS Setting
Plate Number Setting
Working Mode
Alarm Setting
System Protection
3G Network
G-Sensor Setting
Data Backup
Restore Default
Format SD CARD
Firmware Update
Recording Setting
NTSC
PAL
Normal
Recording
Frame
Resolution
5-30 fps
5-30 fps
5-25 fps
5-25 fps
High
720P
VGA
720P
VGA
Better
(1) Click play button on the remote control
during live monitoring mode, to enter
playback page.
(2) To select search type then click enter
button, to enter playback list
(3) To select the playback file, then click enter
button to enter the playback video file.
◆
On the Device
(1) To read the SD CARD with saving data on
PC, then run the player software
CarBox2.exe.
(2) Click “Playback”
,
to open playlist menu.
(3) Select SD CARD, the video files will be
shown in the playlist, Click the video file to
play.
◆
Playback on PC
If the playback list cannot be read in Win7 system.
Solution: click right button and execute CARBOX as
Administer identity.
Configuration
Before execute this function, please insert the SD Card into your computer.
When finish all setting and click
『
Save
』
, all the setting will save to the SD
CARD device. When you insert the SD CARD device into your DVR, the DVR
will read the setting and follow the setting to start recording.
3G Client Remote Monitoring
Support 3G models
Setup the SD Card Setting


