background image

H-DX    User Manual


55 


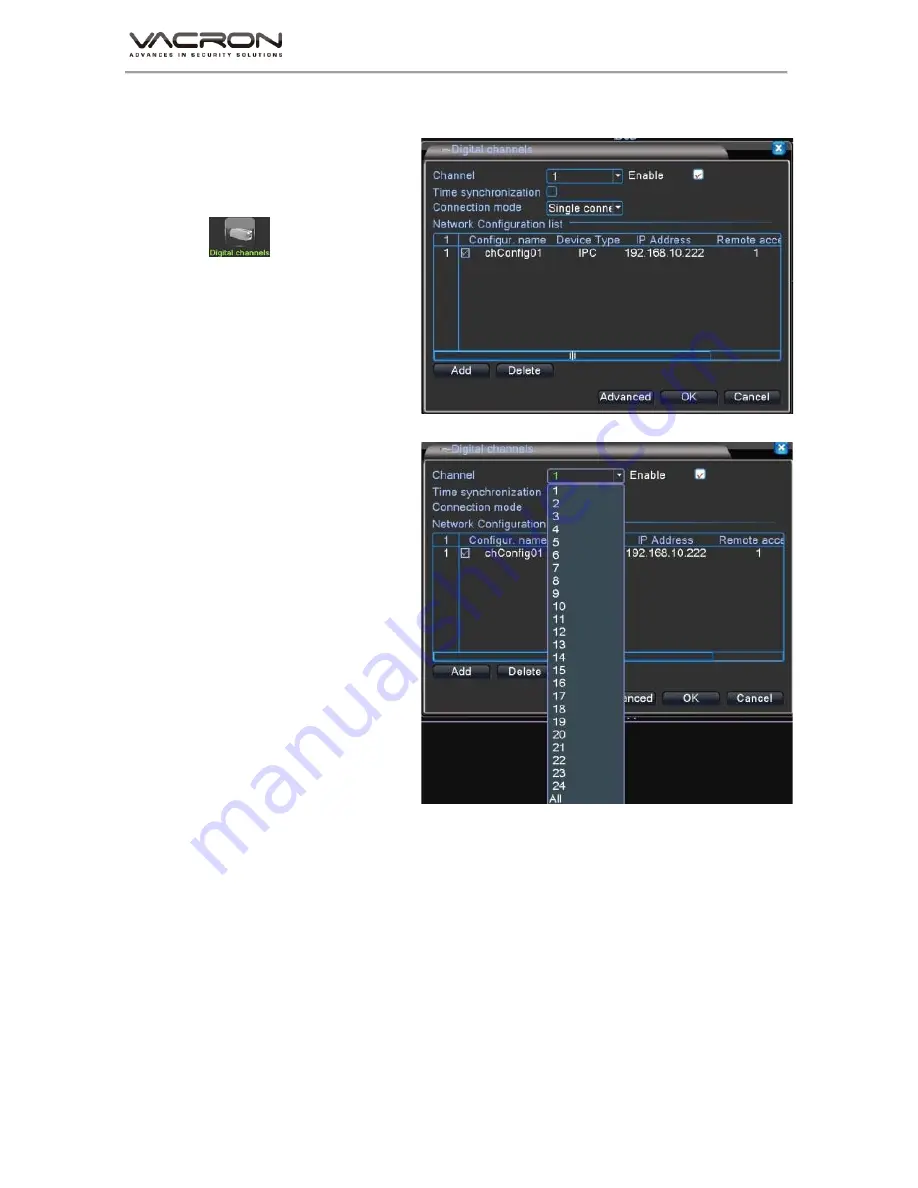
Digital channels 


a).


Channel: Set the NETWORK channels one by one or 

set all channels once to have the same settings. 

b).


Enable: Check it to enable the setting function. Default 

is unchecked. 

c).


Time synchronization: Check it to synchronize 

connected IP cameras/DVRs with the system time on 

DVR. 

d).


Connection Mode: Choose Single 

Connection/Multiple Connection mode. Multiple 

Connections can connect several IP Cams/DVRs to a 

single channel and switch between them. Default: 

Single Connection. 

e).


Add: Search available IP Cam/DVR for connection. 

f).


Delete: Delete the selected IP Cam/DVR from the list. 


Main Menu/ 
System/Digital/Digital 
channels 


:You can set the 

target IP cameras or 
DVRs that you want to 
record. 

Summary of Contents for VDH-DX

Page 1: ...User Manual VDH DX 2014 FEB V1 4 ...

Page 2: ...e individual power instead of share electrical outlets with other electrical equipment as this could result in damage or accident Do not attempt to service this DVR by yourself as it may expose you to dangerous voltage or other hazards Please refer all service to the qualified servicing distributor Please do not remove the machine housing during operation It may cause electric shock or accidental ...

Page 3: ...nf 7 5 1 2 PlayBack 8 5 1 3 Backup 11 5 2 Alarm 12 5 2 1 Motion Detect 13 5 2 2 Video Blind 14 5 2 3 Video Loss 15 5 2 4 Alarm Input 17 5 2 5 Alarm Output 18 5 2 6 Abnormality 18 5 2 7 Intellingent 19 5 3 System 20 5 3 1 General 21 5 3 2 Encode 22 5 3 3 Network 23 5 3 4 NetService 24 5 3 5 GUI Display 25 5 3 6 PTZ Config 26 5 3 7 RS232 27 5 3 8 Tour 27 5 3 9 Spot Set 28 5 3 10 Digital 29 5 4 Advan...

Page 4: ...tput Adjust 59 5 4 5 AutoMaintain 59 5 4 6 Restore 60 5 4 7 Upgrade 60 5 4 8 Device Info 61 5 4 9 Import Export 61 5 5 Info 62 5 5 1 HDD Info 62 5 5 2 BPS 63 5 5 3 LOG 63 5 5 4 Version 64 5 6 Logout 65 6 NET Surveillance WEB IE 66 ...

Page 5: ...mode in LIVE VIEW mode PLAY PAUSE in PLAYBACK mode PLAY PAUSE 5 Next Page available by Pause of PALYBACK mode 6 Under the playback mode there are 4 choices for the speed Choose your choice to fast rewind 7 STOP in PLAYBACK mode 8 Under the playback mode there are 4 choices for the speed Choose your choice to fast forward 9 Under the playback mode there are 4 choices for the speed Choose your choic...

Page 6: ...ttom again to show next set 8 split video 1 8 9 16 30 LIVE or Playback mode 9 split video display press this bottom again to show next set 9 split video 1 9 8 16 31 16 Split screen 32 1 10 0 In LIVEVIEW or PLAYBACK mode to show chosen video CH1 CH10 Number keys 33 11 16 In LIVEVIEW or PLAYBACK mode to show chosen video CH11 CH16 Note There are many DVR equipments in the same place the remote contr...

Page 7: ...ally if recording is scheduled the assigned channel shows red dot Memo 1 Please vertify imput power voltage is coherent to DVR power requirement firmly plug on the power line befor switch the power on 2 Please refer DVR hardware and power requirement on the specification chart Strongly recommend connect DVR to a stable power supply if possible please connect to UPS system 2 Power ON User can shut ...

Page 8: ...lect Main Menu or rest functions key in Account ID Password to login Default Value of Account ID admin Password blank 4 Display Setup Select View 1 for monitoring Single screen optional CAM01 16 single screen Select View 4 for monitoring 4 screens optional CAM1 4 4 CAM5 8 CAM9 12 CAM13 16 ...

Page 9: ...H DX User Manual 5 Select View 8 for monitoring 8 screens optional CAM1 8 CAM9 16 Select View 9 for monitoring 9 screens optional CAM1 9 CAM8 16 Select View 16 for monitoring 16 screens 16 split screen ...

Page 10: ...H DX User Manual 6 5 Main Menu Figure 1 Figure 2 Right click the mouse select Main Menu and it will pop out as Figure 1 Figure 2 5 1 Record Figure 3 Select Figure 2 Record icon pop out Figure 3 page ...

Page 11: ...the disk mirror function It simultaneously uploads the records to another HDD Default value is Off Length Adjust the time period of recording at least 1 Min Max 120 Min Default value is 60 Min Prerecord Mode 3 options Schedule Manual Stop Schedule mode select requested days first and then select recording mode time total 4 periods of time to choose Manual mode must complete the settings before rec...

Page 12: ...H DX User Manual 8 5 1 2 PlayBack Figure 5 Figure 6 Select Figure 3 PlayBack icon pop out Figure 5 page c a b ...

Page 13: ...peed just click play button once again Click pause rewind button rewind the image frame by frame Click pause playback button playback the image frame by frame Previous file button back to last hour file and playback Next file button go to next hour file and playback Click repeat button icon becomes to repeat same file Click full screen button enlarge the image Click one more time back to normal Cl...

Page 14: ...igure 6 and click return to date searching page Right click mouse a dialogue pops out UpWindow Click to return previous layer and back to Record page Stop playback Click to stop select Stop playback to stop playing Full screen display Click Full screen to enlarge images to maximum and then right click mouse to close full screen Single screen Select single screen choose 1 16 Ch to playback Four scr...

Page 15: ...up Select Figure 3 Backup icon get into Figure 6 page Plug in USB storage device click detect to search USB storage which will be shown in window like Figure 6 Select backup icon to get into Figure 7 page Figure 6 Figure 7 Figure 8 ...

Page 16: ...ckup End Time select what time to end backup Remove Remove selected files Add Add selected types or channels Backup format select H264 or AVI default value is H264 Select Burning icon to get into Figure 8 page enable to save any one Channel s record into an USB storage device Synchronously Format selected USB storage device While backup click stop icon to stop backup 5 2 Alarm Select Figure 2 Alar...

Page 17: ...er 1 600 Sec Alarm Output According to the settings to trigger alarm output default value is Off Delay A time period to record after triggering motion detect alarm option 0 3000 Sec default value is 10 Sec Channel Recording Select which channel to record after motion detect is triggered default value is Off Tour Channel pops out after alarm is triggered If select all channels it jumps from Ch 1 to...

Page 18: ...5 2 2 Video Blind Select Figure 9 Video Blind icon get into Figure 13 page Channel setup ch1 ch 16 for individual settings also can setup for all channels Enable Select to setup for the Video Blind functions default value is Off Sensitivity Set the sensitivity level from lowest lower middle higher much higher highest 6 options Default value is middle Period setup the Video Blind from Monday to Sun...

Page 19: ...nction from Ch1 Ch16 like Figure 12 Record Delay The recording duration after the buzzer being triggered Video Blind Option 10 3000 Sec default value is 10 Sec Show message Setup for a prompt message show on the screen when Video Blind is triggered default value is Off Send Email Setup to send triggered photos to assigned email address when Video Blind is triggered default value is Off Buzzer Setu...

Page 20: ...riggered default value is Off Tour Channel pops out after Video Loss is triggered If select all channels it jumps from Ch 1 to ch16 in sequence default value is Off PTZ Activation Set the PTZ function from Ch1 Ch16 like Figure 12 Record Delay The recording duration after the buzzer being triggered Video Loss Option 10 3000 Sec default value is 10 Sec Show message Setup for a prompt message show on...

Page 21: ...0 Sec Record Channel select which channel to record after Alarm Input is triggered default value is Off Tour Channel pops out after Alarm Input is triggered If select all channels it jumps from Ch 1 to ch16 in sequence default value is Off PTZ Activation Set the PTZ function from Ch1 Ch16 like Figure 12 Record Delay The recording duration after the buzzer being triggered Alarm Input Option 10 3000...

Page 22: ... 9 Abnormality icon get into Figure 17 page Event Type Optional No Disk Disk Error Disk No Space Net Disconnection IP conflict etc Enable Select to setup for the Abnormality function default value is Off Show message Setup for a prompt message show on the screen when Abnormality is triggered default value is Off Buzzer Setup for buzzer beeping after Abnormality is triggered default value is Off Fi...

Page 23: ...iagnosis Rule click Set get into Figure 19 page setup whether to Show Traces Sensitivity Higher middle low Move scroll bar for Minimum moving distance Alert way Cordon Warning Area Alarm Output According to the settings to trigger Intelligent analysis default value is Off Delay A time period to record after triggering Intelligent analysis option 10 3000 Sec default value is 10 Sec Record Channel s...

Page 24: ...Sec default value is 10 Sec Show message Setup for a prompt message show on the screen when Intelligent Analysis is triggered default value is Off Send Email Setup to send triggered photos to assigned email address when Intelligent Analysis is triggered default value is Off Buzzer Setup for buzzer beeping after Intelligent Analysis is triggered default value is Off FTP Upload Setup to upload photo...

Page 25: ...H DX User Manual 21 5 3 1 General Figure 21 Figure 22 Figure 23 ...

Page 26: ... Full Setup Overwrite HDD or stop writing while HDD is full The default value is Overwrite DVR No Set DVR No Options 0 998 The default value is 0 Video Standard Set Video Standard NTSC or PAL Auto Logout After a period of time without using it requests to input Password to access Menu options 0 60 Min 0 means no Password required default value is 0 Machine Name Setup the Name of DVR maximum 32 cha...

Page 27: ...L 25 FPS D1 max NTSC PAL 15 FPS QCIF CIF max NTSC PAL 6 FPS Bit Rate Type Variable VBR Constant CBR bit rate Quality Several options from low to highest default value is high Bit Rate Kb s It depends on selected resolution and FPS default value as shown in Figure 24 1 Frame Interval Optional from 2 12 Video Audio Select enable Video Audio default value is Video On Audio Off 5 3 3 Network Select Fi...

Page 28: ...rred 5 3 4 NetService Select Figure 20 NetService icon get into Figure 26 page PPPOE After selected click set keyin account Password of PPPOE and save to create an IP default value is Off NTP Network Time Protocol setup to adjust current local time default value is Off Email After alarm is triggered send messages to assigned email address default value is Off IP Filter Setup the Restricted Type Bl...

Page 29: ... 20 GUI Display Icon get into Figure 27 page Channel Title Setup the title name for 16 channels as Figure 28 Time Display Select to display time default value is On Channel Title Select to display channel titles default value is On Record Status Select to display record status default value is On Alarm Status Select to display alarm status default value is On Deflick Prevent images flicking defaul...

Page 30: ...positions of time display and channel title 5 3 6 PTZ Config Select Figure 20 PTZ Config icon get into Figure 29 page Channel Select Ch 1 16 Protocol 22 options can select default value is PELCOD Address PTZ address Number default value is 1 Baud rate 8 options can select default value is 9600 Data Bits 4 options can select default value is 8 Stop Bits 2 options can select default value is 1 Parit...

Page 31: ...00 Date Bits 4 options can select default value is 8 Stop Bits 2 options can select default value is 1 Parity 4 options can select default value is None 5 3 8 Tour Select Figure 20 Tour icon get into Figure 30 page Enable Tour Enable the auto switching tour function default value is Off Interval Set the switching tour time min 5 Sec max 120 Sec default value is 5 Sec Figure 30 Figure 31 ...

Page 32: ...erval Set the switching time when alarm is triggered min 5 Sec max 120 Sec default value is 5 Sec Return after finished Return to Live image after alarm end 5 3 9 Spot Set Select Figure 20 Spot Set icon get into Figure 32 page TV Channel connect CVBS BNC TV signal Enable Tour Enable the auto switching tour function default value is Off Interval Set the switching tour time min 5 Sec max 120 Sec def...

Page 33: ...ras ANALOG means analog cameras NETWORK means IP cameras Choose Channel Type you will have the following different setting views 4CH models 8CH models VDH DXB576 models VDH DXC816 1 4CH models 2 8CH models Main Menu System Digital Set channel mode User can set the channel model here ...

Page 34: ...H DX User Manual 30 3 VDH DXB576 models 4 VDH DXC816 models ...

Page 35: ...o record 4 channel 960H videos And maximum tunnel of replay supported is shown below After clicking OK the DVR will request to reboot the system 8CH In the 8CH ChannelType choose different modes to record videos of different resolutions For example choose 960H_8CH mode to record 8 channel 960H video And maximum tunnel of replay supported is shown below After clicking OK the DVR will request to reb...

Page 36: ...el D1 videos And maximum tunnel of replay supported is shown below After clicking OK the DVR will request to reboot the system 16CH VDH DXC816 In the DXC816_16CH ChannelType choose different modes to record videos of different resolutions For example choose 960H_16CH mode to record 16 channel 960H videos And maximum tunnel of replay supported is shown below After clicking OK the DVR will request t...

Page 37: ...tions For example choose Analog D1_2CH Network1080P_1CH 720P_1CH mode to record 2 channel D1 1CH 1080P and 1CH 720P videos And maximum tunnel of replay supported is shown below After clicking OK the DVR will request to reboot the system Main Menu System Digital After rebooting there will be three settings available Digital Channels Channel status and ChannelType because Network ChannelType recordi...

Page 38: ... on DVR d Decode Order Choose modes of network transmission Real time first Middle fluency first Default Middle e Connection Mode Single Connection Multiple Connection Multiple Connections can connect several IP Cams DVRs to a single channel and switch between them Default Single Connection f Add Search available IP Cam DVR for connection g Delete Delete the selected IP Cam DVR from the list Main ...

Page 39: ...e IP address of the selected IP Cam DVR g Port Display the port of the selected IP Cam DVR h Username Input the Username of the IP Cam DVR Default admin i Password Input the password of the IP Cam DVR Default BLANK Channel status Main Menu System Digital Digital channels Remote access configuration Choose Add to do the Remote access configuration Choose Search to find all available IP Cam DVR and ...

Page 40: ...H Network1080P_1CH 720P_1CH mode to record 2 channel D1 1CH 1080P and 1CH 720P videos And maximum tunnel of replay supported is shown below After clicking OK the DVR will request to reboot the system Main Menu System Digital After rebooting there will be three settings available Digital Channels Channel status and Channel Type because Network Channel Type is added ...

Page 41: ... on DVR d Decode Order Choose modes of network transmission Real time first Middle fluency first Default Middle e Connection Mode Single Connection Multiple Connection Multiple Connections can connect several IP Cams DVRs to a single channel and switch between them Default Single Connection f Add Search available IP Cam DVR for connection g Delete Delete the selected IP Cam DVR from the list Main ...

Page 42: ...the IP address of the selected IP Cam DVR g Port Display the port of the selected IP Cam DVR h Username Input the Username of the IP Cam DVR Default admin i Password Input the password of the IP Cam DVR Default BLANK Channel status Main Menu System Digital Digital channels Remote access configuration Choose Add to do the Remote access configuration Choose Search to find all available IP Cam DVR an...

Page 43: ...alog D1_4CH Network1080P_1CH 720P_3CH mode to record 4 channel D1 1CH 1080P and 3CH 720P videos And maximum tunnel of replay supported is shown below After clicking OK the DVR will request to reboot the system Main Menu System Digital After rebooting there will be three settings available Digital Channels Channel status and Channel Type because Network Channel Type is added ...

Page 44: ...connected IP cameras DVRs with the system time on DVR d Connection Mode Choose Single Connection Multiple Connection mode Multiple Connection can connect several IP Cams DVRs to a single channel and switch between them Default Single Connection e Add Search available IP Cam DVR for connection f Delete Delete the selected IP Cam DVR from the list Main Menu System Digital Digital channels You can se...

Page 45: ...the IP address of the selected IP Cam DVR g Port Display the port of the selected IP Cam DVR h Username Input the Username of the IP Cam DVR Default admin i Password Input the password of the IP Cam DVR Default BLANK Channel status Main Menu System Digital Digital channels Remote access configuration Choose Add to do the Remote access configuration Choose Search to find all available IP Cam DVR an...

Page 46: ...e choose Analog 960H_8CH 720P_8CH mode to record 8 channel 960H and 8CH 720P videos And maximum tunnel of replay supported is shown below After clicking OK the DVR will request to reboot the system Main Menu System Digital After rebooting there will be three settings available Digital Channels Channel status and Channel Type because Network Channel Type is added ...

Page 47: ...nnected IP cameras DVRs with the system time on DVR d Connection Mode Choose Single Connection Multiple Connection mode Multiple Connections can connect several IP Cams DVRs to a single channel and switch between them Default Single Connection e Add Search available IP Cam DVR for connection f Delete Delete the selected IP Cam DVR from the list Main Menu System Digital Digital channels You can set...

Page 48: ...ay the IP address of the selected IP Cam DVR g Port Display the port of the selected IP Cam DVR h Username Input the Username of the IP Cam DVR Default admin i Password Input the password of the IP Cam DVR Default BLANK Channel status Main Menu System Digital Digital channels Remote access configuration Choose Add to do the Remote access configuration Choose Search to find all available IP Cam DVR...

Page 49: ... of different resolutions For example choose D1_9CH mode to record 9 channel D1 videos And maximum tunnel of replay supported is shown below After clicking OK the DVR will request to reboot the system Main Menu System Digital After rebooting there will be three settings available Digital Channels Channel status and Channel Type because Network Channel Type is added ...

Page 50: ... d Decode Order Choose modes of network transmission Real time first Middle fluency first Default Middle e Connection Mode Choose Single Connection Multiple Connection mode Multiple Connections can connect several IP Cams DVRs to a single channel and switch between them Default Single Connection f Add Search available IP Cam DVR for connection g Delete Delete the selected IP Cam DVR from the list ...

Page 51: ...the IP address of the selected IP Cam DVR g Port Display the port of the selected IP Cam DVR h Username Input the Username of the IP Cam DVR Default admin i Password Input the password of the IP Cam DVR Default BLANK Channel status Main Menu System Digital Digital channels Remote access configuration Choose Add to do the Remote access configuration Choose Search to find all available IP Cam DVR an...

Page 52: ...ple choose D1_9CH mode to record 9 channel D1 videos And maximum tunnel of replay supported is shown below After clicking OK the DVR will request you to reboot the system Main Menu System Digital After rebooting there will be three settings available Digital Channels Channel status and Channel Type because Network Channel Type is added ...

Page 53: ... DVR d Decode Order Choose modes of network transmission time first Middle fluency first Default Middle e Connection Mode Choose Single Connection Multiple Connection mode Multiple Connection can connect several IP Cams DVRs to a single channel and switch between them Default Single Connection f Add Search available IP Cam DVR for connection g Delete Delete the selected IP Cam DVR from the list Ma...

Page 54: ...the IP address of the selected IP Cam DVR g Port Display the port of the selected IP Cam DVR h Username Input the Username of the IP Cam DVR Default admin i Password Input the password of the IP Cam DVR Default BLANK Channel status Main Menu System Digital Digital channels Remote access configuration Choose Add to do the Remote access configuration Choose Search to find all available IP Cam DVR an...

Page 55: ...ns For example choose D1_16CH mode to record 16 channel D1 videos And maximum tunnel of replay supported is shown below After clicking OK the DVR will request to reboot the system Main Menu System Digital After rebooting there will be three settings available Digital Channels Channel status and Channel Type because Network Channel Type is added ...

Page 56: ... d Decode Order Choose modes of network transmission Real time first Middle fluency first Default Middle e Connection Mode Choose Single Connection Multiple Connection mode Multiple Connection can connect several IP Cams DVRs to a single channel and switch between them Default Single Connection f Add Search available IP Cam DVR for connection g Delete Delete the selected IP Cam DVR from the list M...

Page 57: ...the IP address of the selected IP Cam DVR g Port Display the port of the selected IP Cam DVR h Username Input the Username of the IP Cam DVR Default admin i Password Input the password of the IP Cam DVR Default BLANK Channel status Main Menu System Digital Digital channels Remote access configuration Choose Add to do the Remote access configuration Choose Search to find all available IP Cam DVR an...

Page 58: ...ons For example choose D1_24CH mode to record 24 channel D1 videos And maximum tunnel of replay supported is shown below After clicking OK the DVR will request to reboot the system Main Menu System Digital After rebooting there will be three settings available Digital Channels Channel status and Channel Type because Network Channel Type is added ...

Page 59: ...nnected IP cameras DVRs with the system time on DVR d Connection Mode Choose Single Connection Multiple Connection mode Multiple Connections can connect several IP Cams DVRs to a single channel and switch between them Default Single Connection e Add Search available IP Cam DVR for connection f Delete Delete the selected IP Cam DVR from the list Main Menu System Digital Digital channels You can set...

Page 60: ...the IP address of the selected IP Cam DVR g Port Display the port of the selected IP Cam DVR h Username Input the Username of the IP Cam DVR Default admin i Password Input the password of the IP Cam DVR Default BLANK Channel status Main Menu System Digital Digital channels Remote access configuration Choose Add to do the Remote access configuration Choose Search to find all available IP Cam DVR an...

Page 61: ...DD Manage icon get into Figure 36 page Read Write Set HDD enable to Read Write Read Only Set HDD enable to read only Redundant only when there are 2pcs more HDDs for recording same information and then can enable this function Format Disk Format HDD Recover Reappear the error Partition Partition the HDD Figure 35 Figure 36 ...

Page 62: ...roup Modify group accounts Modify Pwd Modify passwords Add User Add a new user account Add Group Sort accounts by groups Delete User Delete user accounts Delete Group Delete group accounts Update Update the database after modification 5 4 3 Online User Select Figure 35 Online User icon get into Figure 38 page Figure 37 Figure 38 ...

Page 63: ...t Adjust Select Figure 35 Output Adjust icon get into Figure 39 page Adjust the position brightness for display 5 4 5 AutoMaintain Select Figure 35 AutoMaintain icon get into Figure 40 page Enable to reboot the DVR and delete files after assigned time Figure 39 Figure 40 ...

Page 64: ... Restore Select Figure 35 Restore icon get into Figure 41 page Restore all values to default value 5 4 7 Upgrade Select Figure 35 Upgrade get into Figure 42 page Plug USB flash disk to upgrade selected files Figure 41 Figure 42 ...

Page 65: ...User Manual 61 5 4 8 Device Info Select Figure 35 Device Info get into Figure 43 page Key in the information for DVR 5 4 9 Import Export Select Figure 2 Info icon get into Figure 44 page Figure 43 Figure 44 ...

Page 66: ... 5 5 1 HDD Info Select Figure 45 HDD Info get into Figure 46 page Figure 45 Figure 46 Select this to show how many pcs for HDD and USB memory storage devices as Figure 45 Select this to show the recording time for HDD as Figure 46 ...

Page 67: ...al 63 5 5 2 BPS Select Figure 44 BPS icon get into Figure 47 page Display the statistics of current image BPS 5 5 3 LOG Select Figure 44 LOG icon get into Figure 48 page Records of DVR LOG message Figure 47 Figure 48 ...

Page 68: ...H DX User Manual 64 5 5 4 Version Select Figure 44 Version icon get into Figure 49 page Display current system version and serial no Figure 49 ...

Page 69: ...H DX User Manual 65 5 6 Logout Select Figure 2 Logout icon get into Figure 50 page Figure 50 Logout current account and then can login another user account Shutdown the device Reboot the device ...

Page 70: ...IE Login IE browser After Keyin IP or DDNS if password without setting in DVR device just key in admin for login After login a message pops out to choose the monitor streams for main stream or subsidiary stream default value is subsidiary stream ...

Page 71: ...H DX User Manual 67 After login monitoring images and select 1 4 9 16 screens Playback Setting requested period of time to playback ...

Page 72: ...H DX User Manual 68 Alarm Log Login in and then can search Alarm log messages Device Config Setting the record selections 1 Record ...

Page 73: ...H DX User Manual 69 2 Alarm settings Setting the alarm selections 3 System settings Setting the system selections ...

Page 74: ...H DX User Manual 70 4 Advanced Setting the Advanced selections 5 Info Checking HDD information Log current version device No ...

Page 75: ...H DX User Manual 71 Config Manager Set the storage place for Recording Videos and photos and alarm setting Log Out Click to log out for current screen ...

Page 76: ...FUHO TECHNOLOGY CO LTD No 30 Lane 726 Jinma Rd Sec 3 Chang Hua City Taiwan 500 TEX 886 4 751 2881 ...

Reviews: