E
N
G
L
IS
H
38
SPRING POSITION
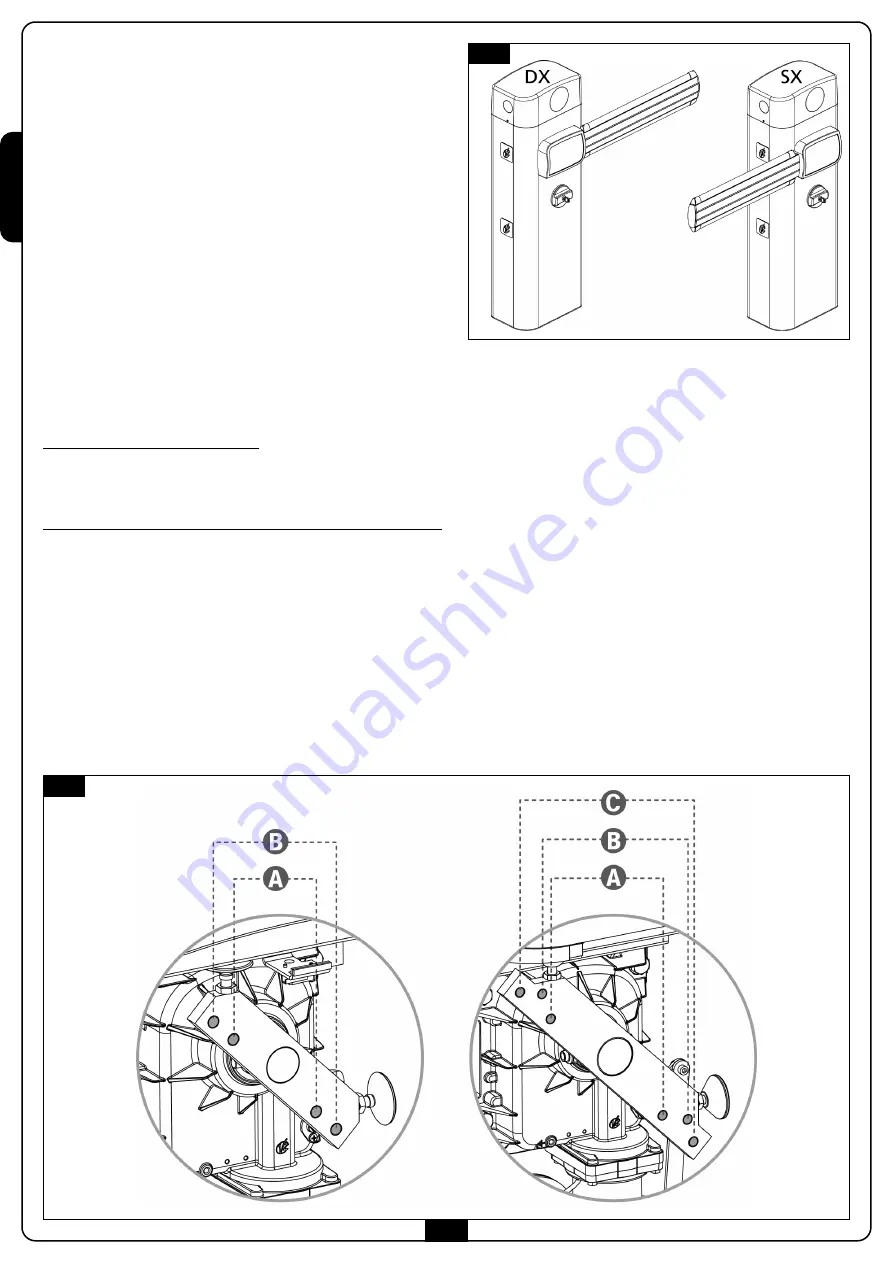
The barrier is provided with the spring fitted for RIGHT
installation (DX) Fig. 3.1
If LEFT installation (SX) is foreseen, the spring must be fitted
as in figure 3.4.
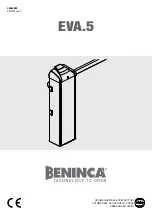
The coupling hole on the rocker arm may vary according to the bar
length. Place the spring onto the proper coupling hole according to the
following parameters:
ZENIA4:
A
For bars whose length ranges between 2.5 and 3 m
B
For bars whose length ranges between 3 and 4 m
ZENIA6:
A
For 4 metre long bars
B
For bars whose length ranges between 4 and 5 metres
C
For bars whose length ranges between 5 and 6 metres
NOTE: the presence of any accessories installed on the bar doesn't affect the rocker arm's coupling hole.
To achieve proper operation act on the spring as indicated in the Bar balancing chapter
In order to change the fastening hole, proceed as follows:
1.
Unscrew the bolt joining the spring to the rocker
2.
Position the spring on the most suitable hole and screw again the bolt
3.
Adjust the 2 run end stops F
In order to modify the position of the spring for LEFT (SX) installation, proceed as follows:
1.
Remove the spring
2.
Reset the automation (see paragraph EMERGENCY RESET)
3.
Rotate the rocker by 90°
4.
Fit the spring selecting the most suitable fastening hole
5.
Adjust the 2 run end stops F
m
ATTENTION: in case of LEFT (LH) installation, it is necessary to change the dir parameter in the control unit
programming menu
Fig.1
Fig.2
Summary of Contents for 36A004
Page 2: ......
Page 9: ...ITALIANO 7 Fig 3...
Page 11: ...ITALIANO 9...
Page 16: ...ITALIANO 14...
Page 34: ...ITALIANO 32 INSTALLAZIONE DELL ACCESSORIO 163604...
Page 41: ...ENGLISH 39 Fig 3...
Page 43: ...ENGLISH 41...
Page 48: ...ENGLISH 46...
Page 66: ...ENGLISH 64 INSTALLATION OF THE ACCESSORY 163604...
Page 73: ...FRAN AIS 71 Fig 3...
Page 75: ...FRAN AIS 73...
Page 80: ...FRAN AIS 78...
Page 98: ...FRAN AIS 96 INSTALLATION DE L ACCESSOIRE 163604...
Page 105: ...ESPA OL 103 Fig 3...
Page 107: ...ESPA OL 105...
Page 112: ...ESPA OL 110...
Page 130: ...ESPA OL 128 INSTALACI N DEL ACCESORIO 163604...
Page 131: ......
Page 132: ......


