background image

Exercise Information

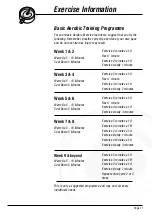
Basic Aerobic Training Programme

For your basic Aerobic Exercise routine we suggest that you try the
following. Remember, breathe correctly, exercise at your own pace
and do not over-train as injury may result.

Week 1 & 2

Warm Up 5 - 10 Minutes
Cool Down 5 Minutes

Week 3 & 4

Warm Up 5 - 10 Minutes
Cool Down 5 Minutes

Week 5 & 6

Warm Up 5 - 10 Minutes
Cool Down 5 Minutes

Week 7 & 8

Warm Up 5 - 10 Minutes
Cool Down 5 Minutes

Week 9 & beyond

Warm Up 5 - 10 Minutes
Cool Down 5 Minutes

Exercise 4 minutes at 'A'
Rest 1 minute
Exercise 2 minutes at 'A'
Exercise slowly 1 minute

Exercise 5 minutes at 'A'
Rest 1 minute
Exercise 3 minutes at 'A'
Exercise slowly 2 minutes

Exercise 6 minutes at 'A'
Rest 1 minute
Exercise 4 minutes at 'A'
Exercise slowly 3 minute

s

Exercise 5 minutes at 'A'
Exercise 3 minutes at 'B'
Exercise 2 minutes at 'A'
Exercise slowly 1 minute
Exercise 4 minutes at 'A'
Exercise slowly 3 minutes

Exercise 5 minutes at 'A'
Exercise 3 minutes at 'B'
Exercise 2 minutes at 'A'
Exercise slowly 1 minute
Repeat entire cycle 2 or 3
times

This is only a suggested programme and may not suit every
individual's needs.

Page 

11

Summary of Contents for S2020

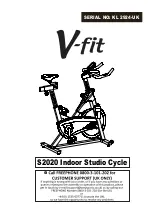
Page 1: ...S2020 Indoor Studio Cycle SERIAL NO KL 2924 UK...

Page 2: ......

Page 3: ...on Page General Information 4 Before You Start 5 Safety 6 Exercise Information 7 Exercise Monitor Instruction 12 Assembly Adjustments 14 Protect the environment by not disposing of this product with h...

Page 4: ...r a period of 1 YEAR from the original certified date of purchase During this period we have the right to a Provide parts for the purchaser to effect repair b Repair the product returned to our wareho...

Page 5: ...e components may be large heavy or awkward to handle alone Open the Carton Carefully open the carton that contains your product taking note of the warnings printed on the carton to ensure that the ris...

Page 6: ...oubt do not use your product but contact CUSTOMER SUPPORT by any of the means listed on the opposite page Before use always ensure that your product is positioned on a solid flat surface If necessary...

Page 7: ...r heart With regular exercise your cardiovascular system will become stronger and more efficient Your recovery rate i e the time taken for your heart to reach its normal resting level will also decrea...

Page 8: ...eed to be able to take your pulse If you do not have a pulse monitor either from the product you are using or a proprietary independent unit you will need to locate the pulse in your carotid artery Th...

Page 9: ...ercises Hold each stretch for a minimum of ten seconds and then relax Repeat each stretch two or three times Do this before your Aerobic Exercise session and also after you have finished Head Roll Rot...

Page 10: ...Open both arms to the side and gently lift them above your head Reach your right arm as high as you can for one count gently stretching the muscles of the stomach and lower back Repeat the action wit...

Page 11: ...Minutes Cool Down 5 Minutes Exercise 4 minutes at A Rest 1 minute Exercise 2 minutes at A Exercise slowly 1 minute Exercise 5 minutes at A Rest 1 minute Exercise 3 minutes at A Exercise slowly 2 minu...

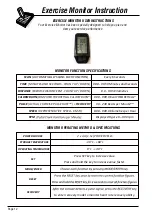
Page 12: ...E EXERCISE DISTANCE KM COUNT UP DOWN 0 0 99 5 Kilometres CALORIE BURN COMPUTED THEORETICAL CALORIE BURN 0 00 999 9 Kcal THEORETICAL PULSE ACTUAL EXERCISE PULSE RATE RECOVERY 30 230 Beats per Minute SP...

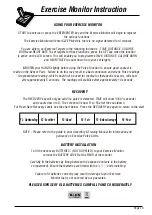
Page 13: ...ure to fit batteries correctly may result in damage to your Exercise Monitor that is not covered by our guarantee USING YOUR EXERCISE MONITOR START to exercise or press the ENTER ENTER key and the Exe...

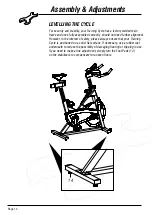
Page 14: ...rrectly should not need further alignment However in the interest of safety please always ensure that your Training Cycle is positioned on a solid flat surface If necessary use a rubber mat underneath...

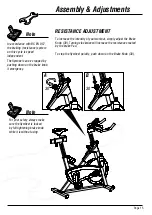
Page 15: ...brake Pad To stop the flywheel quickly push down on the Brake Knob 30 In accordance with BS EN 957 the braking resistance system on this cycle is speed independent Note Note 30 The flywheel can be sto...

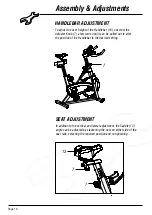
Page 16: ...turns until it can be pulled out to alter the position of the Handlebar to the desired setting SEAT ADJUSTMENT In addition to the vertical and lateral adjustment the Saddle 13 angle can be adjusted b...

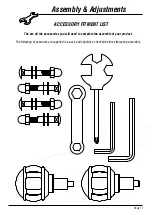
Page 17: ...T LIST The following accessories are supplied in a pack and should be checked before attempting assembly The are all the accessories you will need to complete the assembly of your product Assembly Adj...

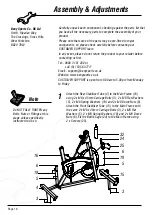
Page 18: ...unpack each component checking against the parts list that you have all the necessary parts to complete the assembly of your product Please note that some of the parts may be pre fitted to major comp...

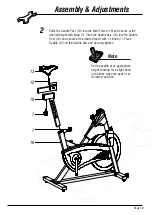
Page 19: ...Knob 7 Slide the Saddle Axis 12 into the Saddle Post 10 and secure at the desired reach with 1 x Knob 7 Place Saddle 13 on the Saddle Axis and securely tighten Note Set the saddle at an appropriate he...

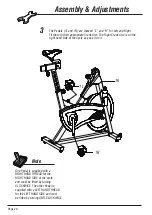
Page 20: ...Crank Arm is on the right hand side of the cycle as you sit on it Note One Pedal is supplied with a RIGHT HAND THREAD for the RIGHT HAND SIDE of the cycle and must be fitted by turning CLOCKWISE The o...

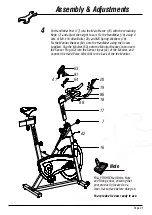
Page 21: ...onto the Handlebar using the Screw supplied Slip the Monitor 63 onto the Monitor Bracket then insert the Sensor Plug A2 into the Sensor Input A1 of the Monitor and connect the Hand Pulse Wire 88 to t...

Page 22: ...0 31 51 20 36 28 29 45 61 67 60 59 66 58 41 52 39 38 2 14 15 3 3114 56 55 2 32 24 43 30 70 71 72 73 74 73 75 76 9 5 77 78 84 5 40 78 84 79 80 23 22 43 41 25 60 62 58 43 44 41 1R 14 54 69 27 53 1920 1L...

Page 23: ...ye Bolt M6 x 54mm 2 40 Nut M6 3 41 Self Tapping Screw M4 x 19mm 14 42 Set Screw M4 x 19mm 5 43 Self Tapping Screw M5 x 13mm 2 44 Outer Chain Cover 1 45 Chain Cover End Plate 1 46 Crank Axle 1 47 Space...

Page 24: ...s Park Cross Hills West Yorkshire BD20 7BW CUSTOMER SUPPORT Open from 9 00am to 5 00pm from Monday to Friday Tel FREEPHONE in the UK 0800 3 101 202 or 44 0 1535 637711 outside the UK E mail support be...

Reviews: