background image

08


How to Use/Instructions for Use

Instructions for Use

Preparation

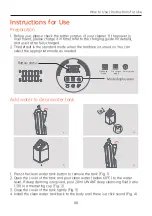
1.  Before use, please check the battery status of your cleaner. If the power is 

insufficient, please charge it in time (refer to the charging guide for details), 

and use it after fully charged.

2. The default is the standard mode when the machine is turned on. You can 

select the appropriate mode as needed.

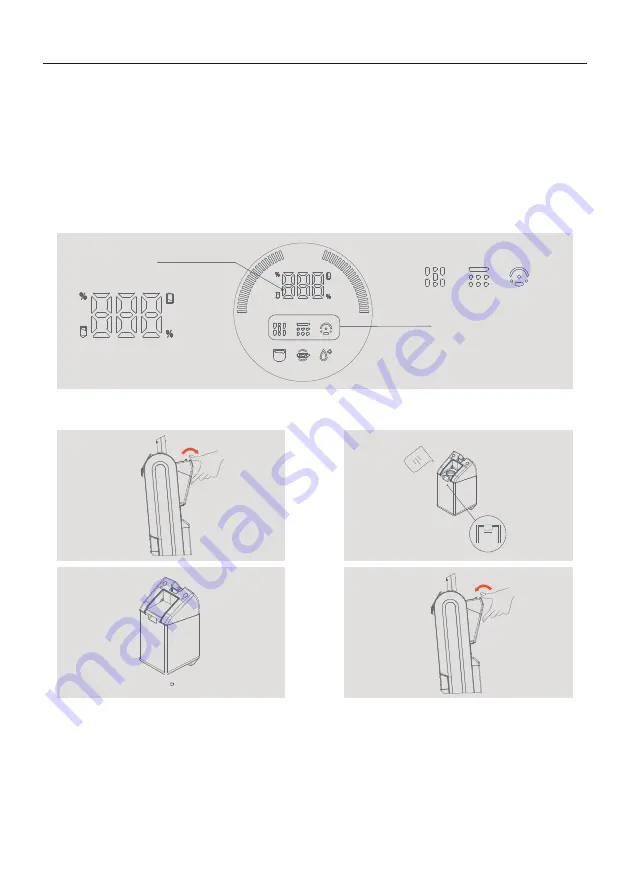
1.  Press the clean water tank button to remove the tank (Fig. 1)

2. Open the cover of the tank and pour clean water (below 60°C) to the water 

level. If deep cleaning is required, pour 20ml UWANT deep cleansing fluid (ratio 

1:30) in a measuring cup (Fig. 2)

3. Close the cover of the tank tightly (Fig. 3)

4. Install the clean water tank back to the body until there is a click sound (Fig. 4)

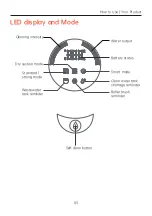
Battery status

Standard 

mode

Smart mode

Dry suction 

mode

Mode display area

Add water to clean water tank

water

level

Summary of Contents for X100

Page 1: ...Instruction Manual UWANT Cordless All in one Floor Cleaner Please read this manual carefully before use and keep it properly ...

Page 2: ...ding children with reduced physical sensory or mental capabilities or lack of experience and knowledge unless they have been given supervision or instruction Children being supervised not to play with the appliance for non EU market The appliance is only to be used with the power supply unit provided with the appliance The plug of power supply unit must be removed from the socket outlet before cle...

Page 3: ...ient smart cleaning technologies products and excellent service quality to satisfy users with different needs and become the steward of the healthy home living environment of every family Brand Orientation Internet technology innovative home appliance brand integrating new intelligent R D production and sales Brand Slogan New smart cleaning Brand Culture Ensure happy life with high quality enrich ...

Page 4: ... How to Use Your Product Disassembly Assembly Technical Parameters Instructions for Use Maintenance Troubleshooting After sales Guide Important Note Schematic Circuit Diagram Name and Content of Toxic and Harmful Substances After sales Service Warranty Card ...

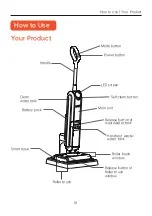
Page 5: ...lean water tank Battery pack Smart base Roller brush Mode button Power button LED screen Self clean button Main unit Release button of wastewater tank Handle of waste water tank Roller brush window Release button of Roller brush window Your Product ...

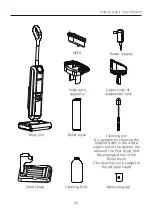
Page 6: ...tor Roller brush Cleaning fluid Cleaning tool It is suitable for cleaning the residual stains in the waste water tank of the cleaner the elbow of the floor brush and the entangled hair of the Roller brush The cleaning tool is subject to the actual product Measuring cup Upper cover of wastewater tank ...

Page 7: ...oduct LED display and Mode Cleaning intensity Water output Battery status Smart mode Clean water tank shortage reminder Self clean button Roller brush reminder Dry suction mode Standard strong mode Wastewater tank reminder ...

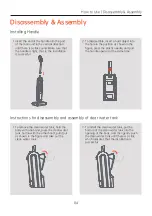
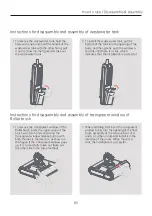
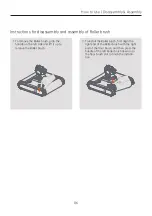
Page 8: ... insert a hard object into the hole in the position as shown in the figure press the elastic needle and pull the handle upward at the same time 1 To remove the clean water tank hold the body with one hand press the clean water tank button with the other hand pull it out as shown in the figure and take out the clean water tank 2 To install the clean water tank put the bottom of the clean water tank i...

Page 9: ...ntly push the wastewa ter tank until there is a click which indicates that the installation is successful 1 To remove the transparent window of the Roller brush press the upper cover of the brush with two hands and move the transparent window release button with both thumbs in the direction as shown in the figure If the transparent window pops up it is successfully taken out take out the other side...

Page 10: ...e Roller brush grab the handle on the left side and lift it up to remove the Roller brush 2 To install the Roller brush first align the right end of the Roller brush with the right end of the floor brush and then press the handle of the left Roller brush down into the floor brush slot to finish the installa tion ...

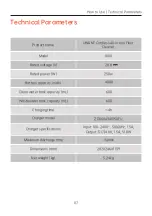
Page 11: ...h Clean water tank capacity mL Wastewater tank capacity mL Charging time Charger model Charger specifications Maximum discharge time Dimensions mm Net weight kg X100 28 8 250w 4000 600 600 4h ZD060A340150EU Input 100 240V 50 60Hz 1 5A Output DC34 0V 1 5A 51 0W 50min 282X246X1139 5 24kg UWANT Cordless All in one Floor Cleaner ...

Page 12: ...n select the appropriate mode as needed 1 Press the clean water tank button to remove the tank Fig 1 2 Open the cover of the tank and pour clean water below 60 C to the water level If deep cleaning is required pour 20ml UWANT deep cleansing fluid ratio 1 30 in a measuring cup Fig 2 3 Close the cover of the tank tightly Fig 3 4 Install the clean water tank back to the body until there is a click sou...
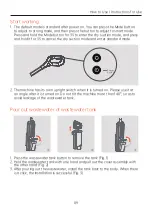
Page 13: ...ress the wastewater tank button to remove the tank Fig 1 2 Hold the wastewater tank with one hand and pull out the cover assembly with the other hand Fig 2 3 After pouring out the wastewater install the tank back to the body When there is a click the installation is successful Fig 3 2 The machine has its own upright switch when it is turned on Please use it at an angle after it is turned on Do not...

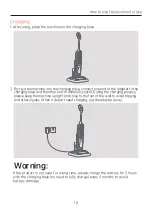
Page 14: ... other end to domestic socket During the charging process please keep the machine upright and close to the foot of the wall to avoid tripping and other injuries When it doesn t need charging put the adapter away Warning Charging If the product is not used for a long time please charge the battery for 3 hours with the charging base no need to fully charge every 3 months to avoid battery damage ...

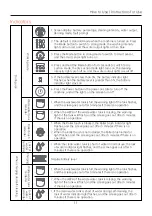
Page 15: ...er brush is blocked the Roller brush indicator light flashes and the screen goes out after 3 minutes if there is no operation 2 When the Roller brush is not installed the Roller brush indicator light flashes and the screen goes out after 3 minutes if there is no operation 1 When the clean water tank is short of water in normal use the lack of water indicator light flashes and the screen goes out afte...

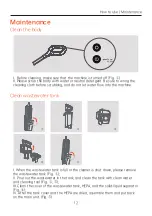
Page 16: ...cloth before scrubbing and do not let water flow into the machine I When the wastewater tank is full or the cleaner is shut down please remove the wastewater tank Fig II Pour out the wastewater in the tank and clean the tank with clean water and cleaning tool Fig III Clean the cover of the wastewater tank HEPA and the solid liquid separator Fig IV After the tank cover and the HEPA are dried assembl...

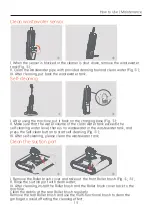
Page 17: ...the clean water tank exceeds the self cleaning water level there is no wastewater in the wastewater tank and press the Self clean button to start self cleaning Fig III After self cleaning please clean the wastewater tank I Remove the Roller brush cover and take out the front Roller brush Fig II Rinse the suction port with clean water III After cleaning install the Roller brush and the Roller brush...
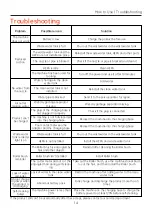
Page 18: ...ck if the nozzle or pipe is blocked and clean it Clean HEPA Turn off the power and use it after 10 minutes Add water Reinstall the clean water tank Send it to the service center for repair Wet dry garbage separator missing Check if the plug is connected Reinsert the machine into the charging base Reinsert the machine into the charging base Pour out the wastewater in the wastewater tank Install the...

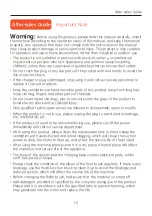
Page 19: ...void electric shock and accidental injury Only qualified technical personnel are allowed to disassemble repair or modify When the product is not in use please unplug the plug to avoid electric leakage fire malfunction etc If the product is found to be abnormal during use please cut off the power immediately and call our service department After using this product please clean the wastewater tank in ...

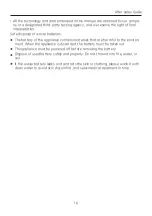
Page 20: ...ery of the appliance contains materials that are harmful to the environ ment When the appliance is discarded the battery must be taken out The appliance must be powered off before removing the battery Dispose of used battery safely and properly Do not throw it into fire water or soil If the waste battery leaks and contacts the skin or clothing please wash it with clean water to avoid skin discomfor...

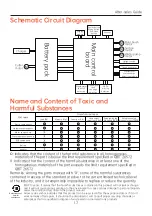
Page 21: ...irement specified in GB T 26572 X Indicates that the content of the harmful substance in at least one of the homogeneous materials of the part exceeds the limit requirement specified in GB T 26572 Remarks Among the parts marked with X some of the harmful substances contained in excess of the standard are due to the current limited technical level of the industry and it is temporarily impossible to r...

Page 22: ...er or man made damage 2 Repaired by unqualified personnel or disassembled and repaired by the user 3 Product accessories such as Roller brush cleaning tool cleaning fluid HEPA adapter etc printed materials such as manual etc giveaway etc 4 Damage caused by giveaway and accessories that are not provided by our company 5 The model included in the invoice does not match the product or has been altered ...

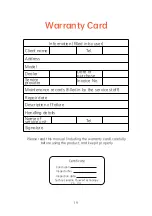
Page 23: ...t and keep it properly Certificate Suzhou Jiandan Youwei Technology Co Ltd Client name Address Model Tel Tel Dealer Maintenance records filled in by the service staff Repair date Description of failure Handling details Signature Service provider Name of service unit Date of purchase Invoice No Conclusion Inspector No Inspection date ...

Page 24: ...t the warranty card and then return it to the factory with the machine About mailing items The important basis of the warranty service is the purchase invoice and related vouchers When returning the goods please send the machine including the main unit accessories and giveaway invoice and purchase voucher Express For related mailing information and other related information please inquire the serv...

Page 25: ...i Technology Co Ltd Place of Origin Suzhou Jiangsu Province Address Room 1518 Building B Kaiping Business Center No 11666 East Taihu Avenue East Taihu Ecological Tourism Resort Taihu New Town Wujiang District Suzhou China ...

Reviews: