background image

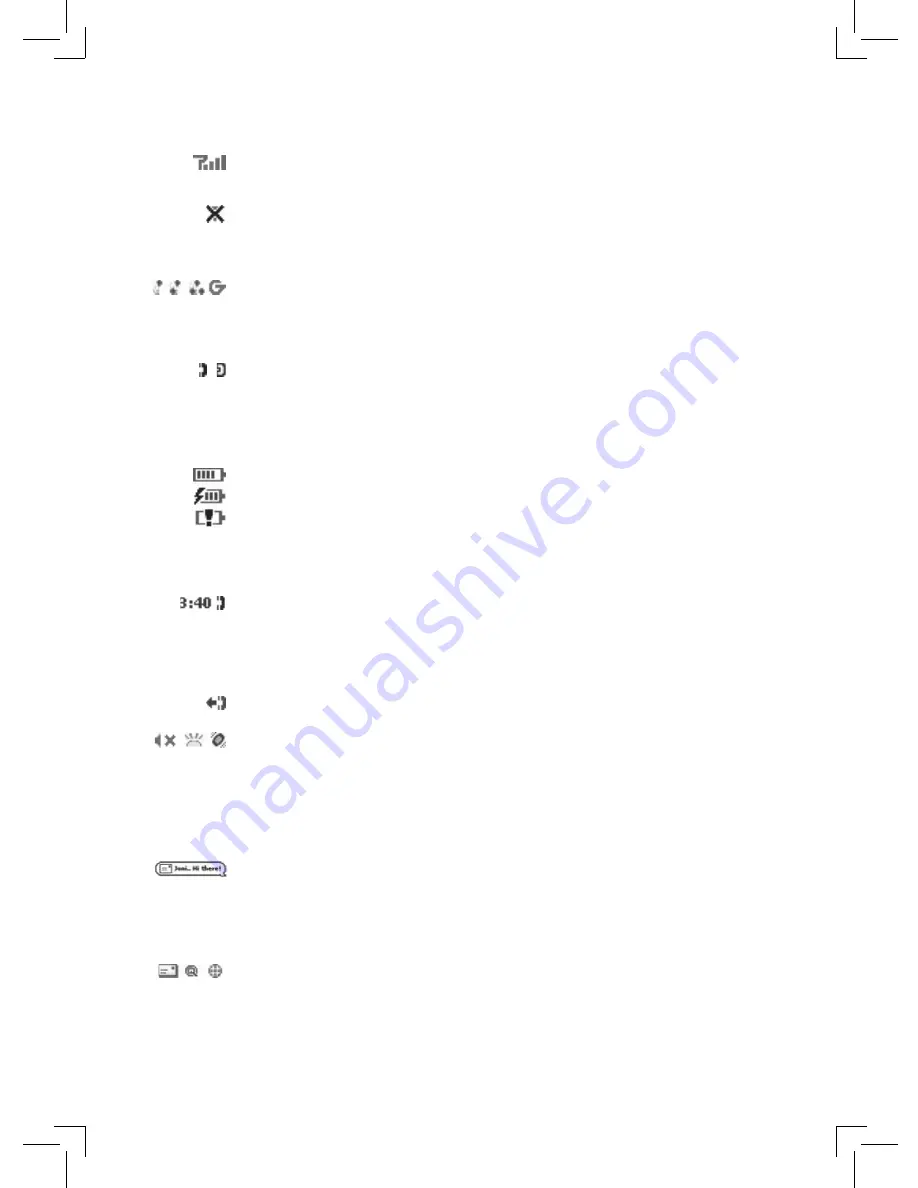
Wireless signal strength indicator.


The number of signal 

bands showing to the right of the radio tower icon represents 

the strength of the signal at your current location. If you see 

an X flashing over the radio tower icon, you’ve temporarily lost 

network connection and can make no calls.

Service connectivity indicators. 

One dot=device is connecting to 

the GPRS network; two dots=getting IP address; three dots=connecting 

to the data service; “G”=fully connected to the data service. 

GSM (Phone) service only.  

A phone icon in the place of the 

“G” means you are using (or only have access to) GSM phone 

service. If you have a call in progress you’ll also see a timer. If the 

phone icon is hollow, you can only make emergency phone calls.

Battery indicators. 

The number of bars showing in the battery 

icon represents the charge remaining in the battery. When 

connected to the charger, a lightning bolt appears, and when 

your battery is almost out of charge, an exclamation point appears.

Phone call indicators.  

A timer appears when you have a call in progress; in the 

example, call time elapsed is 3 mins, 40 secs. Note that 

the phone icon blinks. If you have two calls active, the time 

displayed is for the foreground call.
Call forwarding is turned on. Your phone will not ring. 

Sound Profile setting.   

When you have sound turned off (“Silent” 

sound profile), the title bar will indicate whether you have 

flashing lights or vibration set for alerts or notifications. From left 

to right, the icons indicate: totally silent (no sound, no flashing 

lights, no vibration), flashing lights only, and vibration only.

Communication services notifications.  

When you receive a new 

email, text, IM, or voice mail message, or when a Web page has 

finished loading, you’ll see a visual “balloon” notification move 

across the title bar, while you’re in any application except  a game. 
Until you check your new message or go to your Web page, 

you’ll see the appropriate icon in the title bar as a reminder. The 

examples shown to the left illustrate a pending email message, 

text message, and loaded Web page.


The Device Interface  29

Summary of Contents for Sidekick ID

Page 1: ...Sidekick ID Reference Guide 27 4001 01 Rev A R3 3 Dec 18 2006 Copyright 2006 Danger Inc All rights reserved ...

Page 2: ...13 Battery Charger 13 Removable Battery 14 SIM Card Slot 15 Wrist Strap Holder 16 Replaceable Bumpers 16 Registering Your Device 19 Setting Up Your Device 23 Backgrounds 23 Backlighting 23 Key Guard Mode 24 Enter Key Guard Mode 24 Change Default Key Guard Idle Time 24 Device Privacy Code 25 Sound Profiles 25 Application Customization 26 The Device Interface 27 The Jump Screen 27 ...

Page 3: ...ontact to myFaves 35 Call or Text a myFaves Contact 36 Assign an Icon to a myFaves Contact 36 Replace a myFaves Phone Number 36 Phone Make a Phone Call 37 Answer a Phone Call 38 Add a Number to Your Speed Dial List 38 Set Up Your Voice Mail 38 Check Your Voice Mail 39 Change Your Phone Ringtone 39 Import Contacts from Your SIM Card 40 Text Messages Send a Text Message 40 Web Browser Browse the Web...

Page 4: ...Contact to the Address Book 46 Import Address Book Contacts 47 Set and Send My vCard 48 Send any Contact s vCard 48 Calendar Add an Event to Calendar 49 Notes Create a Note 49 Send a Note 50 To Do Add a Task 50 Photo Album Add Photos to Your Album 50 Send Photos by Email 51 Use Photo for Caller ID or Key Guard Background 51 Download Catalog Download Items from the Catalog 52 Manage Your Downloaded...

Page 5: ... Handling and Use 61 Battery Charger Handling 62 Regulatory and Compliance Information 63 Regulatory Compliance Information for North America 63 FCC Notice 63 Exposure to Radio Frequency RF Signals 64 Recycling Information 65 Legal Information 66 Danger Service and End User License Agreement 66 Danger Service Privacy Notice 70 One Year Limited Warranty 74 Additional Information 75 Contents 5 ...

Page 6: ...exchange instant messages and send and receive email with photo attachments Other features include a full featured phone personal information management PIM applications access to a personal Web portal the Desktop Interface and entertainment applications For the latest instructions on all the Sidekick applications open the online Owner s Manual by clicking Help on the Desktop Interface Separate ch...

Page 7: ... Removable battery Battery charger wall adapter Hands free mono headset Wrist strap Carrying case Sidekick Start Guide Sidekick Reference Guide If any of these items are missing please contact your T Mobile Customer Care department Now let s get started Welcome 7 ...

Page 8: ...creen will spring into the open position The normal operating position of the device is horizontal with the trackball on the right as shown above To close the display reverse the motion to pivot the display counter clockwise and snap it into the closed position Do not open or close the display in the wrong direction as this may damage your device Stop if you feel any resistance the display should ...

Page 9: ... to your ear MICROPHONE When you are using the phone speak into the microphone VOLUME buttons The volume buttons are located under the JUMP button While on a phone call press to increase and to decrease volume Use the shoulder buttons to turn Mute or Speakerphone on and off HEADSET JACK Always connect your headset to your device before making receiving a call If using a third party headset with a ...

Page 10: ...ss these buttons to page up or down DONE button Pressing DONE takes you back through the screens you were previously viewing until you reach the Jump screen On a screen or in a dialog box press DONE to save your changes and dismiss the screen or dialog box If a menu is open press DONE to close it CANCEL button Pressing CANCEL dismisses any changes you have made to a screen or dialog box MENU butto...

Page 11: ...nds on which application you re using For example while using the Phone the left shoulder button toggles Mute and the right shoulder button toggles Speakerphone In the Email compose screen the right shoulder button opens your Photo Album so you can select a photo to attach to the message POWER ON OFF button Press and hold the Power button for three seconds to turn the device on or off You can also...

Page 12: ...ne then roll the trackball left or right to select a profile Wireless On Off Control If you need to turn off your device s GSM and GPRS wireless connectivity for example during aircraft takeoffs and landings do the following 1 From the Jump screen press MENU and select Airplane Mode Turn Wireless Off 2 Your device is now offline You should confirm offline status by looking next to the radio tower ...

Page 13: ...d battery provided with your device or approved by T Mobile or you risk damaging your device 1 Attach the battery charger to your device Locate the battery charger that came in the box with your device Insert the charger lead the small round end of the cord into your device s power jack the small round hole located on the upper right side of your device and plug the power cord into a standard elec...

Page 14: ...ient operation charge your device nightly If you plan to leave your device unattended for an extended period of time be aware that the battery will discharge after two days if it is turned on and not attached to the charger If your device does fully discharge simply attach it to the charger all your data should be restored Removable Battery If you need to replace your rechargeable battery or if yo...

Page 15: ...move the battery cover and battery by following Removable Battery steps 1 3 on pages 14 15 2 Notice the SIM card slot which is shaped like a SIM card and is located just to the left of center 3 To insert the SIM card slide the card into the slot with the gold contacts facing down Make sure the two side brackets are on top of the card holding the card into place 4 To remove the SIM card insert your...

Page 16: ...ck Replaceable Bumpers Customize your Sidekick by changing the bumpers To remove then replace the bumpers on your Sidekick follow the instructions below 1 Turn your device off and remove the cover and battery as described in Removable Battery steps 1 3 on pages 14 15 2 Remove the end cover by pushing the cover away from the device 3 Pull the bumper tabs up to separate the bumper from the device 16...

Page 17: ...rs turn your device face up You can tell which bumper goes on top and which goes below by orienting the control button icons 6 For each bumper position the bumper tabs on the front then the back of the device Insert the tabs into the slots Press the bumpers in making sure the tabs snap in securely Device Basics 17 ...

Page 18: ...e the tabs are seated correctly 8 Replace the battery and back cover as described in Removable Battery steps 4 and 5 on page 15 9 Your device will power on once you insert the battery Due to the nature of the bumper design the materials used and their replaceable nature the bumpers are not covered by the device warranty 18 Device Basics ...

Page 19: ... to 48 hours but usually takes only 1 3 hours While you wait step through the screens that appear If applicable you ll be given the opportunity to select your language just before the Welcome screen appears When you see the Welcome screen you ll know your device has been activated Press the trackball to select the New User button and advance to the next screen On subsequent screens select the Next...

Page 20: ...thenticated if you sign in by typing Bridget BRIDGET or any combination of upper or lower case letters Once you decide on a username type it in the text box on the screen 4 Select a password Select a secure password that follows the rules below Passwords cannot be the same as your username Passwords must contain 4 15 characters can include both letters and numbers but no spaces single quotes semic...

Page 21: ...o open the Question pop up menu scroll to highlight a question then press the trackball to select it Roll the trackball down to highlight the Answer field then type your answer When finished select Next to continue 7 Read and agree to the end user agreement Before you can finish registration you must read and agree to the end user agreement You can read it by selecting the on screen View Agreement...

Page 22: ...9 Congratulations Once your account has been set up you ll see the Congratulations screen Select the Start button to begin 22 Device Registration ...

Page 23: ...hen press the trackball to set it Backlighting For better screen visibility in poor light enable backlighting 1 Press JUMP to open the Jump screen Press MENU to open the menu then select Settings Battery Display 2 Select the Turn on backlight when using device check box to enable backlighting Select the length of time you want backlighting to stay on from the Turn off after pop up menu 3 Press DON...

Page 24: ... the device press MENU DONE You can also wake the device by opening the screen If you have set a privacy code see next section type it at the prompt After your device has been in key guard mode for 30 minutes a screensaver will appear To dismiss the screensaver press any key or open the device Change Default Key Guard Idle Time 1 Press JUMP to open the Jump screen Press MENU then select Settings K...

Page 25: ...using the keyboard or the dial At the prompt re enter your code to verify 4 A New Combination Enabled message appears Select OK 5 Press DONE to save your settings and return to the Jump screen You can still make emergency calls from the key guard screen even if privacy code is enabled by opening the display then pressing MENU JUMP Sound Profiles To create a new sound profile or modify an existing ...

Page 26: ...te Web home page Web Browser Select individual Caller ID icons or photos Phone Address Book Create your own categories and labels for identifying contact information Address Book Set different ringtones for individual callers Phone Address Book If you see a musical note next to a menu item you ll know that s where you customize that application s ringtone setting 26 Setting Up Your Device ...

Page 27: ... by default 2 Press MENU from the Jump screen to open the Jump screen menu From this menu you can open the device wide Settings screens You can also turn wireless on off Airplane Mode open Help online Owner s Manual or Connectivity Tips select a Jump screen Background theme place the device in Key Guard and Power Off 3 To select an application scroll through the ring of application icons When the ...

Page 28: ...u items also have keyboard shortcuts that use the Menu button plus a shortcut key Take a look at the menu shown above To compose a new email message you could press MENU N rather than opening the menu and selecting New Message with the trackball Title Bar and Indicators The device display indicators appear at the top of your screen at all times Screen Title Battery Strength Wireless Signal Strengt...

Page 29: ... of charge an exclamation point appears Phone call indicators A timer appears when you have a call in progress in the example call time elapsed is 3 mins 40 secs Note that the phone icon blinks If you have two calls active the time displayed is for the foreground call Call forwarding is turned on Your phone will not ring Sound Profile setting When you have sound turned off Silent sound profile the...

Page 30: ...rsor press the DEL To delete a character to the right of the cursor press SHIFT To delete all the characters on one line press ALT Cut Copy Paste Undo To cut copy or paste text you have typed follow these instructions 1 Position your text cursor next to the text you want to cut or copy Use the D pad or trackball to position the text cursor 2 Hold down the Shift key while pressing the D pad or trac...

Page 31: ... make a text edit and want to undo it simply press MENU Z To redo an undo press MENU Shift Z AutoText Use the AutoText feature to type text quickly and accurately 1 Press JUMP to open the Jump screen Press MENU to open the menu then select Settings AutoText The AutoText screen appears 2 The screen offers automatic formatting and word replacement options you can select Open the menu to discard or c...

Page 32: ...e characters capitalized by pressing Shift the character like a Toggle back to lowercase by pressing the letter again To see all special characters select All at the bottom of the selector or use the menu shortcut MENU A and the grid expands To open a character set for a specific letter press SYM the letter To type a character using its Unicode value hover over a selection in the selector for two ...

Page 33: ...de included in the box Once you ve signed in your Jump page will open Use the Jump page navigation buttons to open the various applications Open the online Help page by clicking the Help link Import existing contacts from the Address Book Import page import existing Calendar events from the Calendar Import page Synchronize your Sidekick Address Book Calendar and To Do items with Microsoft Outlook ...

Page 34: ...Desktop Interface Jump Page Remember When you ve finished using the Web applications always click the Sign Out link to exit the Web site securely 34 The Device Interface ...

Page 35: ...go into the application 2 To add a new contact press MENU N On the dialog box that opens you must complete the Nickname field and the Phone number field Make sure you type a 7 or 10 digit number You don t need to add hyphens or spaces in the number 3 To add a number already in your Address Book press MENU Roll the trackball to highlight a contact and phone number then press the trackball to assign...

Page 36: ...selector opens 3 Select one of the folders to view the icons within that folder To assign one of your photos open the Select from Photos folder 4 Select an icon or photo with the trackball If you select a photo from your Photo Album you will be able to crop the photo to the portion you want represented in the icon 5 The icon will appear in the Edit myFaves Contact dialog box Press DONE to complete...

Page 37: ...you can use the keyboard to type letters and the on screen dial pad or the number row to type numbers in this mode you can t use the embedded dial pad to type numbers When ready press SEND CALL to place the call To switch back to using the embedded dial pad to type numbers select the icon To dial using a list of recently dialed numbers From the Phone screen highlight then select If the number you ...

Page 38: ...en press the trackball to open the Phone application 2 Press MENU to open the menu Select New Speed Dial to open the New Speed Dial Entry dialog box You can create 8 speed dial shortcuts 3 Select a Shortcut Key from the pop up menu Only the numbers available will appear in the pop up menu 4 Type the speed dial Name and Number then select DONE 5 To dial using the shortcut from either the Phone appl...

Page 39: ...Phone Ringtone 1 Press JUMP to go to the Jump screen then press the trackball to open the Phone application 2 Press MENU to open the Phone menu Select Settings General 3 Highlight the Incoming phone call ring pop up menu then press the trackball The menu reveals the ringtone categories First highlight a category then press the trackball to open the ringtones submenu As you scroll through the songs...

Page 40: ...y default press the trackball to open the Compose screen 3 Address your message using the recipient s 10 digit phone number or start typing their name to bring up Address Book matches Add more recipients by typing a comma or semicolon in the To field 4 Use the trackball to scroll to the message body type your message or use one of the Prewritten Messages by selecting the button Add Smileys by sele...

Page 41: ... can either finish typing the complete URL in the Go To dialog box then press Return or roll the trackball to highlight a suggested URL in the drop down menu then press the trackball To open Web pages faster press MENU and select Settings Scroll down the Settings screen and clear the Show Pictures check box Bookmark a Web Page 1 Open the Web page you want to bookmark 2 Press MENU N to open the Add...

Page 42: ...xt in the forward direction press the SHIFT DEL keys together To delete the current line of text press the ALT DEL keys together 6 When ready to send either select the Send button at the bottom of the Compose screen or press MENU M Receive Email from External Accounts When you register your device account you automatically receive an email account that you can use immediately on either your device...

Page 43: ...unt screen Read the sections below for more details on each field Protocol pop up menu Select the protocol your mail server uses or the type of account from this pop up menu Select Auto detect if you don t know which one to pick Note that if you select a specific account type then the next two fields mail server name and port value will fill in automatically Mail Server field If the mail server na...

Page 44: ...enu the correct port value will be supplied automatically Username and Password fields Type your email account username and password Email Folder pop up menu Select the folder to which you want your account email delivered To create a folder select New Folder 5 When you ve completed all the fields on the screen select the More Options button at the bottom of the screen 6 In the General group box t...

Page 45: ...cation by following the instructions in Add Photos to Your Album on page 50 Receive Email Using Your Device s Web Browser If there is a Web interface to your email account you can use your device s Web Browser application to sign in to those accounts and check your email A couple popular email Web sites are listed below Yahoo Mail http mobile yahoo com home MSN Hotmail http mobile msn com hm folde...

Page 46: ...to go to the Jump screen Scroll to highlight Address Book then press the trackball to open the application 2 Press MENU to open the menu New Contact is selected by default press the trackball to go to the New Contact Identity screen 3 To create a contact you only need to type basic identity information a First or Last name On this screen you can also provide a Middle name and a Nickname as well as...

Page 47: ...owing the instructions in Import Contacts from Your SIM Card on page 40 of this guide If you have existing contact information stored in a Personal Information Management PIM application you can import that data to your Address Book on the device and Web To do this first go to your Address Book on the Web 1 Go to your desktop or laptop computer and sign in to the Desktop Interface by following the...

Page 48: ...t as My vCard On the Browse Contacts screen you will now see a icon next to your name 3 To send your vCard from the Browse Contacts screen press MENU and select Send My vCard via Email or Text A compose screen opens 4 To change or remove the My vCard setting first press MENU and select Clear My vCard To set a different contact as My vCard highlight the contact then press MENU and select Set as My ...

Page 49: ... within the next five days Daily Week or Month views 6 To view your schedule select one of the Views from the menu Upcoming next five days Day Week Month Year or Trash Notes Create a Note You can create and store up to 50 notes Each note can be up to 8000 characters which is about four pages in a paperback 1 Press JUMP to go to the Jump screen Scroll to highlight Organizer then press the trackball...

Page 50: ...ss the trackball to open the second level ring of applications Highlight To Do then press the trackball 2 Press MENU to open the menu New Task is selected by default 3 Press the trackball to open a blank task screen 4 Fill in your task information 5 Press DONE to save the task Photo Album You can store photos and other image message attachments in the Photo Album The image files must be JPG format...

Page 51: ...MENU M to send Use Photo for Caller ID or Key Guard Background You can assign the photos you ve saved in your Album as a Caller ID or a key guard background image To assign a photo as a Caller ID Follow the instructions in Add a Contact to the Address Book step 5 on page 46 To assign a photo as a key guard background image 1 Press JUMP to go to the Jump screen then press MENU and select Settings K...

Page 52: ...s are grouped into folders Highlight a folder then press the trackball to open a folder s items Once you find an item you re interested in highlight the item then press the trackball to open the Item Details screen 4 To listen to a brief sample of a ringtone or view sample screen shots of an application or theme before you purchase it select the Preview button Select Purchase to step through the s...

Page 53: ...em details highlight the item then press the trackball From this screen you can do the following To listen to a ringtone select Play To discard any highlighted item permanently select Discard To uninstall a downloaded application or theme to make room for more items select Uninstall You will be able to Reinstall from the same screen whenever you wish as long as you have space on your device 5 Pres...

Page 54: ... time If you do have more than one IM conversation open you can switch between conversations quickly by doing one of the following Menu Press MENU D to open the IM Conversations submenu which lists all your open conversations Scroll to highlight the conversation you want to open then press the trackball Conversation Number Each open IM conversation has a number 0 9 which is displayed in the IM Con...

Page 55: ...event task to do or contact Insert special Unicode character Press the SYM key Discard item Highlight the item then press MENU CANCEL Send a composed email or text Press MENU N message Delete all text in a single line Press ALT DEL Put device in key guard mode Press and hold DONE for two seconds plus lock controls Unlock device Press MENU DONE Power device on off Press and hold for three seconds P...

Page 56: ...Airplane Mode Turn Wireless Off 2 Your device is now offline You should confirm offline status by looking next to the radio tower icon in the title bar it should read OFF Even without wireless connectivity you can still access the device applications and read email messages that have been downloaded already However you will not be able to send or receive messages until you enable wireless connecti...

Page 57: ... to avoid unnecessary data traffic always power off your device before removing the battery How can I improve radio reception when I m in a fringe coverage area Try the following to improve radio reception Use the hands free headset and position the phone away from your body Walk to a window if you are indoors Step outside of buildings that have high metal concrete or earthen content because they ...

Page 58: ...e remote email server For example if your email address is joe example com then your username is joe Your password on the remote email server This is the same password you use to open the remote email directly Most Internet Service Providers and University email systems work with the POP3 protocol If you are not sure of the protocol use the Auto detect setting or you can call or email your remote ...

Page 59: ...ll features Please refer to the Privacy Policy in this guide for more information How can I clean my device screen The screen on your device is coated with a protective layer of polycarbonate You can safely use warm soapy water denatured alcohol or isopropyl alcohol to remove dirt and smudges from your screen Be sure to use a very soft cotton cloth such as an old t shirt to prevent scratching when...

Page 60: ...to switch accidentally to speakerphone while the phone is against your ear Battery Handling Your device uses a removable lithium ion battery Lithium ion batteries are recy clable Never dispose of the battery or the unit by incineration Always turn off your device before removing the battery Never attempt to disassemble or modify the battery Never touch any fluid that may leak from the removable ba...

Page 61: ... restrict the use of any device that emits low level RF energy Always comply with posted prohibitions of the use of RF emitting devices Do not use the device when at a refuelling station Observe restrictions on the use of radio equipment in fuel depots chemical plants or where blasting operations are in progress It is advised that the device not be used by a driver while the vehicle is moving exce...

Page 62: ...d extension cord or plug When traveling abroad never plug the battery charger into a power source that does not correspond to both the voltage and frequency specified on the charger Always confirm that the battery charger plug has been fully inserted into the receptacle to ensure a secure electrical connection Always immediately power off the device and disconnect the battery charger from the powe...

Page 63: ...RATION Sharp Plaza Mahwah New Jersey 07430 TEL 1 800 BE SHARP FCC Notice This equipment has been tested and found to comply with the limits for a Class B digital device pursuant to Part 15 of the FCC Rules These limits are designed to provide reasonable protection against harmful interference in a residential installation This equipment generates uses and can radiate radio frequency energy and if ...

Page 64: ...hat were developed by independent scientific organizations through periodic and thorough evaluation of scientific studies The standards include a substantial safety margin designed to assure the safety of all persons regardless of age and health The exposure standard for wireless mobile phones employs a unit of measurement known as the Specific Absorption Rate or SAR In the United States and Canad...

Page 65: ...ted States or Canada The RBRC program provides a convenient alternative to placing Li ion batteries into the trash or municipal waste stream which is illegal in some area Please call 1 800 822 8837 for information on Li ion battery recycling in your area UTStarcom s involvement in this program is part our commitment to preserving our environment and conserving our natural resource RBRC is a tradem...

Page 66: ...the right to distribute or sublicense and either pre loaded on the Device at the time of manufacture or otherwise furnished to you by Danger in its sole discretion Software includes the Danger operating system and applications 1 2 LicenseGrant Subject to the terms and conditions of this Agreement Danger hereby grants to you a nonexclusive nontransferable nonsublicenseable license to use perform an...

Page 67: ...orged TCP IP headers or h use the Service in a manner that otherwise violates Danger s then current Acceptable Use Policy the latest version of which is available at www danger com agreements Violations of any of the above will be investigated by Danger and where appropriate Danger may either institute legal action or cooperate with law enforcement authorities in bringing legal proceedings against...

Page 68: ...ent that you upload post email transmit or otherwise make available via the Service whether or not directed to Danger if required to do so by law or in the good faith belief that such disclosure is necessary or appropriate to conform to the law or comply with legal process served on Danger to protect and defend the rights or property of Danger the Service or our customers whether or not required t...

Page 69: ...rnmentEndUsers The Software is a commercial item as that term is defined at 48 C F R 2 101 consisting of commercial computer software and commercial computer software documen tation as such terms are used in 48 C F R 12 212 Consistent with 48 C F R 12 212 and 48 C F R 227 7202 1 through 227 7202 4 all U S Government end users acquire the Software with only those rights set forth therein 12 Applica...

Page 70: ...tion also includes data you transmit and or store on the Danger Service such as your address book notes tasks pictures and the contents of messages and emails you send and receive 2 AnonymousInformation does not personally identify you as an individual It is information collected without connecting it to any name address or other Personal Information Although this data does not per sonally identif...

Page 71: ...gh both the device and the Danger Service Web Site HOWDOESDANGERUSETHEINFORMATIONITCOLLECTS PersonalInformation Danger collects and uses Personal Information to a operate and deliver the Danger Service b process or collect payments and for other billing purposes c to assist with questions about use of the Danger Service d to anticipate and resolve problems with your use of the Danger Service and e...

Page 72: ...nymous Information to them at its discretion when it appears that individuals using our products or services are engaged in activities that are illegal or violate the Danger Service and End User License Agreement Should Danger merge with or be acquired by another company or if the business unit providing your service were sold to another company then customer information maintained by Danger inclu...

Page 73: ...t so that when you return to the site the site knows who you are and can personalize your visit In operating the Danger Service Web Site Danger uses cookies to personalize the site improve your experience at the site and to determine which areas and features of the site are most popular You may set your browser to reject cookies but this may affect your ability to use some parts of the Danger Serv...

Page 74: ...eographic coverage for inadequate signal reception by the antenna or for communications range or operation of the cellular system as a whole When sending your wireless device to UTStarcom Personal Communications for repair or service please note that any personal data or software stored on the device may be inadvertently erased or altered There fore we strongly recommend you make a back up copy of...

Page 75: ...r GSM GPRS affiliates and roaming partners but not in all locations see our coverage maps available at www t mobile com and at T Mobile stores for details Depicted phone model is sold solely for use with T Mobile service all T Mobile rate plans require credit approval 35 line activation fee and minimum one year service agreement with 200 line early termination fee Ability to use some or all phone ...

Page 76: ...ERVICES LOSS OF USE DATA OR PROFITS OR BUSINESS INTERRUPTION HOWEVER CAUSED AND ON ANY THEORY OF LIABILITY WHETHER IN CONTRACT STRICT LIABILITY OR TORT INCLUDING NEGLIGENCE OR OTHERWISE ARISING IN ANY WAY OUT OF THE USE OF THIS SOFTWARE EVEN IF ADVISED OF THE POSSIBILITY OF SUCH DAMAGE Portions of software licensed under the above license include the following additional copyright notices and addi...

Reviews: