background image

24 


11. Entering Information

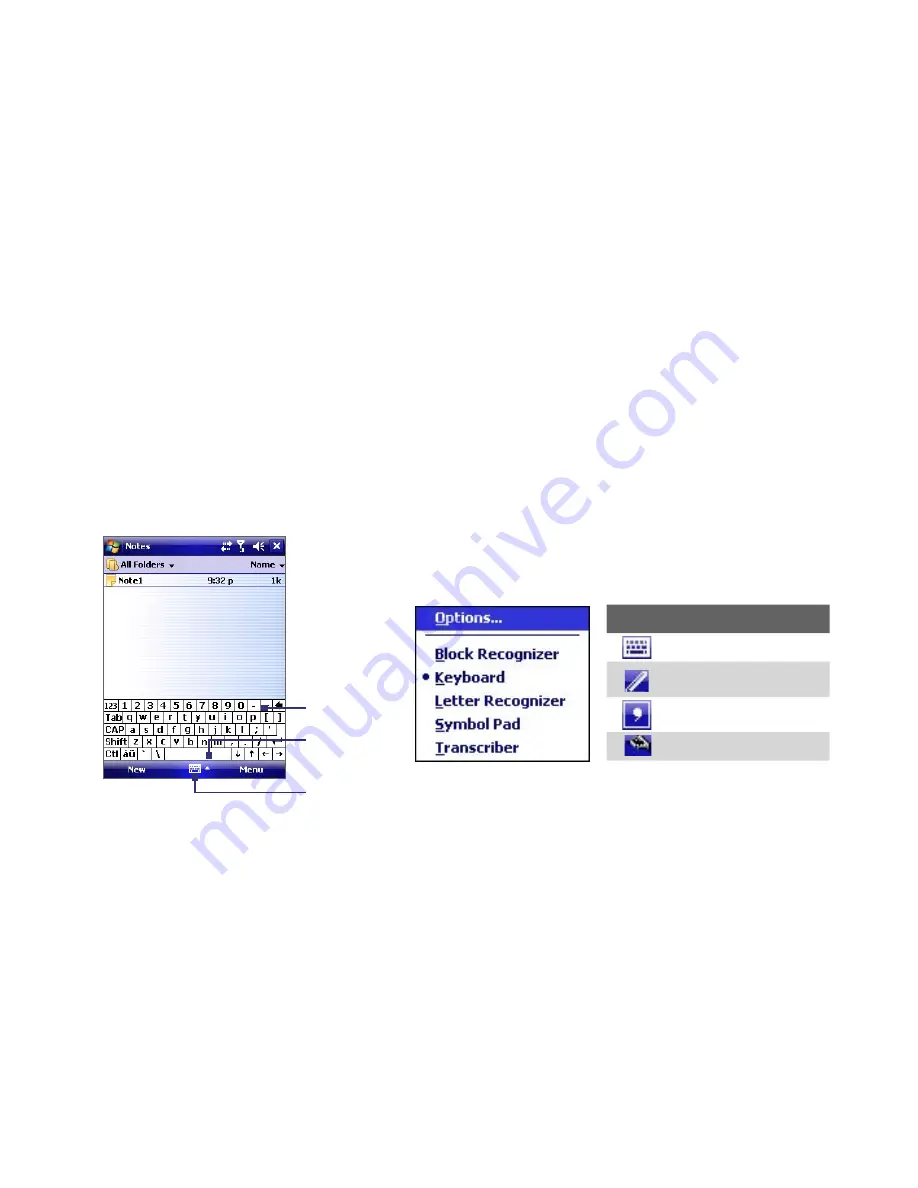
When you start a program or select a field that requires text or numbers, the 

Input Panel

 icon becomes 

available on the menu bar.
Tap the 

Input Selector

 arrow (that appears next to the 

Input Panel

 icon) to open a menu where you 

can select a text input method and customize input options. After selecting a text input method, 

the corresponding 

Input Panel

 is then displayed and you can use it to enter text. To toggle between 

showing and hiding the 

Input Panel

, simply tap the 

Input Panel

 icon. 

Input Panel 

(Keyboard)

Input Selector 

arrow

Input Panel 

icon

Icon

Input method

On-screen Keyboard
Letter Recognizer or  

Block Recognizer
Symbol Pad

Transcriber

Summary of Contents for PPC6800

Page 1: ...PDA Quick Start Guide...

Page 2: ...Text Messages 14 6 Synchronizing Outlook Information 15 7 E mail 17 8 Browsing the Internet 19 9 Using the Camera 20 10 Using Pictures Videos 22 11 Entering Information 24 12 Status Indicators 25 13 C...

Page 3: ...sc Battery Mini USB Stereo Headset AC Adapter Splitter Adapter Extra Stylus Pouch Support Documentation including Quick Start Guide and Read First Poster USB Sync Cable Quick Start Guide Quick Start G...

Page 4: ...4 2 The PDA Phone 5 1 3 4 2 7 6 12 9 10 11 13 8...

Page 5: ...on Press to open Internet Explorer Mobile 6 Hardware Keyboard This is a QWERTY style keyboard just like the computer keyboard Slide the touch screen panel to the left to reveal the keyboard 7 Touch Sc...

Page 6: ...6 18 19 23 26 15 31 30 32 14 16 22 17 24 25 29 27 28 20 21...

Page 7: ...Used when speaker mode has been enabled and to listen to media 21 Battery Cover Latch Press downward to release the battery cover 22 Battery Cover After pressing down the cover latch remove the batter...

Page 8: ...for listening to audio media Accessories No Accessory Function 1 AC adapter Recharges the battery 2 USB Sync cable Connects your device to a PC and synchronizes data 3 Stylus An extra stylus pen is pr...

Page 9: ...stall the battery 1 Press the battery cover latch downward to release the battery cover 2 Remove the battery cover 3 Insert the battery by aligning the exposed copper part of the battery pack with the...

Page 10: ...power is on a charging icon also appears on the Today screen After the battery has been fully charged the LED indicator becomes green and a full battery icon appears on the Today screen Check the batt...

Page 11: ...e display To turn off the device press and hold the POWER button POWER button Insert a memory card If you need more storage for your device you can use a microSDTM memory card to save media and other...

Page 12: ...at the same time use the supplied mini USB stereo headset for hands free conversation or for listening to music 1 Connect the Splitter Adapter to your device s Sync connector 3 Connect the supplied US...

Page 13: ...access Call History Speed Dial and Phone settings To open the Phone screen do one of the following Press TALK on the device TALK button Use the stylus to tap Start Phone Make a call from the Phone scr...

Page 14: ...ating them with a semicolon To access mobile phone numbers from Contacts tap To 4 Enter your message To quickly add common messages tap Menu My Text and tap a desired message To check the spelling tap...

Page 15: ...r Windows Vista PC and start Windows Mobile Device Center for the first time you will be asked to create a Windows Mobile partnership with your device 1 Connect your device to your PC The Windows Mobi...

Page 16: ...eSync to your PC 3 Connect your device to your PC The Synchronization Setup Wizard automatically starts and guides you to create a synchronization partnership Click Next to proceed 4 To synchronize yo...

Page 17: ...ount on your device if you have an e mail account with an Internet service provider ISP or a work account that you access using a VPN server connection 1 Tap Start Messaging New E mail Account 2 Enter...

Page 18: ...our device When you are finished tap Finish Compose and send e mail 1 Tap Start Messaging 2 On the Account Picker screen select an e mail account 3 Tap Menu New 4 Enter the e mail address of one or mo...

Page 19: ...arrow to choose one web site from previously entered addresses 3 Tap the Go icon to go to the web address you entered 4 Tap Back to go back to the previous page 5 Tap Menu Refresh to refresh the web...

Page 20: ...screen Camera screen Capture a still image 1 After launching the camera tap or at the upper left side of the screen or press NAVIGATION left or right to select the Photo capture mode 2 Press the CAMER...

Page 21: ...lect Send via E mail then tap Send 3 If you have more than one e mail account on your device the Select an account screen will appear Tap Outlook E mail or your POP3 IMAP4 account A new e mail message...

Page 22: ...it them or set an image as the background on the Today screen View images 1 Tap Start Programs Pictures Videos The files in the My Pictures folder appear as thumbnails by default 2 Select an image and...

Page 23: ...own 2 To find the video clips that you captured tap the down arrow next to the My Pictures folder and tap My Documents Next tap My Videos Video clips are displayed as thumbnails by default which appea...

Page 24: ...a menu where you can select a text input method and customize input options After selecting a text input method the corresponding Input Panel is then displayed and you can use it to enter text To togg...

Page 25: ...the icon to view all Speakerphone on Voice call in progress Missed call Maximum signal strength No signal Phone is turned off No phone service Searching for phone service Icon Description 1xRTT availa...

Page 26: ...twork arrows moving Connected to wireless network Synchronizing via Wi Fi Vibration mode Sound on Sound off Alarm Battery is fully charged Battery power is very low Battery charging Device is locked D...

Page 27: ...d theme for the background of the Today screen 3 On the Items tab select the items you want to appear on the Today screen Customize the Start Menu 1 Tap Start Settings Personal tab Menus 2 Select the...

Page 28: ...ght select how long your device must be idle before a password is required In the Password type box select the type of password you would like to use Enter the password and confirm it 3 On the Hint ta...

Page 29: ...29 15 More Information For more instructions refer to the User Manual on the CD or contact your authorized dealer for assistance...

Page 30: ...sferable or assignable This Warranty does not apply to a Product subjected to abnormal use or conditions accident mishandling neglect unauthorized alteration misuse improper installation or repair or...

Page 31: ...th proof of Warranty coverage e g dated bill of sale the consumer s return address daytime phone number and or fax number and complete description of the problem transportation prepaid to the Company...

Page 32: ...exclusion or limitation of incidental or consequential damage so the above limitation or exclusions may not apply to you This Warranty gives you specific legal rights and you may also have other righ...

Reviews: