background image

Core Cutting

MTC Coring Unit. Operator’s Manual

© 2016 Utilicor Technologies Inc.

11

ATTENTION

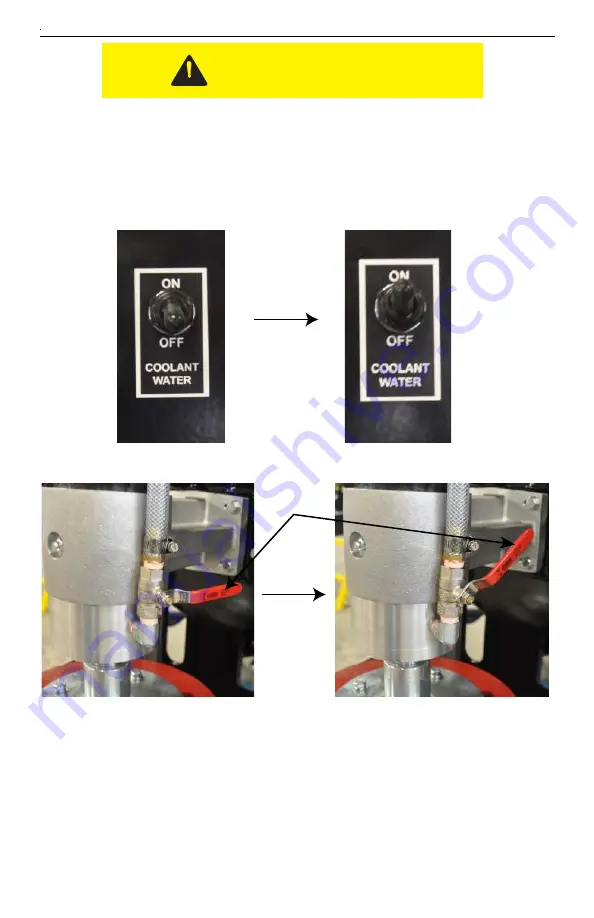
Step 3.

1. Turn on Coolant Water

2. Open Water Petcock (1/8 turn) 

3. Verify that water is flowing out through the Pilot Bit.


The coring process requires water to cool the core drum and the pilot bit.  Make 

sure the water tank is full before you begin the coring operation. The process uses 

approximately 1 gallon of water per inch depth cut. 

Petcock

Summary of Contents for MTC-100

Page 1: ...MTC 100 CORING ATTACHMENT Operator s Manual 2017 Utilicor Technlogies Inc ...

Page 2: ...ok up 8 Recomended Core Drum Speeds 8 Section 2 Coring Step 1 Attachment Drive Controls 9 Step 2 Spring Lock 10 Step 3 Coolant Water 11 Step 4 Begin to Cut 12 Parts Core Drum Assembly 14 Pillow Block Assembly 15 DryLin Rails and Cars 16 Hydraulic Schematic 17 Pre Trip Check List 18 Utilicor Process Central Pilot Bit 19 Tips for Sucessful Coring Operation 20 Troubleshooting 21 Warranty 22 Warranty ...

Page 3: ...fe as those who operate it Safety tips shown throughout the Operator s Manual must be followed at all times MTC Coring Unit Operator s Manual 2016 Utilicor Technologies Inc 1 The mounting plate located at the front of the machine provides for the easy installation and safe use of the wide variety of available attachments This system is very easy to use but requires the proper use of the attachment...

Page 4: ...lt the attachment slightly forwards or backwards until the pins can be rotated Position the attachment on a level surface NOTICE Clean the lower edge of the female attachment mounting plate to remove any debris that might interfere with the attachment installation Start the machine engine lower the loader arm and tilt the mounting plate forwards NOTICE Make sure that both of the attachment lock pi...

Page 5: ...chment lock pins Item 1 Figure 4 into the locked position securing the attachment to the machine 7 Start the engine and raise the attachment off the ground Visually inspect the bottom edge of the attachment s mounting plate to make sure that both of the attachment lock pins are securely holding the attachment in position Figure 3 Hydraulically Powered Attachment Installation Figure 4 Hydraulically...

Page 6: ...nd shut off the engine 9 Move any of the main hydraulic controls forward and backward to release any stored hydraulic pressure Make sure that the engine has been shut off before beginning this procedure a Move the AUXILIARY control levers Items 1 Figure 5 either towards the hand grip or backwards into the REVERSE detent position This will release the hydraulic pressure locked in the auxiliary hydr...

Page 7: ...rized fluid can cause injury or pierce skin Before disconnecting a hydraulic line turn engine off and operate all controls to relieve pressure Lower block or support any raised component with a hoist Cover connection with heavy cloth and loosen connector nut slightly to relieve residual pressure Catch all fluid in a container Before using system check that all connections are tight and all lines a...

Page 8: ...l 2016 Utilicor Technologies Inc 6 Figure 8 Attachment 12 volt connection Auxiliary 12 volt outlet Plug in 12 volt line to Auxiliary Outlet If Equipped or wire 12 volt line directly to the battery 15 Amp in line fuse is recommended for this application ...

Page 9: ... step off of the platform when the auxiliary attachment s power is engaged If you release the AUXILIARY hand control operator presence control the attachment will automatically stop all motion but the engine will continue to run Figure 8 Auxiliary Attachment Controls CAUTION 1 3 Using the Bucket Controls tilt the MTC back and raise the MTC off the ground before moving the unit Using the Drive Cont...

Page 10: ...lve 9 To verify that the oil is flowing in the right direction move the Drum Speed Lever up and to the right If the Core drum begins to turn the oil is flowing in the right direction If the drum does not turn reverse the flow from the powering unit 10 Increase the Core Drum Speed 8 inch Diameter Core Drum 250 to 270 RPM 10 inch Diameter Core Drum 230 to 250 RPM 12 inch Diameter Core Drum 210 to 23...

Page 11: ...back Forward Flow to engage the hydraulics Note The MTC is equipped with a one way valve on the tank line to prevent the oil from flowing in the wrong direction If the unit does not operate with the Drive Control in the Forward flow position reverse the flow by Pushing the drive control Reverse Flow Attachment Drive Control Before beginning any coring operation ensure that the work area has been i...

Page 12: ...TENTION Step 2 1 Unlatch the Spring Lock by pulling up n the red handle The Spring Lock is installed to prevent the coring drum assembly from creeping down during transport The Spring Lock should always be engaged when transporting moving or storing the MTC Lock Engaged Lock Released ...

Page 13: ...t Water 2 Open Water Petcock 1 8 turn 3 Verify that water is flowing out through the Pilot Bit The coring process requires water to cool the core drum and the pilot bit Make sure the water tank is full before you begin the coring operation The process uses approximately 1 gallon of water per inch depth cut Petcock ...

Page 14: ...2 Begin to lower coring assembly by turning the Steering Orbital clockwise until the Pilot Bit engages the ground 3 When the coring drum contacts the substrate use Auxiliary Water Hose to cool the drum until it has fully seated The coring process varies depending on the substrates you are cutting through For best results slow and steady feed works best If the feed is too fast the pressure will beg...

Page 15: ...rn steering Orbital counter clockwise 6 Shut off Coring Drum when the drum clears the substrate 7 Close Water Petcock and turn of Coolant Water Pump 8 Insert a pry bar in the Kerf and gently apply force If the core moves you have successfully cut the core and you can move the MTC to the next cut location NOTE If the core does not move repeat the coring process 9 Engage Spring Lock before moving at...

Page 16: ...Parts MTC Coring Unit Operator s Manual 2016 Utilicor Technlogies Inc 14 CORE DRUM ASSEMBLY CP AFLNG CD 8 CD 10 CD 12 CD 18 CP SHAFT CP PDC GR 5 HHCS 3 8 X 1 1 2 ...

Page 17: ...SS Pillow Block Spindle Shaft 1 2 PB TB Tapered Bearing 2 3 PB BR Tapered Bearing Race 2 4 PB MS Pillow Block Shim 1 5 PB PB Pillow Block Casing 1 6 PB WS Pillow block Water Seal 2 7 PB EX Pillow block Key stock 1 8 PB SW Pillow Block Water Swivel 1 6 Part No Description Qty PILLOW BLOCK ASSEMBLY ...

Page 18: ...Manual 2016 Utilicor Technlogies Inc 16 1 DLHD DryLin Heavy Duty Car 4 2 IRDR IgusRailMTC 2 3 HHCS M10x40 16 4 SHCS M8 X 40 32 Part No Description Qty DRYLIN RAILS AND CARS 1 2 3 4 Cars are self adjusting and self lubricating ATTENTION ...

Page 19: ...ilicor Technlogies Inc 17 P 90 10 P F EF P T P T R L 12 5 CI MAL20 30 50CC SO BFC PD50 90 DF DR ATTENTION THE SPEED OF THE CUTTER WILL DEPEND ON THE FLOW FROM THE POWER UNIT SET POWER UNIT ENGINE TO MAX RPM TO ACHIEVE 13 TO 16 GPM HYDRAULIC SCHEMATIC T P ...

Page 20: ...he trailer for transit 7 When loading the mini track loader or skid steer and MTC on the trailer ensure that MTC is raised high enough to clear the trailer in loading forwards or to clear the ground if loading backwards otherwise serious damage to the unit may result 8 Are your Driver s Licensed H2S WHIMIS First Aid certificates and are other necessary documents available and current 9 Have you co...

Page 21: ...complexity to the coring process 3 Strength and Stability The central pilot hole when filled with Utilibond increases the bonding surface of a typical 12 deep 18 diameter core by almost 100 square inches a 13 increase in bonding surface area and adds strength to the reinstatement process In addition to increased surface bond strength this central column of Utilibond acts as a continuous stabilizin...

Page 22: ...fts off the ground 5 Remember to raise the coring drum completely out of the cut area periodically during the coring operation This will help to remove any build up of suspended solids and cutting debris that can cause the core to become lodged in the drum Keep the cut space surrounding the core or kerf clean and free of debris 6 You will know you are through the concrete asphalt pavement when the...

Page 23: ...ants such as antifreeze and oils can be picked up while doing a walk around the truck during operation This may lead to the discovery of such things as oil leaks or overheating of parts FEEL The sense of feel usually applies when doing an inspection after the unit has been working for sometime In warmer climates it is good practice to feel certain hydraulic compo nents or tanks for excessive heat ...

Page 24: ...t its option any part or parts of said product found to the Vendor s satisfaction to be defective upon examination and provided that such part or parts shall be returned to the Vendor s facility at no cost to the Vendor Labor charges to install any replacement part will be allowed in accordance with the Vendor s schedule of applicable labor rates The Vendor shall not be liable for any freight trav...

Reviews: