


2/3
F
IELD MEASURE
:
1)
1. Open the right cover 1 and the front cover.
2. Release the lock lever and then remove the waste toner box.
3. Release the toner container lever (blue) and then remove the toner container.
4. Release the 2 lock levers (yellow) and open the developing cover.
5. Release the lock lever (yellow) and then remove the developing unit.
6. Release the lock lever (yellow) and then remove the drum unit. * Refer to Service Manual for each procedure for
removing the parts.
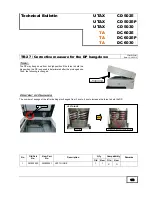
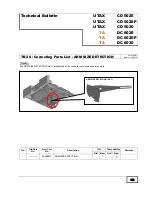
2)
Correct the angle of the tilted detection PWB at
the machine inner side.
Surely wear the anti-static band.
Align the connector of the detection PWB
rightwards by hand inserting from aperture in
front of the main machine in order to equalize
the gap (
X
) between the aperture of the holder
and the connector.
(NG figure at right side is the state that the upper
gap (
X
) is narrow and lower gap (
X
) is wide. It
means that the detection PWB tilts
counterclockwise.)
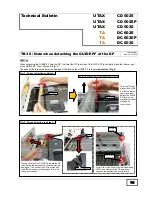
3)
Check the connector terminal at the developing
unit rear side.
If it deforms, correct its deformation by a tool like
the needle nose pliers.
Surely wear the anti-static band.
4)
Confirm if the connector terminal at the developing unit rear side does not deform after reinstalling / detaching the
developing unit in the main machine.
5)
Reattach the removed parts in the reverse procedures.
NG
OK
Developing unit
rear side.
Machine inner side
(Connector of the detection PWB)
Detection PWB
NG
OK
Connector on the
detection PWB
X
(Equalize the gap)
Narrow
Aperture of the holder
Wide


