OPERATION INSTRUCTIONS
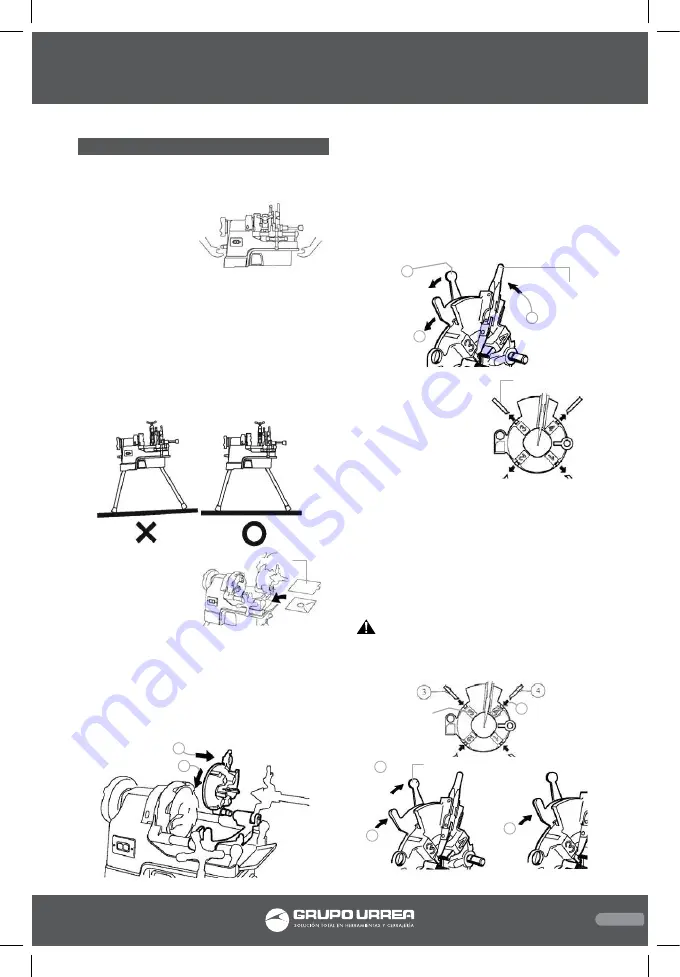
TRANSPORTATION
lt is necessary to drain off the oil during trans-
portation.
1. Insert a short pipe
and close the chuck
finnly.
2. Grip the pipe with
the cutter for cutting,
fix the caniage, and carry the pipe.
SETTING UP
1. When setting up the machine, the legs
should be adjusted with the rear chuck higher
than the hammer chuck so that oil does not
flow back down the pipe being cut.
2. Remove the tank upper cover, and check
that the level of the oil adequately covers the
strainer.
3. Set the oil cover and
scrap receiver in the
right position.
PUT DOWN THE DIE HEAD
Fit the die head to the machine.
1. Adjust the die head post to the carriage fit-
ting hole, and while moving the die head, push
it until hitting the carriage.
2. Put down the die head and check on correct
setting.
REMOVAL AND REPLACEMENT OF THE DIES
REMOVING THE DIES
Push the auto-open lever A in the direction of
the arrow (1) and put the die head into the
open position.
Loosen the lever nut by tuming in the arrow (2)
and fully tum the cam plate in the direction of
the dies open position (3).
Next, pull the knob
and open the cam
plate as far as the
release position, and
then remove the dies
from the diehead.
REPLACING THE DIES
Insert each die into its corresponding slot num-
ber in the die head as far as the line marked
on the die (1).
Tum the cam plate in the direction of the die-
set (2) and tighten the lever nut on the appro-
priate pipe size position (3).
Next push the cam plate upwards in the direc-
tion of the die-set and set in position (4).
CAUTION: Be sure to use only the TRM300
die head and dies. The die heads and dies for
other models cannot be used with TRM300.
1
2
Push
Loosen
Pull
Auto-open
lever A
Lever nut
1
2
3
Pull out
Dies
Insert
Die
number
1
Thighten
Push
Lever nut
2
3
Push
4
Scrap receiver
15
E N G L I S H •
User’s manual
TRM300 manual.indd 15
09/06/15 15:10


