


5
E N G L I S H •
User’s manual
GENERAL SAFETY RULES
Working safely with the measuring tool is pos-
sible only when the operating and safety infor-
mation are read completely and the instructions
contained therein are strictly followed. Never
make warning labels on the measuring tool un-
recognizable. SAVE THESE INSTRUCTIONS.
CAUTION: The use of other operating or
adjusting equipment or the application of
other processing methods than those men-
tioned here, can lead to dangerous radiation
exposure.
Do not direct the laser beam at persons
or animals and do not stare into the la-
ser beam yourself. This measuring tool
produces laser class 2 laser radiation according
to IEC 60825-1. This can lead to persons being
blinded.
• Do not use the laser viewing glasses as safety
goggles. The laser viewing glasses are used for
improved visualization of the laser beam, but
they do not protect against laser radiation.
• Do not use the laser viewing glasses as sun
glasses or in traffic. The laser viewing glasses
do not afford complete UV protection and re-
duce color perception.
• Have the measuring tool repaired only
through qualified specialists using original
spare parts. This ensures that the safety of the
measuring tool is maintained.
• Do not allow children to use the laser measur-
ing tool with- out supervision. They could unin-
tentionally blind other persons or themselves.
• Do not operate the measuring tool in explo-
sive environments, such as in the presence of
flammable liquids, gases or dusts. Sparks can
be created in the measuring tool which may
ignite the dust or fumes.
+ Keep the measuring tool away from cardiac
pacemakers. The magnets generate a field that
can impair the function of cardiac pacemakers.
+ Keep the measuring tool away from mag-
netic data medium and magnetically-sensitive
equipment. The effect of the magnets can lead
to irreversible data loss.
FEATURES
INTENDED USE
The tool is intended for determining and indi-
cating exact horizontal and vertical lines.
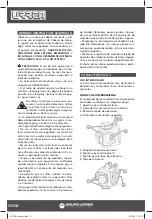
KNOW YOUR TOOL
The numbering of the product features shown
refers to the illustration of the measuring tool
on the graphic page.
1. Exit opening for laser beam.
2. Automatic leveling indicator.
3. Operating mode button.
4. On/Off switch.
5. Laser warning label.
6. Tripod mount 1/4".
7. Latch of battery lid.
8. Battery lid.
9. Telescopic rod*.
10. Laser viewing glasses*.
11. Tripod*.
* The accessories illustrated or described are
not included as standard delivery.
OPERATION INSTRUCTIONS
IMPORTANT:
The working range can be
decreased by unfavorable environmental con-
ditions (e.g. direct sun radiation).
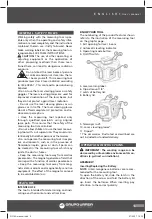
ASSEMBLY
Inserting/Replacing the Battery
NOTE: Alkali-manganese batteries are recom-
mended for the measuring tool.
To open the battery lid, slide the latch in the
direction of the arrow and fold the battery lid
up. Insert the batteries. When inserting, pay
attention to the correct polarity.
1
2
3
4
6
5
8
1
7
NL12A manual.indd 5
07/03/17 12:12


