background image

DS1093-038

81

4.2.4

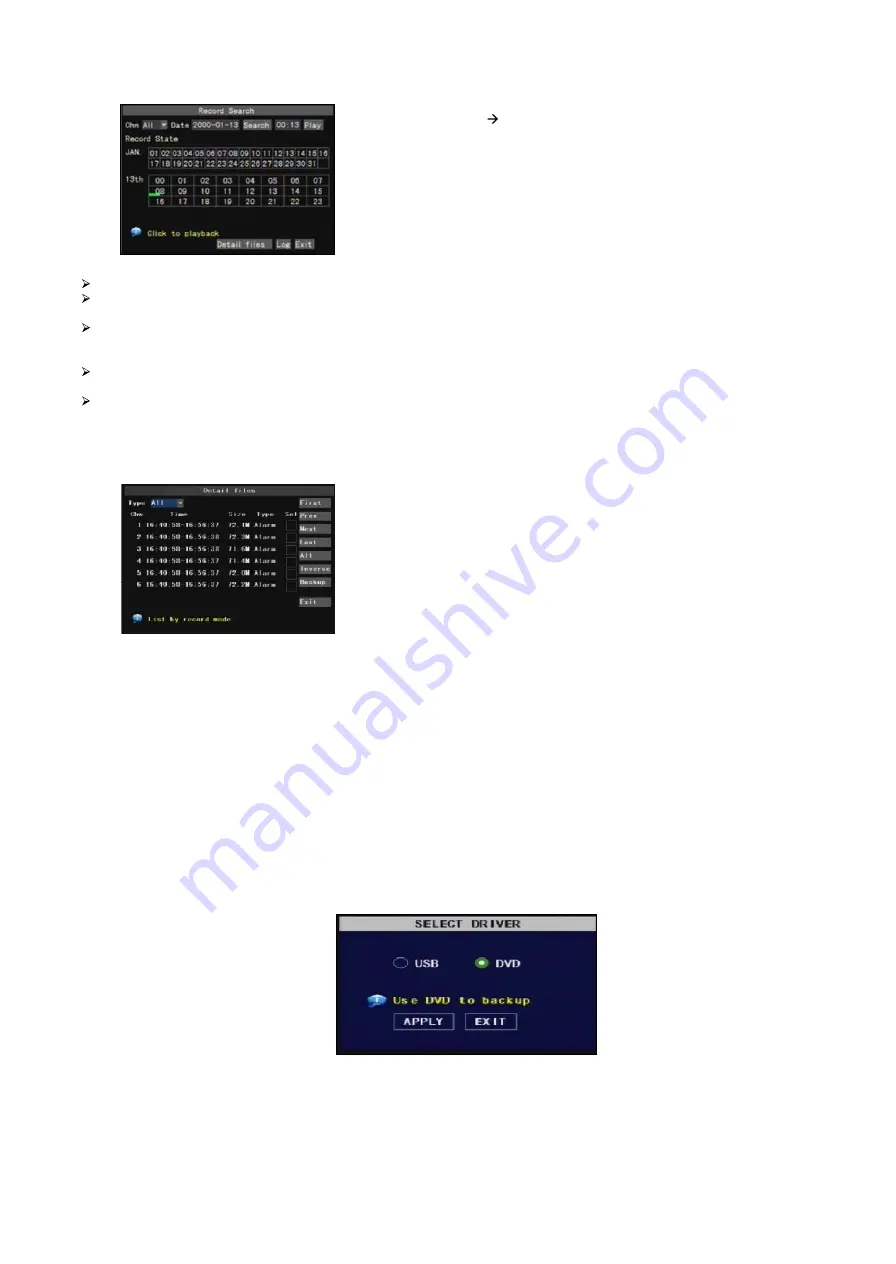
RECORDING SEARCH

Channel:

allows you select the channel you want to search

Time  Search:

In  the  Video  Search  screen,  user  can  search  for  a  specific  date  and  time  for  a  recording  and  view  it  in

Playback mode. This is useful for hunting a specific recording of an incident if you know the date and time it occurred.

Date Search:

 In the Video Search screen, user can search for all the recordings in a specific date. To execute a video

search, highlight and select the date numeric field,and then click a detailed time quantum of the specific date, system will start the

playback from the first recoding of the time quantum.

Playback Mode:

 You can use the Playback Control bar to operate the Fast Forward (X2, X4 and X8), Slow play (1/2, ¼ and

1/8 speed), Play, Pause/Frame, Rewind(X2, X4 and X8). When ending playback, DVR will return back to previous menu.

File List:

 click [File list] button to enter into the [File List] screen, the video recordings for the time quantum will appear in

the screen. And you also can filter the recordings you want to view by the Channel or recording mode based on date/time

search.

First:

Indicates the first page of recording history you have searched. When you view other pages, clicking [First] button brings

you back to Page one.

PRE (Previous page):

When viewing event list, clicking [Previous page] button will take you back to previous page from current

page (except the first page).

NEXT (Next page):

When viewing event list, clicking [Next page] button will take you to the next page from current page (except

the last page).

LAST (Last page):

 Indicates the last page of recording history you have searched. When you view other pages, clicking [Last

page] button will take you to the Last page.

ALL (Select All):

Allows you to select all the events on the current page.

INVERSE (Select Invert):

 Allows you to select other events on the current page except those you have currently selected.

File backup

If you want to backup one history record from the file list, you just select the record and backup device, and then click [Ok] button.

Click [Main menu  search] to enter into [Video Search] menu

Summary of Contents for 004A

Page 1: ... 8 CH 16CH WITH VGA DVR Ref 1093 004A 008 016 DVR 4 CANAUX AVEC VGA Réf 1093 004A H 264 4KANAL 8 KANAL 16 KANAL MIT VGA DVR TYP 1093 004A 008 016 DVR DE 4 8 16 CANALES H 264 CON VGA REF 1093 004A 008 016 MANUALE D USO INSTRUCTIONS MANUEL UTILISATEUR BEDIENUNGSANLEITUNG MANUAL DE USUARIO ...

Page 2: ...n menu preview 75 4 2 Main menu 76 4 2 1 Camera setup 76 4 2 2 Record setup 77 4 2 3 Network set 79 4 2 4 Recording search 81 4 2 5 Log Search 82 4 2 6 Device Management 83 4 2 7 HDD Management 83 4 2 8 Alarm Set 84 4 2 9 Email setup 85 4 2 10 PTZ Setup 86 4 2 11 Mobile 86 4 2 12 Mobile Viewer s Access Instruction 86 4 2 12 1 Windows Mobile 86 4 2 12 2 Symbian System Mobiles 87 4 2 12 3 Iphone 88 ...

Page 3: ... Web Login 105 4 18 urmet netviewer Log in 105 4 19 Web and urmet netviewer client software Interface 106 4 19 1 Menu Bar 106 4 19 1 1 Live screen 106 4 19 1 2 Playback 108 4 19 1 3 Remote setting 108 Channel Parameters 109 Record setting 110 Alarm Parameters 111 Network Parameters 112 Device Parameters 114 System management 116 4 19 2 Local setting 118 4 19 3 Log out 118 Appendix Active X install...

Page 4: ...otification through email Auto maintenance mode PTZ controls via RS 485 Backup on USB 2 0 port flash drive o hard disk Use of USB Mouse Remote Control Multi Language OSD PDA software Mobile for the following Platforms Symbian 3 th and 5 th Edition Windows Mobile Iphone Android Blackberry Watermark Multi Language Web Client software Syncronous Playback 4ch for Sch 1093 004A 8ch for Sch 1093 008 16 ...

Page 5: ...lts Do not cover the device with a cloth while it is running to prevent deforming the external casing and overheating the internal parts risk of fire electrocution and mechanical failure Keep magnets and magnetised objects away from the device to prevent faults Do not use the device in presence of smoke vapour humidity dust or intense vibrations Wait for a while before operating a device immediate...

Page 6: ...lid Ref 1093 004A open lid Ref 1093 008 closed lid Ref 1093 008 open lid Sch 1093 016 NOTE The USB port on the front panel is not intended for the connection of the provided mouse The mouse must be connected on the port in the rear panel see below H 264 4CH Digital Video Recorder ...

Page 7: ...ed to enable disable the AUDIO function only for Ref 1093 008 CH Button Used to select the channel before the current one only for Ref 1093 008 CH Button Used to select the channel following the current one only for Ref 1093 008 ALL Button Shows all the cameras only for Ref 1093 008 REW Button fast backward button used to move left in the menus rewind during playback Switch video output control me...

Page 8: ...channels Audio Button enables disables the audio only for Ref 1093 016 Multiscreen button allows the simultaneous vision of all the video channels Button for recording and backup start Button for frame by frame recording and playback Start Button starts the manual mode images recording Stop Button stops recording Green led indicator indicates that the devices is powered Red led indicator indicates...

Page 9: ... monitor BNC connector for CH1 CH2 CH3 CH16 channel Video input connect here cameras 75 4 Inputs are available on Ref 1093 004A 8 inputs on Ref 1093 008 16 inputs on Ref 1093 016 VGA Audio output used to connect Audio devices only for Ref 1093 016 12 ways terminal strip for RS485 Sensors Alarm this is the connector to which input sensors alarm output and RS458 line are connected only for Ref 1093 ...

Page 10: ...utput output connector for VGA monitor VGA Audio output used to connect audio devices only for Ref 1093 008 Ethernet port intranet or internet connection RJ45 Use a crossed cable not provided both for router switch connection and for pc connection Obviously for a router switch connection also a straight cable can be used USB port USB mouse connection Audio inputs connector for 1 4 audio channels R...

Page 11: ... 4 input Pin 11 12 Alarm Output RS485 Sensor Alarm port Sch 1093 008 Pin RS 485A Pin RS 485B Pin 1 2 Sensor 1 input Pin 3 4 Sensor 2 input Pin 5 6 Sensor 3 input Pin 7 8 Sensor 4 input Pin 9 10 Alarm Output RS485 Sensor Alarm port Sch 1093 016 RS 485 input Keybord D D input ALARM OUT NO COM output G GROUND Pin 16 12 ALARM IN input G GROUND Pin 1 11 ALARM IN input ...

Page 12: ...the appliance while using the remote control The remote control constitutes an interface between the User and the Appliance Therefore it is particularly important to be familiar with the controls on the remote handset IR REMOTE CONTROL FOR REF 1093 004A 1093 008 BUTTON DESCRIPTION 1 8 Channel Select 1 8 Numeric key 9 0 Numeric Key ALL Preview all Channel Menu Enter Exit Main Menu Up Key Down Key L...

Page 13: ...n 0 9 Channels selection numeric buttons Up button Down button Left right button ENTER Enter Menu Esc Main menu access exit PIP Picture In Picture MUTE Mute REW Go back button PLAY Playback button access to recorded track search menu FWD Forward button PAUSE Pause frame by frame playback STOP Stop manual recording Stop playback SLOW Slow forward Z Zoom in Z Zoom out F Focus F Focus I PTZ luminosit...

Page 14: ...rding file Change the status of check box and motion detection area Clicking combo box to access pull down menu By clicking left key you can adjust Color control bar and volume control bar By clicking left key you can select values in edit boxes or pull down menu special symbol numeric and character input use instead of Enter or Backspace Click left key of Mouse In the Detailed file menu mode clic...

Page 15: ... system which is showing no video input status Once there are video inputs the interface will display live images from the cameras In main interface mode if you use the mouse to double click the live image of any channel the image will be maximized to full screen by double clicking again the display will be come back to quad mode displaying all cameras clicking the right button of the mouse will e...

Page 16: ...or Main Menu Menu Lock Video Search PTZ Start record Stop Record and also operate for Start Cruise after successful PTZ parameter setting etc Rec Search Search Playback File List Camera Recording HDD Management Alarm Setting PTZ Setting Mobile Motion Color set System User password System Information Language Select System Maintenance Video Setting Time Setting Device Management Network Area settin...

Page 17: ...ont panel buttons use the FWD and REW button to move in the menu and the SEL button to select the icon You use the ESC button to return to previous window In Main Menu mode you can control device management settings such as Camera Recording Network Recording search HDD Alarm PTZ Control Mobile Phone motion detection etc you can also set system function settings such as Time setting User password A...

Page 18: ...ecord 08 18H to Normal and 19 00H to Alarm Explanation On the record Set and Search mode original color stands for no record Red stands for alarm record Green stands for normal record Record option allows you set up recording status Enable Disable of each channel Audio option allows you turn audio on off Quality include three options Best Good and Normal Pack time indicates maximum continuous reco...

Page 19: ...9 5 24 5 HD1 25FPS 12 16 5 24 5 CIF 25FPS 16 5 23 29 1093 008 DVR 8ch HDD Duration days Resolution Frame Rate Best Quality Better Quality Good Quality D1 6 25FPS 11 15 17 HD1 12 5FPS 11 15 21 CIF 25FPS 9 12 16 1093 016 DVR 16ch HDD Duration days Resolution Frame Rate Best Quality Better Quality Good Quality D1 6 25FPS 5 5 7 5 8 5 HD1 12 5FPS 5 5 7 5 10 5 CIF 25FPS 4 5 6 8 Explanation Bandwidth and...

Page 20: ...At the bottom of the NETWORK SETUP window there is an option to setup a DDNS service of the DVR shown as Picture 5 10 You can access the DVR through a static or dynamic IP address however a dynamic address can change from time to time How often depends on your service provider When it changes you need to go to a website such as www myipaddress com from a computer attached to the same router as the...

Page 21: ...interface may be different however when entering into virtual server user will need forward port 0080 and port 9000 of router to IP address of DVR allocated or automatically captured and select All or Both in corresponding protocol column and save the above setting Above steps may differ from the router device depending on the manufacturer UPnP server Now that you have set up the DVR on your local...

Page 22: ...for the time quantum will appear in the screen And you also can filter the recordings you want to view by the Channel or recording mode based on date time search First Indicates the first page of recording history you have searched When you view other pages clicking First button brings you back to Page one PRE Previous page When viewing event list clicking Previous page button will take you back t...

Page 23: ...u will be notified Please click OK button to save your backup Backup file will be in H264 format you can convert it to AVI format using the Multimedia Player program that comes with the DVR or through the net viewer program so you can use any player which supports AVI format Note Please make sure you have connected the backup device well 4 2 5 LOG SEARCH User can search relative log information us...

Page 24: ...automatically overwrite the oldest recordings once the hard drive is full if you select OFF recording will stop once the hard drive is full It is also possible to define the time i e in days that the recording file can be displayed in SEARCH RECORDING Select the value i e days between the suggested options USB FORMAT Use this option to format USB devices Note It is an important first step when con...

Page 25: ...last when alarm ends 0s 30s 1minute 2minute 5minute Pre record time you can set how long record will last before alarm occurs Off 10s Alarm Type Function Motion Detection When an object moves into motion detection area alarm will be triggered You can adjust sensitivity level to suit the needs of your actual application environment I O Alarm System can convert alarm signal triggered by external sen...

Page 26: ...ons for example SMTP port of G mail server should be 465 SMTP server indicates server address you use Sender email indicates sender s email address The email address should be consistent with the server you use That is to say when you use email address aaa gmail com the according server should be smtp gmail com Receiver address indicates receiver s email address The email address is used to receiv...

Page 27: ...nstallation procedures 4 2 12 1 Windows Mobile 1 First you need to copy a program named as Aseesetup CAB that is included on the CD provided by the DVR to the mobile phone 2 Click the program Aseesetup and choose an installation location after the initialization 3 Click Install button to start the installation processing 4 After finishing the installation click the icon named Asee to run the progr...

Page 28: ...copy a program named as Asee_AL_3rd 0723 sisx or SeeAL5th0723 sisx that is included on the CD provided by the DVR to the mobile phone shown as Picture 7 Generally the program is defaulted to save into mobile storage card Note See_AL_3rd _0723 sisx apply to S60 The 3rd edition operate system Mobile and See_AL_5th _0723 sisx to S60 The 5th edition operate system Mobile 2 Click the program Asee_AL_3r...

Page 29: ... icon will be displayed to mobile phone interface Function buttons in the bottom in turn are 1 CH 1 CH 2 CH3 CH 4 2 PTZ Direction left right up down 3 PTZ Lens control Focus Zoom and Iris from left to right in turn 4 Play Bar Play Pause Full screen Snapshot Setup Next CHs Group and Quit button from left to right in turn Note The snapshot images will be saved to the defaulted path File manager Imag...

Page 30: ...anager 11 Choose Application Loader from the Main Menu 12 Click Start Button on the Add Remove application menus 13 Click browse button and tick select Asee alx file 14 Click Finish button to end the installation process 7 Channel select 8 PTZ Direction left right up down 9 Area Selection ZOOM ZOOM 10 Focus focus focus Aperture I I 12 Function buttons from left to right in turn are Play Pause Snap...

Page 31: ...ion but not support touch screen mobile 5 Enter the Monitor DVR info in the below Setup Menu 1 Connect Disconnect 2 Full screen 3 snapshot 4 setup 5 help 6 Next CHs Group 7 PTZ Control Name allows you set device s title Address allows you enter device IP address Port allows you enter device port User ID allows you enter user name you set Password allows you enter password Network Type allows you s...

Page 32: ...o display 7 Click Full screen icon to enter into full screen display mode again click the Trackball button of mobile to quit the full screen mode 8 Click Next page button to find the PTZ Control icon and enter into the mode Now you could freely control your PTZ camera via mobile phon 6 1 Select I I Z Z or F F 6 2 Click the middle key of mouse 6 3 Loose the middle key to stop the PTZ operation 9 Fo...

Page 33: ...r Android Mobile such as Apkinstaller 13 Make sure your mobile have been connected to network and could download the software a Enter into Program option and highlight E market icon b Enter into the E market interface c Click Search icon on the upper right corner and input Apkinstaller to search the Apkinstaller program d Highlight and install the program you searched e Follow up the installation ...

Page 34: ...testing device infos l Help Instructions m History Record and auto record info 1 CHs Select 2 PTZ Direction 3 Zoom 4 Focus 5 Iris 6 Function buttons from left to right in turn are Play Pause Snapshot Setup Next CHs Group and Help Address Enter the IP address of the DVR Port Enter the Mobile Port No Of the DVR Device Name Enter DVR name User defined User ID Enter the User s Name Password Enter the ...

Page 35: ... moves into the motion detection area and the area where the object is located is displayed in red recording will be triggered In the semi transparent area the motion detection is off When Multiple DVRs are controlled by keyboard user needs to set communication protocol Baud rate set baud rate of serial protocol Data Bit Set data bit Stop Bit Set stop bit Check allow you set Check to none The Syst...

Page 36: ...put RotateTime Allow to set the Poll time Select a value in the following range 0 300 sec View Setup available only for Sch 1093 016 the option allows you setup display position of any channel in a multi screen grid When this function is enabled Rolling function is not available VGA Resolution Your options are 1024 768 1280 1024 1440 900 Video output includes the following options VGA it is possib...

Page 37: ...fter system Auto restarts Enter into Click Main Menu System Info to preview system info including Device Name Device ID Device Type Device SN Software firmware version and MAC address etc Privacy Zones up to 4 per channel can be enabled disabled by selecting ON OFF for each channel It is possible to select for each camera 4 privacy zones that can be moved enlarged or reduced according to requireme...

Page 38: ...t value after restart 3 Please return back to live screen and have no any operation after setting auto maintain time otherwise the auto maintenance function will be not effective Enter into Main menu System Maintain menu to reset the DVR parameters to factory default settings update system software firmware and set system auto maintenance Auto Maintain When opening auto maintain function you can s...

Page 39: ...12 CH13 16 If in the 16 split mode the display show as below Channel CH1 16 Considering a system safety feature you can click Menu Lock menu to lock menu when leaving the DVR If you want to login to the DVR you would input device code and password Common user only has the authority to search recordings but Administrator has full authority over Main Menu operations Any user can start and close manu...

Page 40: ...menu if you want to setup cruise function system default off and set up cruise channel cur point and total quantity and stop time etc This option allows to select a channel in full screen mode and zoom in on the image in LIVE mode By right clicking on the channel displayed in full screen mode it is possible to select the option DIGITAL ZOOM Now it is possible to select the area to be enlarged with...

Page 41: ...p Menu to enter into the Record option Now you can start manual record function or you also can click Rec button on the Front panel or Remote controller to activate manual record Please stop record manually once you activate manual record 4 11 STOP RECORD To stop record quickly please enter into pop up Menu to click Stop option 4 12 START AUTO SEQUENCE When entering into Start sequence menu auto s...

Page 42: ... e see the instructions below Sch 1093 004A and 1093 008 In order to switch Menu Control on Video Output press and hold REW Button on Front Panel and release it after audible warning is heard Sch 1093 016 In order to switch Menu Control on Video Output it is needed to select the following sequence button on Front Panel MENU ESC UP Button Enter Button NOTE Pay attention to press the buttons one tim...

Page 43: ...en the file 3 Select the playback file you desired from the file Note Please select the file with 264 format or nvr The record file backed up by U flash disk or removable disk is with 264 format and DVD Recorder with nvr format 4 Open backup file Double click the record event at the right side to start record file playback ...

Page 44: ... the record file at X2 X4 X8 and X16 speeds Forward button forward playing the record file at X2 X4 X8 and X16 speeds Frame by frame Play the record file frame by frame Snapshot click the button to capture the record image and save the image to a specified position Add click the button to add one record file Del click the button to delete one record file Del all click the button to delete all the ...

Page 45: ...tructions in order to play a stored video into PC or USB DVR Backup Click OPEN Button and select video file Click the PLAY Button Click WATERMARK Button in order to enable disable Watermark function displayed as for picture above It is possible to use the others Player functions i e Pause Stop F F Fast Forward Slow Slow Playback Next Frame Frame By Frame 1X Playback speed ...

Page 46: ...is correct ports are forwarded correctly and ActiveX is enabled Note Cause DVR sytem update If you want to delete old IE webcam at the computer which already login before input the command characters regsvr32 u HiDvrOcx ocx on Start Menu Run 4 18 URMET NETVIEWER LOG IN After finishing plug ins installation or Client Software Installation the Login Urmet Netviewer Screen is displayed Please enter p...

Page 47: ...mode 4 split mode 9 split mode and 16 split mode Left key Click the icon of one channel to display the channel s image Click the icon to start manual record save path is setup on local setting Live display Key function LIVE DISPLAY KEY FUNCTION 1 On Off Live display clicking the button will open or close Live display 2 Snapshot clicking the button will capture the live image from one selected chan...

Page 48: ...e firstly 4 Set allow you set a series of specific preset points of a PTZ camera Detailed settings please refer to section 5 5 PTZ control 5 Go to On the Live mode enter preset point No you want to display and click Go to button system will quickly go to the specific preset point 6 Load allow you load the last preset point you set 7 Save allow you save the preset point you set 8 Cruise allow you e...

Page 49: ...cified saving path It is only possible to download the file after that the playback is stopped Picture 6 4 You can set Save Path option on the Local Setting menu The Play control bar is located at the bottom of the interface include Play Pause Stop Slow Play Fast Play Next Frame and Volume adjust option The backup file will be defaulted to save as AVI format 4 19 1 3 Remote setting Click the Remot...

Page 50: ...l Parameters Default enter channel setting menu you can setting remotely and save on the DVR Click Copy Setting to option on the right bottom corner of the interface to copy all the remote setting to any channel showna bove ...

Page 51: ...o Record Setup option to set record control parameters including record enabling audio enabling Pack time Record mode and Frame Quanlity Resolution etc If Frame rate is adjustable you can setup Picture Quality and Frame rate for each chanel ...

Page 52: ... form which are the same method on DVR menu Alarm Parameters Click Alarm Parameters option to enter into the Alarm Config interface which include I O Status Video cover Video loss HDD loss HDD space Prerecord and Alarm time Also can setup Email alarm and Full screen enlarge when in Alarm ...

Page 53: ...DS1093 038 112 Network Parameters Click Network option to enter into Network setting menu including Basic character PPPoE DDNS and Email set ...

Page 54: ...DS1093 038 113 ...

Page 55: ...4 Device Parameters Click Device option to enter into the interface Now you can check Hard disk info PTZ Parameters Mobile info and Motion Click PTZ Parameters to setup PTZ control the setting are same with DVR menu ...

Page 56: ...DS1093 038 115 Mobile phone setup the same with DVR menu setup Click Motion Detection to setup each channel parameters including Sensitivity and Motion Area The sam with DVR menu setup ...

Page 57: ...DS1093 038 116 System management Extend System option to enter into sub menus System setting User Authority DST Daylight saving time and DVR information ...

Page 58: ...DS1093 038 117 Click User to setup Authority Log in name and password for different user DST setting ...

Page 59: ...option allows you set Record Save Path snapshot Save Path and File Save Path Note Record save path Save file of remote manual record from netwok File save path Save download recording file from DVR 4 19 3 LOG OUT Click Logout option to return back Log in Interface ...

Page 60: ... performing the connection to the PC activate IE protection configuration following the procedure below Double click the icon to open Internet Explorer browser The following display will appear or however the default page Double click the icon The screen Internet Properties will appear Select the area Trusted sites Click the item Sites ...

Page 61: ...device IP address in the field Add this website to the zone Click the button Add The following confirm screen will appear NOTE Do not select the item Require server https verification for all sites in this zone Click repeatedly OK to finish Install Active X ...

Page 62: ...UB STREAM Hard Disk Interface Max 1 Sata HDD Max 2 Sata HDD Hard Disk 500 GB default Memory for video backup USB pen drive removable HD USB CD DVD writer Network AVI files Playback modes PLAY SLOW FWD Frame by Frame Syncronous Playback 4 ch 8 ch 16 ch Watermark Yes Web Client Software Multi Language Yes I O alarm 4 CH alarm inputs 1 CH alarm output 8 CH alarm inputs 1 CH alarm output 16 CH alarm i...

Reviews: