background image

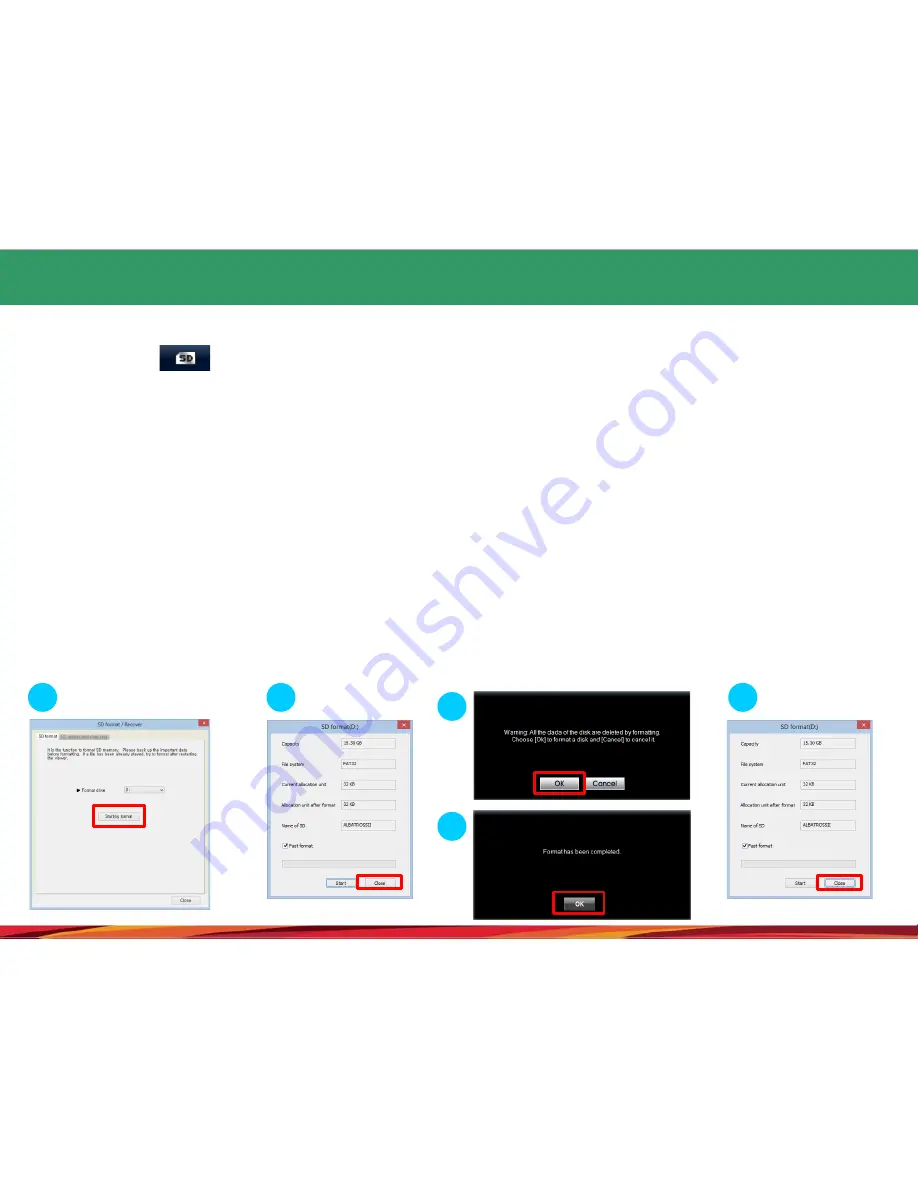
23. Format and restore the SD card (1)

1.

Take Micro SD card out of the black box and connect it computer.

2.

If you select              button in main screen of viewer, SD format tab where Micro SD card can be formatted will 

appear as shown in the picture of (1).

3.

Format Drive : Confirms the location of a drive Micro SD card is loaded.

4.

Information window asking for confirmation or cancellation of format will be poped up when format start button is 

pressed.

5.

If you press confirm button, SD format window will be seen. Information on the volume of Micro SD card, type of file 
system, current allocation unit and allocation unit after format will also be seen and the name of SD card will be 
automatically assigned as “ALBATROSS”. Format will be started upon pressing start button. “quick format” is also supported. 
It may take a long time for SD card to be formatted depending on the specification of PC in “ normal format”.

CAUTION

) Allocation after format: When a normal format is done on your PC, select 32KB.

6.

Window indicating the completion will be seen when format is completed. Press confirm button and close button to 

end the procedures for formatting Micro SD card

1

2

3

4

5

52

Summary of Contents for Albatross II MD-7500P

Page 1: ...Assurance Acquired the Q mark the first for a black box This system is for assisting people in driving safely Users should properly use the product for its original purposes considering that they will...

Page 2: ...ation 23 15 Albatross II information message 34 16 Albatross II information voice 39 17 Installation of the viewer 40 18 Main window of the viewer 41 19 Viewer buttons 42 20 Black box configuration 46...

Page 3: ...is unlawfully modified created and distributed without prior written consent of the manufacturer the offender shall be punished with imprisonment for a period not exceeding five years and liable on co...

Page 4: ...PC viewer program can be run with Window XP Vista Windows 7 The product and manual can be changed for further improvement without any notice to users All rights of the software and hardware related t...

Page 5: ...ents are recorded by the product Accidents caused by tiny impact can not recorded as the event video image when the motion sensor does not work Caution in Use of SD Memory Card Data should be checked...

Page 6: ...is directly connected to the car do not use the product for an extensive period of time It may discharge the battery Make sure that the double side adhesive tape is firmly affixed during installation...

Page 7: ...al back up function the latest file is saved on occurrence of power interruption Instant checking in front and a rear images and accident recording files real time images of the front and the rear are...

Page 8: ...tely through the 3 5 inch wide LCD screen with high resolution It is possible to check the front and rear videos immediately in real time through the 3 5 inch wide LCD screen with high resolution They...

Page 9: ...ding of images by auto deleting of old files and overwriting with new files in chronological order Check the recording data in the exceptional PC viewer When the users play the stored video images wit...

Page 10: ...er immediately Basic components Option This components can be changed based on the part supply without any notice The images for user s understanding can be different from the real one Main body holde...

Page 11: ...08 Part names and functions front camera 11 11...

Page 12: ...n micro USB port for connecting the rear camera LCD screen 3 5 inch LCD screen for playing back recorded videos or manipulating the device Embedded microphone For recording the audio while recording t...

Page 13: ...3 million pixel front camera lens Based on the pixels for still frames Connection port 5 pin micro USB port for connecting to the main body Security LED High luminance blue LED for indicating the ope...

Page 14: ...before an accident to 15 seconds after it will be recorded when a motion or a shock is detected by the front or and rear camera s When entering Recording is now in progress Monitoring activated The bl...

Page 15: ...MD7500P_Meminfo bin MD7500P_Rootfs bin to it 2 After turning the Albatross II off install the SD card to the main body 3 Turn on the Black box it shows firmware upgrade image as below and then upgrade...

Page 16: ...rogram information window And then formatting the memory card in the PC or Viewer But after formatting users cannot check the firmware version 3 Check the driver s location which is connected with mem...

Page 17: ...stall the Micro SD card to Albatross main body 5 Black box power on and then the Upgrade will be progressing showed firmware upgrade image on the display with two times buzzer sound And also the work...

Page 18: ...provided with the Product Check the components and read the instructions before installation Check if the SD Card is correctly inserted and then connect power The Product should be located in such aw...

Page 19: ...o will be displayed and the voice notification Recording is now in progress will be heard at the same time State check LED Continuous mode Green LED On Parking mode Green LED Off Before building in th...

Page 20: ...starts will be heard at the same time Connect the connection cable micro USB port to the rear camera Touching the Rear video icon on the main screen will bring up the rear video Clean the spot on the...

Page 21: ...con 2minutes later Driving Mode Rebooting Home button Previous button Booting SD installed No SD Booting success Front Rear Selection Touch After touch 1 min later Touch Screen save mode Home button T...

Page 22: ...13 Albatross II GUI structure 2 In case of memory usage 0 Swift driving mode System rebooting Parking monitoring Parking Mode Booting No SD SD installed 22...

Page 23: ...ate REC EVT While on the video screen when the PIP function is turned on from the screen setting section the front and rear videos can be checked at the same time through the PIP function Default is P...

Page 24: ...en touching the LCD screen will bring up the menu screen The menu screen will show eight icons for front video rear video image recording LCD off formatting video view system state and setting While o...

Page 25: ...ording event recording voice notification and GPS reception Except for the GPS icon other icons can be set and operated individually The screen saver can display the speed information normally only wh...

Page 26: ...g Moves to the menu screen Arranges and shows the files in descending or ascending order Arranges and shows the front video files or the rear video files Moves between pages of the list of files Video...

Page 27: ...checking Selecting and clicking a file from the list of files will play back the saved video Partial Zooming While a video is being played back if users push the hold button and touch the screen the Z...

Page 28: ...recorded files Firmware version Shows the current firmware version of the black box Kernel version Shows the current kernel version of the black box SD card usage Shows the SD card s total memory and...

Page 29: ...vel the parking mode motion detection sensitivity the cutoff function the parking mode SD storage space and the time Screen setting For correcting the coordinates and also for setting the PIP function...

Page 30: ...e shock level setting Low Medium High Parking mode shock level setting Low Medium High Parking mode motion detection sensitivity setting Low Medium High 14 Albatross II System setting 1 System setting...

Page 31: ...cking voltage setting 11 5V 11 7V 11 9V 12 1V 6Hours 12Hours 24Hours 48Hours Parking Mode SD Capacity 0 25 50 Time setting Year Month Day Hour Minute Second 14 Albatross II System setting 2 Previous b...

Page 32: ...display of speed and disabled Setting for enabling disabling the rear video shift function For setting for enabling and disabling the rear video shift function Caution When the rear video shift functi...

Page 33: ...14 Albatross II Voice setting Audio setting Icons Meaning Details Voice recording Voice recording or Mute Volume Speaker Volume setting Previous button Menu Home button 33...

Page 34: ...is being formatted It will disappear when formatting is completed This message will be displayed when the firmware upgrade file is damaged or recognized as a wrong file It is required to copy the upg...

Page 35: ...de This message will be displayed to notify that the LCD will be turned off before entering the parking mode and starting to record Message about shifting to continuous mode This message will be displ...

Page 36: ...rrors with the system Message about errors with sensors This message will be displayed when there are errors with the input from the sensor Notification on turning of the LCD This message will be disp...

Page 37: ...ge the parking mode memory assignment Message for confirming whether to format the memory card Message about failure in formatting Required to format the SD card directly using a computer Message abou...

Page 38: ...stop Message about problems in playing back files Message for notifying that there is no rear camera connected Message for that the video recording starts Message for that the video recording will st...

Page 39: ...the parking mode When changing from the continuous mode to the parking mode Impossible to enter the parking mode When the parking mode memory usage is 0 The SD card will get formatted When the SD card...

Page 40: ...d then click the following steps But Don t touch your mouse or keyboard when the computer pass the process No 5 component 1 2 3 4 5 6 Minimum PC spec for PC viewer Computer OS XP 32bit Vista 32bit Win...

Page 41: ...layed with GPS module option Picture quality H or L Mute M and GPS G are displayed at the bottom of the screen Minimization Exit full screen Rear Volume Brightness playback speed Zoom Viewer firmware...

Page 42: ...irmware are downloaded Please choose Unblock button during Windows safety worming pops up 2 Zoom button Users can use the Digital Zoom function with this buttons 3 Full Screen button It changes front...

Page 43: ...g a file at the list and restarting the pause video 10 Pause 11 Stop the play 12 Screen print Printing the whole screen of the viewer 13 Screen capture Saving the full screen at the viewer as a JPG fi...

Page 44: ...he SD Card This is enabled only when the SD card is connected to your PC 20 Display Hide Map This button is used to display the information on the driver s location on the map in playback mode This fu...

Page 45: ...e the locations of the front and rear videos on the PC viewer 25 For showing the acceleration and speed graphs Pushing the button will pop up the acceleration and speed graphs 26 For changing the arra...

Page 46: ...an be selected 5 Parking mode shock level setting For setting the level of shocks to record events when shocks occur while parked The user can select from high medium and low levels 6 Parking mode mot...

Page 47: ...c screen that screensaver is on the basic screen turns back to the previous video screen displaying video image of the front or rear view In the Screen saver status if there is touch signal during 2 m...

Page 48: ...ettings and standard time settings are available 2 Black Box Time Setup If the GPS option Module is not in use you can set time to the Black Box Upon time setup insert the SD Card onto the Black Box a...

Page 49: ...ing the memory card if needed to change the video quality 3 Audio recording The black box is designed to record the video and audio at the same time When the audio recording is disabled Mute only the...

Page 50: ...select all the videos or select them by group such as continuous file event file parking file parking event file or according to user s own selection Items Meaning Open files Individual files of vide...

Page 51: ...le the vehicle is parked 3 5 Parking Event Folder Folder to store the event detected by sensing an impact while the vehicle is parked 4 Select a specific file in the list of main screen and select but...

Page 52: ...at window will be seen Information on the volume of Micro SD card type of file system current allocation unit and allocation unit after format will also be seen and the name of SD card will be automat...

Page 53: ...D card 4 The pictures of 2 3 and 4 is showing the results of memory card inspection fixing the errors and error detection respectively 5 In case that the error as shown in the picture of 4 format info...

Page 54: ...u want to review the relevant driving route is shown in the map on the right Note Stoppage time is not included in trip time and parking time is not included in stoppage time in the map on the left 24...

Page 55: ...save the file as a bitmap To print the map screen To Show recording date and time During playback Move the selected item from the list of paths on the map in order to play To marking on the route path...

Page 56: ...tton clicked will return to the main screen window 3 Full screen button shows the videos as a full screen Switch the front screen 4 Standard screen front 1920x1080 rear 1280x720 1 Clicked button In fu...

Page 57: ...he left button of the mouse you can see the screen as desired 4 While the video is being played back in full screen it is also possible to apply the digital zooming to enlarge the video Zooming button...

Page 58: ...mpact Detection previous 5 seconds to 15 seconds total 20 seconds after the image is saved EXAMPLE of file creation 20130101_231545_A2 avi January 01 2013 23 15 45 at the beginning is made of two chan...

Page 59: ...g files and parking event files There might be some differences depending on the memory card characteristics CAUTION 1 The playback of a video file created in the Parking mode may be intermittently st...

Page 60: ...30 fps 1ch Max 30 fps Recording resolution Driving mode front 1920 x 1080 rear 1280 x 720 Parking mode front 1280 x 720 rear 1280 x 720 Video H 264 extension AVI Audio internal microphone PCM recordin...

Page 61: ...ed with new parts or with similar parts having the similar functions The manufacturer shall not be responsible for repair replacement or refund unless the defective Product is returned This warranty c...

Page 62: ...th occurrence If irreparable Product returned to shop for repair is lost Paid replacement Parts for repair are unavailable within a fixed part retention period Parts for repair are available but repai...

Page 63: ...Customer support center Contact 1599 0141 Address Urive customer support center 1st floor 39 12 8 gil Gangnamdae ro Seocho gu Seoul Korea 137 897 Previous address 1st floor 339 2 Yangjae dong It is r...

Page 64: ...ed to the Customer Center for repair are deemed that data therein had been backed up by the user and therefore the Center does not provide additional data backup services The manufacturer is not liabl...

Page 65: ...correctly Black GND RED B Yellow ACC Power Screen saver clock display do not work Select the Screen setting in the menu mode the screen saver settings Enable Disable can see Can not receives GPS Blac...

Reviews: