background image

Page 6

www.urethanesupply.com

f. 

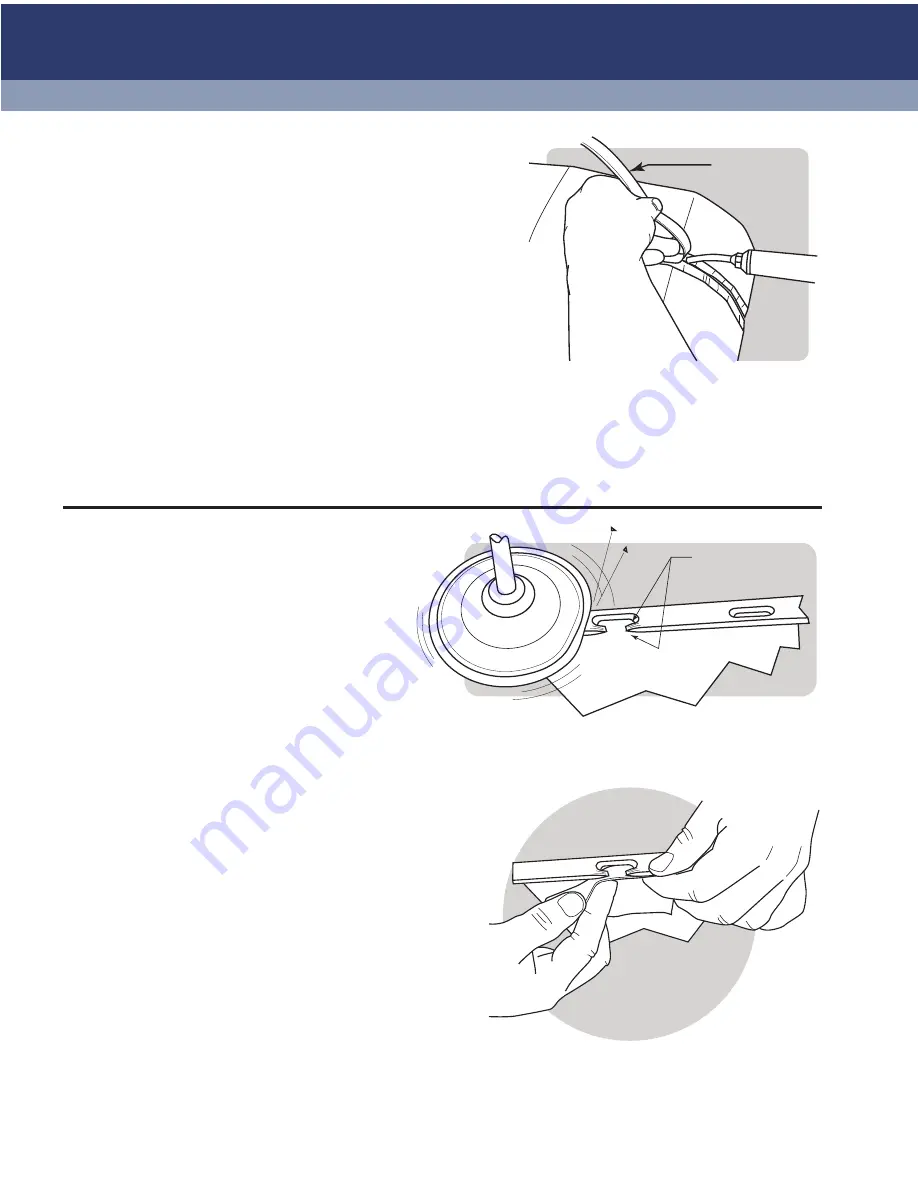
Weld the front side of the crack

. On the front, it’s usually best 

to use the narrow, thin R13 rod. This will tuck down into the 
v-groove and retain most of its strength even after it’s been 
sanded flush. Use the same process as on the backside to weld 
it. However, the R13 will melt and bend much more easily since 
it’s thinner. It’s best to focus the heat from the welder a little 
farther in front of the point where the rod meets the bumper to 
keep the rod from becoming too weak. You need to apply about 
a pound of downward pressure on the rod as you do your weld 
to make sure the rod fuses properly with the bumper. 

g. 

Finishing the weld

. Once the weld is completely cool, sand 

with 50-80 grit paper in a grinder or DA. Be careful not to sand 
too fast; this will just melt and smear the plastic. It’s best to use 
a sharp, new piece of paper and slow the sander down a bit to 
keep the plastic from melting. Sometimes the repair may be 
finished out and feathered with the welding rod, but most often 
you’re going to need some filler to fill in the low spots. Please 
see our “Book of Plastic Repair” for more information on how 
to apply filler on plastic parts. 

Welding a broken bumper slot

Because of the strength provided by the nitrogen weld-
ing system, you can make strong repairs even when you 
don’t have a lot of surface area to weld to. A perfect ex-
ample is the slots on the edge of the bumper where the 
bumper snaps into the quarter panel, like on a Honda 
bumper. These often seem to break out when the bump-
er is removed. There’s not enough surface area to make 
a good repair with either a two-part system or with the 
FiberFlex. Here’s how you fix a torn-out bumper slot.

a. 

Clean the plastic 

f

irst

. Do this every time 

BEFORE you touch it with sandpaper. Clean the 
plastic with soap and water first, then with 1000 
Super Clean plastic cleaner. 

b. 

Taper the edges with sandpaper

. Using 50 to 80 grit sand-

paper, remove paint from the area to be welded and taper 
the ends down to a point on both sides. This will give you 
enough surface area to stick to  when you finish the repair.

c. 

Apply tape to support rod during weld

. Use the 6481-1 or 

6485 aluminum body tape underneath the hole to support 
the melted plastic welding rod. You can also clamp a strip 
of sheet metal or wood along the edge if that works bet-
ter. Make sure the edge of the support is at the edge of the 
plastic so it doesn’t interfere with the clamp and leave room 
between the clamps to use the hand seamer as described in 
Step F.

Taper both
sides

R13
PP Ribbon

Step F - Welding the front side of the crack with R13 PP 
ribbon

Step B - Tapering the edges of the slot to be repaired with sandpaper. Taper 
both sides down so the rod has surface area to stick to once sanded.

Step C - Applying aluminum tape to support the melted welding 
rod. You can also clamp a wooden stick underneath to provide 
extra support.

Summary of Contents for 6053 EZ-Weld

Page 1: ...welding equipment and using it to make the fastest strongest and most cost effective repairs to plastic bumper covers and other parts Copyright 2010 Urethane Supply Company All Rights Reserved Every step of the way Urethane Supply Company has what you need to repair and refinish plastics YOU WILL SUCCEED ...

Page 2: ...steady flow of air coming from the welder s tip The heating element must AL WAYS have adequate air flow to prevent it from burning out Air flow should be set quite low you re more likely to distort or melt through plastic if the air flow is set high 3 Plug in the power cord Power is turned on and off by pressing the knob The knob is rotated to the desired temperature setting Within a few seconds y...

Page 3: ...w to nitrogen before you begin welding and back to air when you re finished with your weld This will minimize the use of your nitrogen gas and assure adequate gas flow to keep from burning out the heating element NOTE One important feature of the design on the 6053N2 Nitrogen Air Controller is that if the nitrogen bottle runs out of gas while the controller is set on nitrogen the air will back flo...

Page 4: ...mportant factors for plastic welding T A P S an acronym for Temperature Angle Pressure and Speed For temperature set the temperature on the hot air welder s dial to the proper setting For example the PP TPO setting will generate an air flow of about 550 600 F This can be adjusted up or down for various thicknesses of plastic but this is a good starting point An angle of 45 between the torch and th...

Page 5: ...he plastic pieces are lined up use Urethane Supply s 6481 1 or 6485 aluminium tape on the outer cosmetic surface It s best to line up the outer surface to minimize the need for filler and weld the backside of the crack first c Prep the backside of the crack If there s any paint over spray on the backside remove it first by sanding with 80 or 180 grit sand paper Also lightly sand the area the weldi...

Page 6: ...ace area to weld to A perfect ex ample is the slots on the edge of the bumper where the bumper snaps into the quarter panel like on a Honda bumper These often seem to break out when the bump er is removed There s not enough surface area to make a good repair with either a two part system or with the FiberFlex Here s how you fix a torn out bumper slot a Clean the plastic first Do this every time BE...

Page 7: ...e the underlying plastic h Weld opposite side Repeat the welding process on the opposite side Usually the tape or metal support is not needed but it can be helpful After welding mash the repaired area flat and straight again using the hand seamer i Restore slot dimensions and finish repair After letting the weld cool restore the final dimensions of the slot and bumper edge using a Dremel tool airl...

Page 8: ... technique as described earlier g Prep the outer surface by grinding a shallow v groove about 3 8 wide along the seam Feather back paint and put down some sand scratches with 80 grit in a DA Blow dust free h Weld the front side of the bumper with R13 rod Lay one strip down along the long seam then weld each end and wrap the weld ing rod around the edge If you have an airless welder you can melt an...

Reviews: