background image

11

Complete Control

MX-490

Owner’s Manual

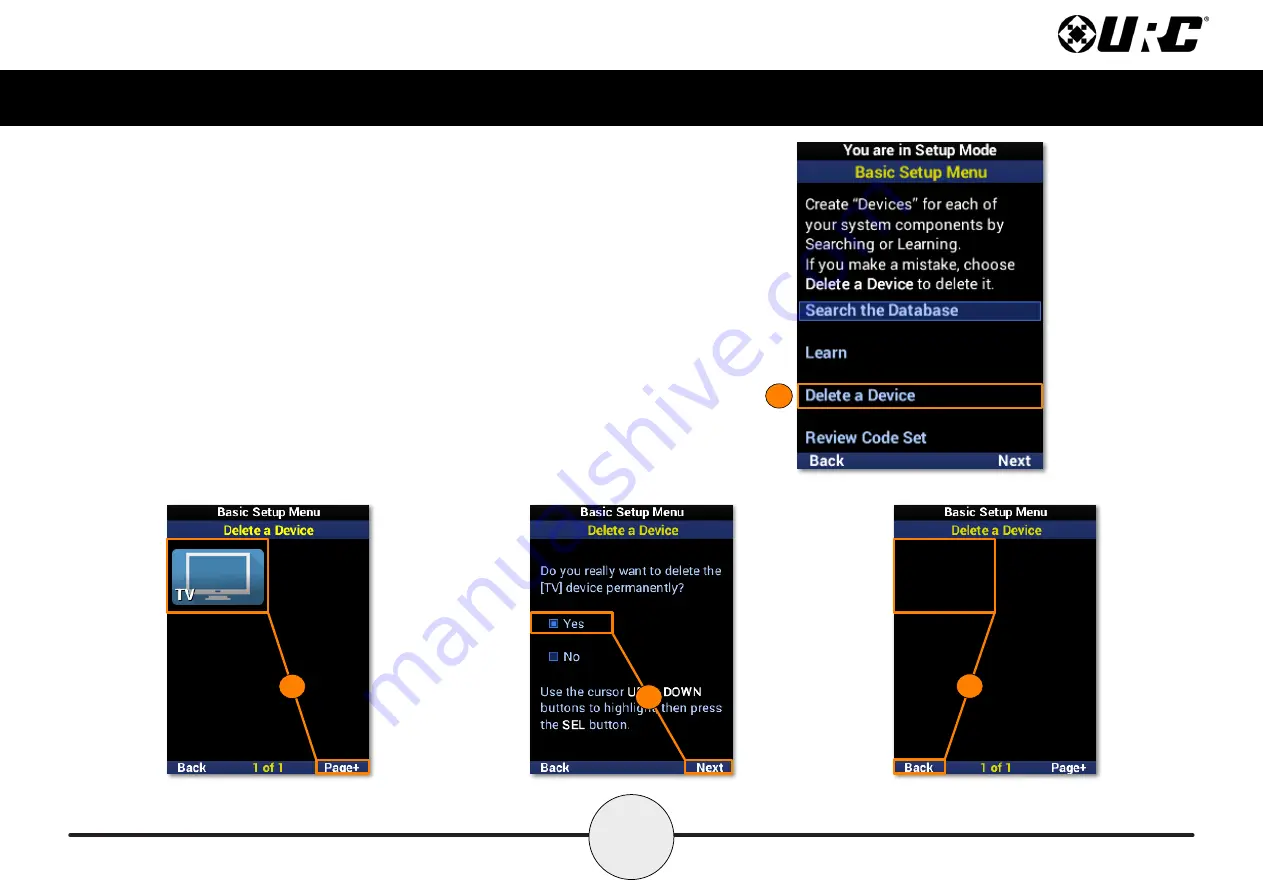
Delete a Device

To

remove

a device from the remote, perform the following:

1. Highlight

Delete a Device

and select

Next

.

2. Select the

device

to be deleted. Use

Page+

to move between pages.

3. Highlight

Yes

and select

Next

.

4. The device list is displayed to confirm the removal of the device. Repeat this

process for

each device

to be removed. Select

Back

to return to the menu.

1

2

3

4

Summary of Contents for MX-490

Page 1: ...MX 490 Owner s Manual Complete Control MX 490 Owner s Manual ...

Page 2: ...17 Macros 18 Setup a New Macro On the Main Menu 19 Setup a New Macro Inside a Device 20 Test Edit Existing Macro On the Main Menu 21 Test Edit Existing Macro Inside a Device22 Hide or Display Pages 23 On the Main Menu Hide or Display Pages 24 On the Main Menu Hide or Display Devices 25 Inside a Device Hide or Display Pages 26 Inside a Device Hide or Display Buttons 27 Edit Labels 28 On the Main Me...

Page 3: ...ommands macros which enable a single button press to turn the needed devices ON or OFF Ultra reliable narrow band RF compatible with URC 418 MHz RF Base Stations The MX 490 can communicate directly to RF base stations This gives the MX 490 the ability to control your system without being in direct line of sight Fast setup of complex systems via Complete Control PC editor To fully automate an audio...

Page 4: ...4 way cursor buttons enable you to navigate on screen guides and menus with ease The Volume and Mute buttons always control the sound regardless of what screen is displayed Press either of the Page buttons to see any other available choices The Title displays what the main page or device you can control The Transport buttons Play Stop Skip Skip Rec Fwd Rew and Pause operate when the selected devic...

Page 5: ...en you do the screen changes to the Tip screen Press the Main button to leave the Tip screen and reach the Setup Menu To exist the Setup Menu press the LCD button under Exit If Tips are disabled during initial setup holding the Main button for three 3 seconds will take the user directly to the Setup Menu If no button is pressed for thirty 30 seconds the MX 490 returns to the Main Menu ...

Page 6: ...tup The Basic Setup section allows for basic programming of the MX 490 This includes adding devices from the built in database learning IR from other remotes removing devices from the remote UI and the ability to review the code sets used by a device ...

Page 7: ...rch the Database and select Next 2 Select a location on the UI for the new device Use the Page option to add another six device locations to the menu 3 Select the type of device to be added and select Next A TV is used in this example 4 If desired use the left and right navigation buttons to select a new icon and select Next 1 3 4 2 ...

Page 8: ...the setup process manually turn on the device Highlight the brand of the device Point the MX 490 at the device and select Next 7 If the device turned off select Test to continue If the device is still on press the Down navigation button to select the next code set Repeat this step until the device turns off and then select Test 5 7 6 ...

Page 9: ...t works for the device For a TV test the Power Volume Channel and other buttons to test them Select Pass if the buttons are functioning properly 9 The device has now been added Highlight Yes to add another device or No to finish adding devices and select Next 8 9 ...

Page 10: ...arn The MX 490 is capable of learning IR commands from another remote The IR window on the MX 490 is narrower than most of URC s remotes Ensure the MX 490 and the other remote are on a level surface with the IR windows closely facing each other ...

Page 11: ...Page to move between pages 3 Once selected the banner will flash READY to indicate it is ready to learn IR commands Point the other remote directly at the MX 490 and press a button to learn the IR command 4 The banner will flash SAVED and return to the device menu A device with a learned IR command displays an L in a green box Repeat this process for each command to be learned Select Done to retur...

Page 12: ...to learn an IR command to Use Page to move between pages 4 Once selected the banner will flash READY to indicate it is ready to learn IR commands Point the other remote directly at the MX 490 and press a button to learn the IR command 5 The banner will flash SAVED and return to the function list A function button with a learned IR command displays an L in a green box Repeat this process for each c...

Page 13: ...llowing 1 Highlight Delete a Device and select Next 2 Select the device to be deleted Use Page to move between pages 3 Highlight Yes and select Next 4 The device list is displayed to confirm the removal of the device Repeat this process for each device to be removed Select Back to return to the menu 1 2 3 4 ...

Page 14: ...Code Set Easily check the code sets used by each device on the remote 1 Highlight Review Code Set and select Next 2 Each device displays the code set it is using Use the Page button to move between menu pages 3 Select Back to return to the menu 3 2 1 ...

Page 15: ...tup section allows for more specific customized programming of the MX 490 This includes copy and pasting commands creating and adding macros to devices hiding devices and pages on the UI editing device labels erasing macros and learned commands and RF control configuration ...

Page 16: ...stomization easier Volume Group Includes Vol Vol and Mute commands Channel Group Includes Ch Ch and Prev Ch commands Play Group Includes Play Pause Stop Rew Fwd Skip Skip and Rec commands Menu Group Includes Menu Info Guide Navigation Select and Exit commands Power On Only Includes only the Power On command Power Off Only Includes only the Power Off command The Volume Group is used for all example...

Page 17: ...supports pasting commands to a single device 1 Highlight To One Device and select Next 2 Select a device from the list Use Page to move between device pages 3 Select the device again to confirm The banner flashes SAVING and returns to the Paste menu when complete 2 3 1 ...

Page 18: ...l Devices This option supports pasting commands to all devices 1 Highlight To All Devices and select Next 2 Select a device from the list to paste the commands to all devices The banner flashes SAVING and returns to the Paste menu when complete 1 2 ...

Page 19: ...u and Favorite Channels 1 Highlight To the Main Fav and select Next A Select a device from the list to paste the commands to the main menu and favorite channels The banner flashes SAVING and returns to the Paste menu when complete B Select Page to access the option to erase pasted commands from the Main Menu A B ...

Page 20: ... Owner s Manual Macros The MX 490 macro feature allows for multiple functions and or button presses to be assigned to a single button A Setup a New Macro Creates a new macro B Test Edit Existing Macro Edit an existing macro B A ...

Page 21: ...ext 2 Select a device to begin recording a macro to it Use Page to move between menu pages 3 Once selected a Rec label appears in the top right corner and a Step counter at the bottom middle of the screen Enter the macro by pressing the associated buttons 4 Select Done to finish recording and save the new macro 1 4 3 2 ...

Page 22: ...on to add a macro to it Use Page to move between device pages 4 Once selected a Rec label appears in the top right corner and a Step counter at the bottom middle of the screen Enter the macro by pressing the associated buttons 5 Select Done to finish recording and save the new macro 6 The device button displays an M to show a macro is assigned to it Select Back to return to the menu 1 2 3 4 5 6 ...

Page 23: ... a device to view the macros assigned to it Use Page to move between menu pages 3 Highlight a macro from the list A Test Use this option to test commands and ensure they function correctly B Edit Menu Provides several edit options including moving a macro adding to it and including delays 4 Select Save to confirm any changes 1 2 B 4 A 3 ...

Page 24: ...e to move between menu pages 3 Select a function button Use Page to move between device pages 4 Highlight a macro from the list A Test Use this option to test commands and ensure they function correctly B Edit Menu Provides several edit options including moving a macro adding to it and including delays 5 Select Save to confirm any changes 1 2 3 B 5 A 4 ...

Page 25: ...o customize what is seen by the user or hidden from view There are two areas available for customization A On the Main Menu Select this option to show or hide pages and devices located on the Main Menu B Inside a Device Select this option to show or hide pages and functions located within a device A B ...

Page 26: ...ible to or hidden from the user 1 Highlight Hide or Display Pages and select Next 2 Select a page to hide and select Yes to confirm Use Page to move between device pages 3 The page is now hidden Confirm by selecting Hide or Display Pages again A HIDDEN label will appear on all devices of the hidden page Select Main to exit 1 3 2 ...

Page 27: ...ion allows for Main Menu devices to be visible to or hidden from the user 1 Highlight Hide or Display Devices and select Next 2 Select each device to be hidden Use Page to move between device pages 3 A HIDDEN label will appear on all devices to be hidden from view Select Yes to confirm 1 2 3 ...

Page 28: ...hidden from the user 1 Highlight Hide or Display Pages and select Next 2 Select a device Use Page to move between device pages 3 Select which page s to hide from view by selecting a device Use Page to move between device pages 4 A HIDDEN label will appear on the buttons of pages that are hidden from view Select Yes to confirm 1 2 3 4 ...

Page 29: ... be visible or hidden from the user 1 Highlight Hide or Display Buttons and select Next 2 Select a device Use Page to move between device pages 3 Select which button s to hide from view Use Page to move between device pages 4 A HIDDEN label will appear on any buttons that are hidden from view Select Yes to confirm 1 2 3 4 ...

Page 30: ...ns allow for custom labels to be added to devices the function buttons within and the Main Menu A On the Main Menu Customize device labels on the Main Menu B Inside a Device Customize button labels within a device C Edit Main Label Customize the Main Menu label C B A ...

Page 31: ...nd select Next 2 Select a device from the list Use Page to move between menu pages 3 Select the device type 4 Select an icon for the device 5 Enter a label using the number pad and select Next to confirm the new label 6 The device reflects the label change Select Done to confirm 1 2 3 4 5 ...

Page 32: ... Next 2 Select a device from the list Use Page to move between menu pages 3 Select a button to edit the label Use Page to move between device pages 4 Enter a label using the number pad and select Next to confirm the new label 5 The button reflects the label change Select Done to confirm 1 3 4 2 5 ...

Page 33: ...31 Complete Control MX 490 Owner s Manual Edit Main Label 1 Highlight Edit Main Label and select Next 2 Enter a label for the Main Menu using the number pad and select Next to confirm the new label 2 1 ...

Page 34: ...asing Mistakes happen The MX 490 offers a convenient erase feature to quickly remove macros and learned commands A Macros Offers options for the removal of macros only B Learned Commands Offers options for the removal of learned commands only A B ...

Page 35: ...om a single function button 1 Highlight One Button and select Next 2 Highlight an option based on the macro location and select Next A On the Main Menu Removes a macro from a device on the main menu B Inside a Device Removes a macro from a function button within a device 1 A B 2 ...

Page 36: ...34 Complete Control MX 490 Owner s Manual Macros One Button On the Main Menu 1 Select a device Use Page to move between menu pages 2 The macro has been removed from the device 1 2 ...

Page 37: ... Owner s Manual Macros One Button Inside a Device 1 Select a device Use Page to move between menu pages 2 Select a function button Use Page to move between device pages 3 The macro has been removed from the function button 1 2 3 ...

Page 38: ... Removes all macros from a single device 1 Highlight All on 1 Device and select Next 2 Select a device to remove all the macros from Use Page to move between menu pages 3 Select Yes to confirm the removal of all macros assigned to the device and its functions 1 2 3 ...

Page 39: ...omplete Control MX 490 Owner s Manual Macros All Everywhere Removes all macros from the remote 1 Highlight All Everywhere and select Next 2 Select Yes to confirm the removal of all macros on the remote 1 2 ...

Page 40: ...ro from a single function button 1 Highlight One Button and select Next 2 Highlight an option based on the macro location and select Next A On the Main Menu Removes a macro from a device on the main menu B Inside a Device Removes a macro from a function button within a device 1 A B 2 ...

Page 41: ...39 Complete Control MX 490 Owner s Manual Learned Commands One Button On the Main Menu 1 Select a device Use Page to move between menu pages 2 The learned command has been removed from the device 1 2 ...

Page 42: ...anual Learned Commands One Button Inside a Device 1 Select a device Use Page to move between menu pages 2 Select a function button Use Page to move between device pages 3 The learned command has been removed from the function button 1 2 3 ...

Page 43: ...ll learned commands from a single device 1 Highlight All on 1 Device and select Next 2 Select a device to remove all the learned commands from Use Page to move between menu pages 3 Select Yes to confirm the removal of all learned commands assigned to the device and its functions 1 2 3 ...

Page 44: ... MX 490 Owner s Manual Learned Commands All Everywhere Removes all learned commands from the remote 1 Highlight All Everywhere and select Next 2 Select Yes to confirm the removal of all learned commands on the remote 1 2 ...

Page 45: ...nding both IR and RF commands RF control requires additional devices to receive commands from the remote A All Devices Set Same Select this option to configure the entire remote for a single RF ID B Each Device Differs Select this option to configure each device for IR and RF B A ...

Page 46: ...Devices Set Same and select Next 2 Highlight IR or RF Signal and select Next A IR Signal is Use the LCD button to enable or disable IR B RF Signal is Use the LCD button to enable or disable RF 3 Select Save to confirm any changes 4 Highlight ID Address and select Next 1 A B 3 2 4 ...

Page 47: ... RF ID is Use the LCD buttons to set the RF ID number 5 Select Save to confirm any changes 6 Highlight Emitter Routing and select Next A Emitter is Use the LCD buttons to set the emitter line number 7 Select Save to confirm any changes A 7 5 6 A ...

Page 48: ...46 Complete Control MX 490 Owner s Manual 8 Highlight Blaster On Off and select Next A Blaster is Use the LCD button to enable or disable the IR Blaster 9 Select Save to confirm any changes 8 A 9 ...

Page 49: ...lect Next 2 Select a device from the list to configure Use Page to move between device pages 3 Highlight IR or RF Signal and select Next A IR Signal is Use the LCD button to enable or disable IR B RF Signal is Use the LCD button to enable or disable RF 4 Select Save to confirm any changes 1 3 2 A B 4 ...

Page 50: ... Highlight ID Address and select Next A RF ID is Use the LCD buttons to set the RF ID number 6 Select Save to confirm any changes 7 Highlight Emitter Routing and select Next A Emitter is Use the LCD buttons to set the emitter line number 5 6 7 A ...

Page 51: ...l MX 490 Owner s Manual 8 Select Save to confirm any changes 9 Highlight Blaster On Off and select Next A Blaster is Use the LCD button to enable or disable the IR Blaster 10 Select Save to confirm any changes A 8 9 A 10 ...

Page 52: ...ete Control MX 490 Owner s Manual Favorite Channels Favorite channels provide a quick and easy means of reaching a viewer s preferred content The favorites may be customized with unique labels logos and macros ...

Page 53: ...select Next 2 Select a location on the UI for the new favorite channel Use the Page option to add another six locations to the menu When editing select the favorite channel from the UI 3 Browse the collection of channel logos using the navigation buttons and Page Animal Planet is used in this example 4 Select Label to add a custom label to the button 1 4 2 3 ...

Page 54: ...er a label for the favorite channel Select Next when finished LABEL is used in this example 6 Select Device 7 Select a device from the list to add the favorite channel to it Use Page to move between device pages Animal Planet is being added to a TV in this example 6 5 7 ...

Page 55: ...53 Complete Control MX 490 Owner s Manual 8 Select Channel 9 Using the number pad enter the channel numbers and select Next 10 Select Save to finish creating the favorite channel 10 8 9 ...

Page 56: ...te Favs MX 490 favorite channels may be removed by specifically choosing individual channels or removing all of them at once A One Fav Channel Removes specified favorite channels B All Fav Channels Removes all favorite channels from the remote A B ...

Page 57: ...490 Owner s Manual One Fav Channel 1 Highlight One Fav Channel and select Next 2 Select each favorite channel to be removed Once selected a channel appears slightly faded 3 Select Delete to remove the selected favorites 3 2 1 ...

Page 58: ...56 Complete Control MX 490 Owner s Manual All Fav Channels 1 Highlight All Fav Channels and select Next 2 Select Yes to confirm the removal of all favorite channels 2 1 ...

Page 59: ... s Manual User Settings This section of the Setup Menu allows for the customization of screen and button lighting provides system information on memory usage and firmware and allows for the remote to be restored to factory conditions ...

Page 60: ...58 Complete Control MX 490 Owner s Manual Color Screen Allows for simple customization of the MX 490 LCD screen ...

Page 61: ... s Manual Brightness Shows the current brightness level of the MX 490 screen 1 Select this option to customize the brightness level of the screen 2 Move the brightness slider with the LCD buttons Select Save to confirm any changes 1 2 ...

Page 62: ...ming Shows the screen timeout in seconds indicating how long the MX 490 waits before automatically turning off the screen 1 Select this option to customize the screen timeout 2 Move the timeout slider with the LCD buttons Select Save to confirm any changes 1 2 ...

Page 63: ...61 Complete Control MX 490 Owner s Manual Button Lighting Allows for simple customization of the MX 490 hard buttons ...

Page 64: ...c On Shows the current status of button automatic lighting 1 Select this option to change the automatic lighting setting 2 Use the left and right navigation buttons to select Yes or No which enables or disables the button automatic lighting feature 1 2 ...

Page 65: ...ows the button timeout in seconds indicating how long the MX 490 waits before automatically turning off the button backlighting 1 Select this option to customize the button timeout 2 Move the timeout slider with the LCD buttons Select Save to confirm any changes 1 2 ...

Page 66: ...64 Complete Control MX 490 Owner s Manual System Battery Info Provides current information on the power level and used memory of the MX 490 ...

Page 67: ...ower Remaining Shows the percentage set for low power warnings 1 Select this option to customize the low power warning and view the current battery percentage 2 Move the warning slider with the LCD buttons Select Save to confirm any changes 1 2 ...

Page 68: ... Control MX 490 Owner s Manual System Info Shows the current percentage of used memory 1 Select this option to view further details on the remote including the firmware version 2 Select OK to exit System Info 1 2 ...

Page 69: ... MX 490 to the factory default All of your programming will be lost To erase your MX 490 program perform the following 1 Highlight Factory Reset and select Next 2 Select Next to confirm the reset 3 Select Yes to once again confirm the reset 4 Please wait as the remote is reset to factory settings The process automatically returns to the Main screen 2 3 4 1 ...

Page 70: ...etup Menu and during the configuration process These tips may be disabled but URC recommends first time programmers take advantage of the extra help during setup 1 Select an option ON Programming tips are displayed during the configuration process OFF Programming tips are no longer displayed 2 Select Save 1 2 ...

Page 71: ...al device pursuant to part 15 of the FCC Rules These limits are designed to provide reasonable protection against harmful interference in a residential installation This equipment generates uses and can radiate radio frequency energy and if not installed and used in accordance with the instructions may cause harmful interference to radio communications However there is no guarantee that interferen...

Page 72: ...g The manufacturer is not responsible for any Radio or TV interference caused by unauthorized modifications to this equipment Changes or modifications not expressly approved by the manufacturer could void the user s authority to operate the equipment ...

Reviews: