background image


7


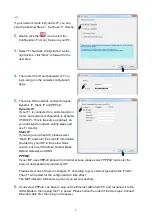
If your network mode is Dynamic IP, you can 
skip the following Step 2 ~ 6 and use T1 directly.
 

2. 

Double click the 

 icon to start the 

Configuration Tool net_Setup on your PC. 


3. 

Select 

T1 Network Configuration

 as the 

right picture, click 

Next

 to forward to the 

next step. 


4. 

Then enter the ID and password of T1 to 
login and go to the network configuration 
page. 


5. 

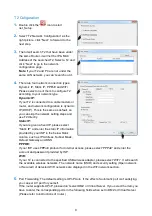
There are three network connection types: 
Dynamic IP, Static IP and PPPoE. 

Dynamic IP: 

If your T1 is connected to a cable modem or 
router, and network configuration is dynamic 
IP (DHCP). This is the same as default, so 
you can skip the network setting steps and 
use T1 directly.


Static IP: 

If you are given a fixed IP, please select 

Static IP

 and enter the static IP information 

provided by your ISP in the below blank 
column, such as IP Address, Subnet Mask, 
Default Gateway and DNS. 

PPPOE: 

If your ISP uses PPPoE protocol for Internet access, please select 

PPPoE

 and enter the 

account and password provided by ISP. 
 
Please select one of them to configure T1 according to your network type and click 

Finish

Then T1 will restart for the configuration to take effect. 
The NET indicator will become green if you set successfully. 


6. 

If you select PPPoE, you have to plug out the Ethernet cable from PC and reconnect it to the 
ADSL Modem, then replug the T1

s power. Please notice the order of the two steps: Connect 

Ethernet cable first, then plug on the power. 

Summary of Contents for netTV3 System

Page 1: ...netTV3 System User Guide Includes hardware installation management tools and software configuration for netTV3 System...

Page 2: ...ntents INTRODUCTION 3 INSTALLATION 4 Connection 4 Configuration 6 MANAGEMENT 11 File 12 Account 14 T1 17 T2 19 About 21 TEST TOOL 22 CLIENT PLAYER 24 Windows App 24 Mac App 30 Mobile App 33 IPTV STB 3...

Page 3: ...oes no work and all the work is done by main When main can t provide service backup will enable and provide the same service to take the place of main temporarily until main restores its functionality...

Page 4: ...cator on the front panel is red it means LAN functionality is enabled When it is green either WAN or WAN LAN functionality is enabled Connect Power Source Remember to place the step at last Connect th...

Page 5: ...net cable When the NET indicator on the front panel is red it means LAN functionality is enabled When it is green either WAN or WAN LAN functionality is enabled Connect Power Source Remember to place...

Page 6: ...ual server ports first Enter the router s Virtual Servers page and click the Add New button to add the service ports 3512 80 3514 3515 for T1 as following Type the T1 IP Address in the IP Address fiel...

Page 7: ...ting steps and use T1 directly Static IP If you are given a fixed IP please select Static IP and enter the static IP information provided by your ISP in the below blank column such as IP Address Subne...

Page 8: ...y Static IP If you are given a fixed IP please select Static IP and enter the static IP information provided by your ISP in the below blank column such as IP Address Subnet Mask Default Gateway and DN...

Page 9: ...please check if the input account and password are correct Then check if the modem and telephone circuit are available 3 If the connection type is WiFi you should confirm that the wireless signal str...

Page 10: ...on ports that T2 needs and then you must set the router to configure these connection ports If you don t know how to set you can enable the remote assistance service and let the professional personnel...

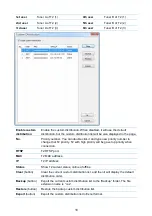
Page 11: ...to start T1_Manager the main menu after login is as following File Account T1 T2 Edit CH Table Show All Accounts Modify T1 Password Show All T2Boxes Backup Edit Account Reboot T1 Search the Specified...

Page 12: ...ou can only edit the right mapping relation When a channel is set as 0 it means that channel will not appeared on TV video Backup This item is used to backup account formation or CH table for restorin...

Page 13: ...en the current account and CH Table setting will be repeated by the backup files so please use the function with caution Export Using this item you can export the account and CH Table files to Excel f...

Page 14: ...lso click this item to logout when in login status Exit Exit T1_Manager Account Show All Accounts This item will list the information all account such as ID password Activity CH Table and Expiry Remot...

Page 15: ...tch the corresponding channels of that CH Table Test account Set the account as test account Then the account will only be available in the specified test days after user first login Reset If the test...

Page 16: ...t Enter the account ID and then click OK button to search it in all accounts list Specify an Account to Quit If you want to disconnect a specified account you can use this item Then it will pop up a d...

Page 17: ...this port when the current T1 is Backup T1 Custom Distribution Using this item can set the distribution priority for each T2 under the current T1 When remote users send connection request T1 will dist...

Page 18: ...t and type new priority number to change that T2 priority T2 with high priority will be gave top priority when connection RTSP T2 RTSP port MAC T2 MAC address IP T2 IP address Status Show T2 current s...

Page 19: ...RTSP port MAC T2 MAC address IP T2 IP address Tuner This column is used to discriminate the two Tuners of T2 1 means Tuner A and 2 means Tuner B You can also discriminate them by the last character o...

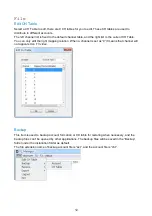
Page 20: ...h T2 by the account ID which is connected T2 currently So it will only search in the T2 with busy status Search by Port Search T2 by RTSP port It will list all the T2 with the specified RTSP port Sear...

Page 21: ...se of netTV3 System according the usage ratio When the max used Tuners number is equal to Tuner total number it means that all Tuners have ever been used Please note if they are not enough Please clic...

Page 22: ...2Box s network and video signal to reach acceptance level for administrator When testing T1_Tester will connect all T2 under the specified T1 and record the specified three channels of their Tuners ea...

Page 23: ...when test the application will skip it and test next one And it will return to record it after all other Tuners have been recorded It will wait until the user quits so we suggest you test T2 when ther...

Page 24: ...o build up connection You can get them in the account list of management tool T1_Manager Before login you can click in the main panel to hide or show the login panel And after login you can also click...

Page 25: ...isplay area 4 Playback and Time Shift control slide bar 5 10min On Off Time Shift switch Playback Pause Open the Playlist Recorded files list Instant recording Pause Function setting key 6 Video resol...

Page 26: ...u could move your mouse cursor and right click to open the pop up menus The commands on this menu are the same with those on the control panel but you could find some more options Items Operations Cap...

Page 27: ...down M Mute or restore sound Volume up O Pop up the property setting page Volume down P Capture image 100 R Pop up the remote control panel Brightness up down T Always on top 0 9 Jump to the monitorin...

Page 28: ...this item it will auto full screen when start the application VIDEO SETTINGS Resolution There are three resolutions for you to choose and the vertical resolutions have a little difference under diffe...

Page 29: ...to skip advertisements So if you need leave the player when watching program you can enable the Time Shifting function and it will begin to record the programs automatically then you can watch the pr...

Page 30: ...dyndns tv then run net TV 2012 pkg 2 This is the first screen you will see Click the Continue button to begin the installation and then follow the on screen instructions 3 Select the disk where you wa...

Page 31: ...application Enter the ID and Password in the login panel and click the login button to build up connection It will remember the ID and password when you login successfully Interface Instructions The m...

Page 32: ...33 CH34 Last channel Channel down as CH34 CH33 Channel return click it to return to last channel You can switch channel with the up down key of your computer s keyboard Quality Click the button it wil...

Page 33: ...ms such as Android iOS and Windows Phone based devices Installation 1 Start Play Store or App Store or Marketplace in the application list Play Store App Store Marketplace 2 Enter the keywords net TV...

Page 34: ...cted ID until it appears the button then press it to delete the ID iOS Set the application before login as right Video Quality The video quality has four items ECO CIF H D1 and D1 user can select acco...

Page 35: ...l buttons of the mobile phone Clicking on the video area can hide or display the remote control panel As following when the remote control panel is hidden you can adjust the screen volume and brightne...

Page 36: ...eo Quality The video quality has four items ECO CIF H D1 and D1 user can select according to the displayed bit rate the default is CIF The application will remember the quality status and use the same...

Page 37: ...internet with it When watching TV you can set IPTV STB on screen directly with the supplied remote control and the convenient operation let you operate it easily even if you don t know how to operate...

Page 38: ......

Reviews: