


9
QUICK START
FIGURE 9
FIGURE 10
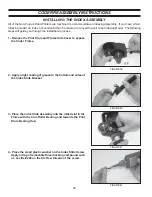
4 - Remove the Core Assembly from the Ink Roller Axle.
5 - Separate the two halves of the Core Assembly.
Remove the Instruction Sheet from the Core.
FIGURE 11
FIGURE 12
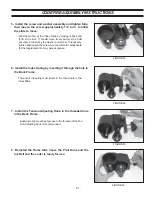
6 - Place the Pre-Inked Ink Roll on its side and push the
Core into the center hole .
7 - Using the Core Hub, push the Ink Roll fully onto the
Core.
The ink roll you install on the coder must be Pre-Inked. If
your ink roll is not saturated with ink refer to page 15 for
inking instructions.
Summary of Contents for HPNP-100
Page 25: ...25 ...


