background image

Page 5

OPERATION, TESTING & MAINTENANCE

OPERATION:

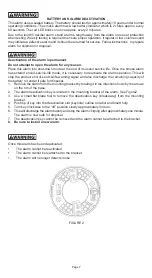
 The smoke alarm is operating once the battery power is connected by removing the 

pull-tab. When products of combustion are sensed, the alarm sounds a loud alarm which continues 

until the air is cleared.

This alarm incorporates the NFPA recognized horn signal for evacuation. During alarm mode, the 

horn produces three beeps followed by a two second pause and then continually repeats.

READY/ACTIVE CONDITION:

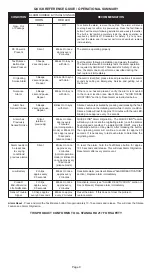
 The red LED blinks on once approx. every 2 minutes to indicate 

the alarm is properly functioning.

ALARM CONDITION:

 The alarm emits a loud, pulsating alarm sound and the red LED blinks on 

in sync with horn.

NUISANCE ALARMS:


The smoke alarm is designed to minimize nuisance alarms. Smoking will 

not normally set off the alarm unless smoke is blown directly into the smoke alarm. Combustion 

particles from cooking may set off the alarm if the smoke alarm is located close to the kitchen cooking 

surface. Large quantities of combustion particles are generated from spills or broiling.

If the smoke alarm does sound, check for fires first. If a fire is discovered, get out and call the fire 

department. If no fire is present, check to see if one of the reasons listed above may have caused 

the alarm. Use the Silence Feature if it is a nuisance alarm, or reset the alarm by pressing and 

holding the Test/Silence button for 10-15 seconds. Refer to RESET below.

NOTE:

 It is best to "reset" the alarms before initial test is performed. See below for Reset 

procedures.

TESTING:

 Test by pressing the Test/Silence button on the smoke alarm cover until the alarm 

sounds, then release. The alarm sounds if all electronic circuitry, horn and battery are working. If 

no alarm sounds, the alarm may have a power supply failure. 

Test the smoke alarm weekly to 

assure proper operation. IMPORTANT: 

Under normal conditions, the test button should sound 

the alarm immediately after it is pressed. There are special conditions that, when you press the 

Test/Silence button, you will experience a delay of approx. 10-15 seconds before the alarm sounds. 

This delay occurs if the Test/Silence button is pressed during a self-diagnostic period. This may 

occur after initial power up. Retest after 10-15 seconds.

ALARM ORIGINATION: 

The QUICK FIND

®

 feature will allow you to immediately locate the 

originating alarm (once the alarm has stopped sounding). To initiate QUICK FIND

®

, press the 

Test/Silence button on each alarm. After releasing the button, the originating alarm will continue to 

sound for 60 seconds. It is necessary to test each alarm to determine the originating alarm.

RESET:


To reset the QUICK FIND

®

 Alarm Origination condition, press and hold the Test/

Silence button on any alarm for at least 10-15 seconds and then release. This will clear 

alarm origination indicator. Reset after each alarm activation.

END-OF-SERVICE LIFE NOTIFICATION:

 A majority of home fire deaths are a result of no smoke 

alarms or no 

working

 smoke alarms. In addition to the "replace by date" stamped on the back of 

your alarm, your alarm contains a unique audible end-of-service life notification feature. When it 

is time to replace your alarm, which is after approximately 10 years of operation from initial power 

up, the alarm will sound 2 chirps approx. every 60 seconds and the red LED will blink on once 

approx. every 2 minutes. The alarm should be replaced immediately.

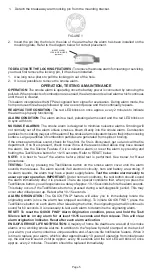
2.  Insert the pin into the hole in the side of the alarm after the alarm has been installed on the 

mounting plate. Refer to the diagram below for correct placement.

1.  Detach the breakaway alarm locking pin from the mounting bracket.

TO DEACTIVATE THE LOCKING FEATURES:

 To remove the smoke alarm for cleaning or servicing, 

you must first remove the locking pin, if it has been installed.
1.  Use long nose pliers to pull the locking pin out of the hole.

2.  It is now possible to remove the smoke alarm.

INSERT ALARM 

LOCKING PIN HERE

(optional)

FIGURE 1

Summary of Contents for MP316S

Page 1: ...y 8 Warranty Back Cover READ ALL INSTRUCTIONS THANK YOU for purchasing this smoke and fire alarm This tamper proof alarm does not require battery changes It has a permanent power sealed battery which will last for approximately 10 years This manual includes important information regarding where to install the alarm how to operate maintenance testing and product features It also includes tips and i...

Page 2: ...their lives and properties l SMOKE ALARMS CANNOT DETECT FIRES IF THE SMOKE DOES NOT REACH THEM Smoke from fires may not reach the sensing chamber and set off the alarm One alarm should be installed inside each bedroom or sleeping area Do not obstruct airflow around the smoke alarm or place in areas of obstructed airflow l BEAWARE OF VARIOUS SITUATIONSAGAINST WHICH THE SMOKEALARM MAY NOT BE EFFECTI...

Page 3: ... or smoke detectors mounted on a sloped ceiling having a rise greater than 1 ft in 8 ft 1 m in 8 m horizontally shall be located within 36 in 914 mm of the high side of the ceiling but not closer than 4 in 102 mm from the adjoining wall surface Tray Shaped Ceilings Smoke Alarms or smoke detectors shall be installed on the highest portion of the ceiling or on the sloped portion of the ceiling withi...

Page 4: ... If the battery is dead the alarm cannot operate The sealed battery cannot be replaced Failure to properly install and activate this alarm will prevent proper operation of this alarm and will prevent its response to fire hazards Test the alarm following installation and weekly thereafter The built in test switch accurately tests the alarm operation as required by ANSI UL217 Standards for Safety If...

Page 5: ...t button should sound the alarm immediately after it is pressed There are special conditions that when you press the Test Silence button you will experience a delay of approx 10 15 seconds before the alarm sounds This delay occurs if the Test Silence button is pressed during a self diagnostic period This may occur after initial power up Retest after 10 15 seconds ALARM ORIGINATION The QUICK FIND f...

Page 6: ...g properly Clean this alarm at least once a month to remove dust dirt insects and debris Using a soft brush or wand attachment to a vacuum cleaner vacuum all sides and cover of smoke alarm Be sure all the vents are free of debris DO NOT use spray cleaning chemicals or insect sprays directly on or near the alarm DO NOT paint the alarm Doing so may permanently damage the alarm and interfere with ala...

Page 7: ...ly approximately 3 4 turn 6 This will discharge the alarm battery and stop the alarm chirping after approximately one minute The alarm is now safe for disposal 7 The deactivation key cannot be removed and the alarm cannot be attached to the bracket 8 Be sure to install a new alarm Once this alarm has been deactivated The alarm cannot be reactivated The alarm cannot be reattached to the bracket The...

Page 8: ...veryone is there o Call the fire department from your neighbor s home not from yours o Don t return to your home until fire officials say that it is all right to do so NATIONAL FIRE PROTECTION ASSOCIATION REQUIRED INFORMATION For your information the National Fire Alarm Code NFPA 72 reads as follows 11 5 1 Required Detection Where required by applicable laws codes or standards for a specific type ...

Page 9: ...nditions previous alarms Low Battery 2 chirps approx every 60 seconds Deactivate alarm see User s Manual ALARM DEACTIVATION section Replace alarm immediately Blinks On once approx every 2 minutes Silent 3 Beeps 2 second pause Repeat Blinks On in sync with Horn If hazard is identified please take all precautions if an alarm sounds by calling an Emergency Service and getting out of the home 3 Beeps ...

Page 10: ...t at 800 390 4321 extension 238 to obtain the current postage and handling fees USI does not warrant and specifically disclaims any warranty whether express or implied of fitness for a particular purpose other than the warranty contained herein No implied warranty on this product created by state law shall extend beyond the term of this warranty unless such law otherwise provides USI specifically ...

Reviews: