background image

VOLUME

BUTTON

29

30

Macr

oPower

Setup 

CUSTOMIZING

CUSTOMIZING

SimpleSound Setup & 

Other ‘Punc

h Thr

oughs’

Advanced Macro Options:

SETTING UP A POWER OFF MACRO:

Simply follow the same steps as outlined above, except

press the OFF button in place of the ON button.

SETTING A COMPONENT BUTTON AS MACRO:

If you wish to set one of the Component buttons as a

macro, in STEP 3, press the Page Up button twice. The top

of the display will change to MAIN, and you can navigate to

MAIN page 1 or page 2. Press the Component button you

want to set as a Macro button. The top of the screen will

display the button label you selected. Select the

Component and Page that has a button you want in your

Macro using the MAIN, Component and Page buttons.

Simply press the button(s) with the command(s) you want

in your Macro. Then complete and save the Macro by

following STEPs 12 and 13 as outlined above.

PROGRAMMING A “PRESS & HOLD” MACRO:

Another option for Component button macros is to only

send the macro if the button is pressed and held. This is

setup by entering a delay as the first step of the macro.

The amount of delay determines how long the user must

press the button before the macro is sent. The advantage

of this option is that a normal press of the COMPONENT

button will simply switch Components without sending the

macro command.

SimpleSound™ Setup & Other ‘Punch Throughs’

SimpleSound™ is a dynamic feature that gives you total

volume control over all the Components in your system,

even those without their own built-in volume control, such

as TiVo, DVD and VCR... saving you the hassle and

inconvenience of constantly needing to switch between

Component modes on the remote. With SimpleSound™,

you can set the RF20’s volume control buttons to always

control the sound in your system, even when you’re in VCR

or DVD mode, without switching back to AUDIO or TV.

Even more exciting, SimpleSound™ is what is called a

‘Punch Through’ feature and is not limited strictly to volume

control. Click and enjoy!

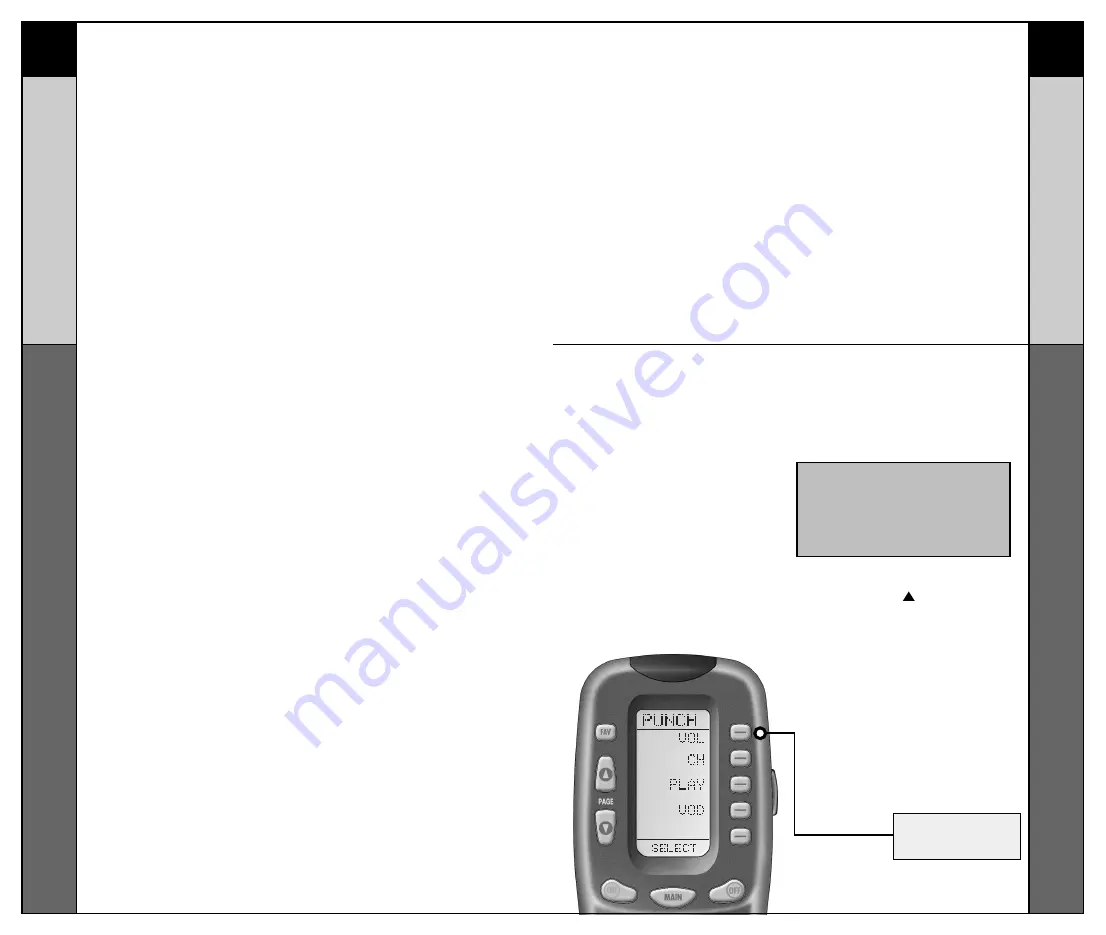
STEP 1:

In a basic home entertainment

system, the sound may come

from your TV. In a more

advanced system, the sound

may come from your audio

Component such as a Surround

Sound Receiver or Home

Theatre system. So, first, you

need to identify which

Component you want to use in

your system for sound.

STEP 2:

Press and hold the MAIN and

ENT (Enter) buttons at the same

time for approximately 3

seconds, until the word “SETUP”

is displayed at the top of the LCD

screen. This signals that you are

now in setup mode.

STEP 3:

Press the PAGE ( ) UP button to

display Page 2 of the Setup

Menu on the LCD screen. Press

the PUNCH display button.

STEP 4:

Then press the VOL (Volume)

display button. The screen will

display “VOL” at the top. This

sets up the group of three

buttons (Volume Up, Volume

Down and Mute) in one action!

IMPORTANT:You now have 30 seconds to
perform the next step while you are in
SETUP mode. If you don’t press a button
within 30 seconds, SETUP will disappear
from the screen, signaling that you have
exited setup mode and you will need to
start over.

Summary of Contents for MRF100B POWERPACK

Page 1: ...g changing the way a remote control works MRF100B PowerBlaster OWNER S MANUAL No More Pointing changing the way a remote control works 500 Mamaroneck Avenue Harrison NY 10528 Phone 1 914 835 4484 FAX...

Page 2: ...es by guiding you through an easy step by step process This Owner s Manual is designed as a companion refer ence source to the DVD Setup Guide should you need to refer back to a particular section or...

Page 3: ...and sends them out to components in the same cabinet space via the built in front blaster 3 Self adhesive flashers included in the PowerBlaster kit affix to the front panels of your components The fla...

Page 4: ...aster receives an RF signal from an RF series remote control The Mounting Plate guides enable PowerBlaster s matching guide to slide and snap into place for mounting on the wall Front blaster sends In...

Page 5: ...ll of your components powered ON as they will be when you operate the system SETP 2 Connect the Power Supply Connect the 9V power supply to an active UNSWITCHED AC outlet PowerBlaster must always be p...

Page 6: ...ly occurs a half inch or so away from the IR sensor Once you have found the spot that gives the most reliable operation peel off the protective backing of the self adhesive tape on the included flashe...

Page 7: ......

Page 8: ...he extensive code library pre programmed into the remote And the RF20 s impressive lineup of special advanced features can automate and customize the operation of your system in many ways So get ready...

Page 9: ...ain menu FUNCTION BUTTONS FAVORITE CHANNEL PAGE NUMBERS TITLE PAGE BUTTONS changes the page of buttons displayed Getting Started Overview This is what MASTERCONTROL RF20 is all about The RF20 is desig...

Page 10: ...perate another Component simply press the MAIN button again to return to Page 1 of the Light Button The fully backlit keypad makes the RF20 easy to use in the dark or dim lighting conditions Simply pr...

Page 11: ...o program let s say your TV to start Look up your TV s manufacturer setup code from your reference list STEP 3 Press and hold the MAIN and ENT Enter buttons at the same time for approximately 3 second...

Page 12: ...g up AUX to operate a second DVD Player you would first need to press AUX in Step 5 and then DVD in Step 6 STEP 5 Press the Component display button you want to program For example If you want to setu...

Page 13: ...ogram in this example TV and punch in the 3 digit code that you wrote down for that specific Component Use the Number buttons 0 9 on the remote to punch in the code If the 3 digit code number that you...

Page 14: ...o times signaling that the code number has been successfully saved STEP 10 Exit SETUP mode by pressing the MAIN button two times When the LCD screen displays MAIN you are back in normal operating mode...

Page 15: ...screen The top of the screen will change to LEARN and display the five Components from Page 1 of the MAIN menu STEP 4 Select the Component you want to teach commands to by pressing that Component disp...

Page 16: ...sunlight halogen or quartz lighting can interfere with the learning process Even though the old remote seems to be working fine put in fresh alkaline batteries Gradually vary the distance between the...

Page 17: ...eatures described in this section Customizing the LCD Screen You can easily edit or change the name of any of the display buttons including Favorite Channels on the LCD screen by following these steps...

Page 18: ...press of the same number button selects the next character of that number s group as shown in the diagram below STEP 7 Once the character you want appears move to the next space by pressing the Right...

Page 19: ...button The top of the display will show FAV The bottom of the display will flash SELECT STEP 3 Use the PAGE buttons until you locate the name i e ABC CBS NBC of the favorite channel you want to setup...

Page 20: ...creen STEP 6 Now press the MAIN button to return to the Main Component listing STEP 3 will display at the bottom of the screen STEP 2 Press the MACRO display button on the LCD screen The top of the sc...

Page 21: ...rn on in this exam ple CABLE and CABLE will display at the top of the screen STEP 7 will display at the bot tom of the screen STEP 11 Then press the ON button to confirm the command STEP 8 will displa...

Page 22: ...tal volume control over all the Components in your system even those without their own built in volume control such as TiVo DVD and VCR saving you the hassle and inconvenience of constantly needing to...

Page 23: ...s The bottom of the dis play will flash SAVED STEP 6 Repeat STEPS 4 5 until all your Components operate the volume perfectly STEP 7 Press the MAIN button twice to return to normal operating mode and t...

Page 24: ...ect a page the top of the screen indicates whether you want to ADD or HIDE the page displayed When you want to change a page s visibility i e either ADD or HIDE simply press the LIGHT button STEP 6 Yo...

Page 25: ...e LCD screen The display will change to the Recall screens The screen automati cally switches between four screens alternately flashing Page 1 components and code numbers then Page 2 compo nents and c...

Page 26: ...o buttons in a single Component NOTE This option is not available for FAVs KEY Erases one button only STEP 1 Press and hold the MAIN and ENT Enter buttons at the same time for approximately 3 sec onds...

Page 27: ...ter 10 seconds the RESET screen appears Press the ALL button The RF20 will display a SURE button Press the SURE button to erase all of your settings and return to the factory default setup Re setting...

Page 28: ...F20 it sends both a standard IR Infrared Command AND an RF Radio Fre quency signal If you install the PowerBlasterTM kit it will automatically receive RF20 s radio signals and translate them into the...

Page 29: ...includes TV VCR combo units Within each category the code numbers are listed in rows by brand Sony Panasonic B K etc Some brands have more than one three digit code for you to try Just circle the cor...

Page 30: ...9 KMC 143 KTV 043 197 143 154 LG 113 116 102 004 106 112 119 127 143 243 284 363 365 LODGENET 072 LOEWE 164 LOGIK 072 LUXMAN 004 LXI 166 007 015 052 081 160 164 MAGNAVOX 164 059 197 003 060 061 004 06...

Page 31: ...AMERICAST 099 ARCHER 005 007 014 ARMSTONG 074 AT T BROADBAND 074 ATLANTIC BROADBAND 043 074 BELL SOUTH 099 BLUE RIDGE 043 074 BRESNAN 074 BRIGHT HOUSE 043 110 BUCKEYE COMM 074 CABLEVISION 043 074 108...

Page 32: ...CLASSE 167 COBY 258 DENON 007 080 173 FUNAI 143 GATEWAT 175 GE 026 027 GO VIDEO 137 218 220 221 222 HARMAN KARDON 084 140 HITACHI 101 ILO 268 INTEGRA 142 180 JVC 012 KENWOOD 151 KISS 179 279 KLH 135 K...

Page 33: ...nctions for VCR 067 POLAROID 234 SAMSUNG 137 159 SANSUI 154 SONY 145 191 TOSHIBA 141 ZENITH 091 VCR Functions for VCR171 DVD DVD Recorder GATEWAY 175 GO VIDEO 220 221 222 ILO 268 KISS 279 LITEON 265 P...

Page 34: ...ONICA 053 054 ORION 025 PANASONIC 066 070 145 083 133 140 157 163 074 167 PENTAX 013 020 031 063 PHILCO 031 034 067 PHILIPS 031 067 034 101 054 071 156 PILOT 101 PIONEER 021 013 048 PORTLAND 108 PULSA...

Page 35: ...14 266 279 291 KENWOOD 026 066 145 146 181 190 197 192 182 199 151 222 180 005 280 374 550 KINERGETICS 220 140 KLH 331 KOSS 216 573 KRELL 150 072 376 384 KYOCERA 007 LEXICON 120 235 236 237 357 358 35...

Page 36: ...OM 148 DIRECTV 173 ECHOSTAR DISH 122 167 168 EXPRESSVU 122 GENERAL ELECTRIC 151 106 150 GENERAL INSTRUMENT 148 GOI 122 HITACHI 139 140 HTS 122 HUGHES 161 162 068 154 165 166 108 117 JVC 122 LG 170 MAG...

Page 37: ...212 247 MCS 014 073 092 MEMOREX 010 MISSION 044 107 MITSUBISHI 179 MITSUMI 153 MODULAIRE 182 MONDIAL 147 MYRYAD 244 155 NAD 006 005 067 178 NAKAMICHI 217 218 219 095 NEC 014 062 NIKKO 046 NSM 044 107...

Page 38: ...62 HAUPPAUGE 294 295 HP 261 262 HUNTERDOUGLAS 219 JERROLD 153 JVC 185 KENWOOD 185 KENSINGTON 406 KEYSPAN 297 LITE TOUCH 208 257 LUTRON 158 159 077 MAKITA 186 201 MICROSOFT XBOX 408 107 MINDPATH 205 NI...

Page 39: ...088 SANSUI 027 113 119 224 SHARP 026 057 131 175 181 SHERWOOD 038 004 028 030 033 034 SONY 020 022 052 084 089 TEAC 009 059 212 TECHNICS 007 010 076 088 109 122 193 TOSHIBA 112 VICTOR 106 YAMAHA 021...

Page 40: ...d still remember your settings Who can I call for more answers The Universal Remote Control Technical Support and Customer Service staff are ready to answer any questions you might have Call us at 1 9...

Page 41: ...500 Mamaroneck Avenue Harrison NY 10528 Phone 1 914 835 4484 FAX 1 914 835 4532 www universalremote com OCE 0046B_rev01 simply MORE powerful RF20...

Reviews: