background image

- 20 -

Connecting the Device to Your Computer

1.  After ActiveSync has been installed, 

connect the PA692 to your PC as 
described in Connecting the terminal to 

a host (PC/Notebook).

2.  Turn the PA692 on.
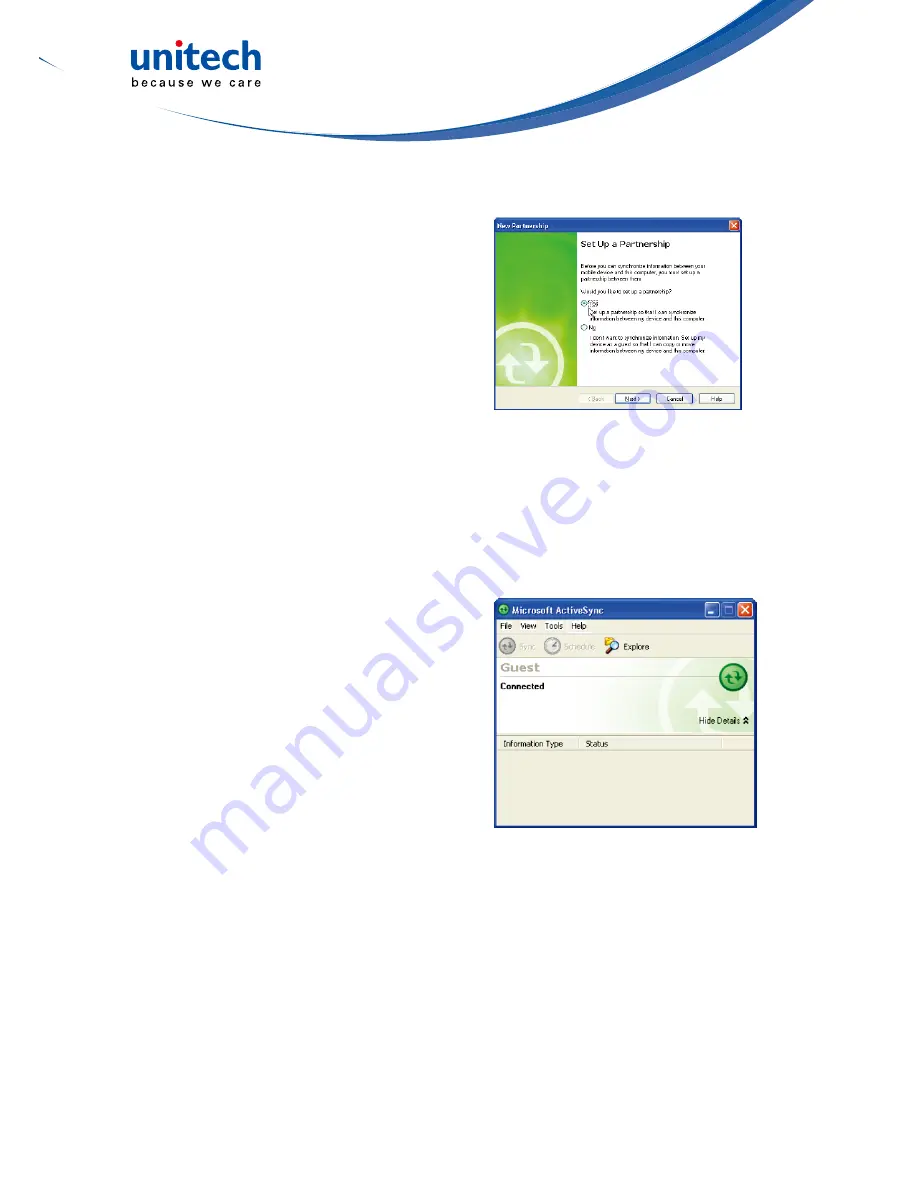
3.  ActiveSync starts automatically and 

configures the USB port to work with 

the PA692. The New Partnership setup 
wizard automatically starts.   

NOTE: 

If ActiveSync doesn’t start automatically, click Start → Programs → 

Microsoft ActiveSync.

NOTE: 

If a message appears indicating that it is unable to detect a connection, 

click the Cancel button and manually configure the communication 

settings.

4.  Follow the on-screen instructions.

5.  When the configuration process is 

complete, the Active-Sync window 
appears.  

6.  Synchronization will be initialized and will take place if you’ve chosen to 

synchronize periodically or upon connection.

NOTE: 

Your computer can create a partnership with multiple PA692s. Also, a 
PA692 can create a partnership with up to two computers.

Summary of Contents for PA692

Page 1: ...Rugged Handheld Computer PA692 User s Manual 400979G_Version 1 0 2014 Unitech Electronics Co Ltd All rights reserved Unitech is a registered trademark of Unitech Electronics Co Ltd...

Page 2: ......

Page 3: ...hange without notice 2014 Unitech Electronics Co Ltd All rights reserved Unitech global website address http www ute com Bluetooth is a registered trademark of Bluetooth SIG Microsoft Windows and Acti...

Page 4: ...e separation between the equipment and receiver Connect the equipment into an outlet on a circuit different from that to which the receiver is connected Consult the dealer or an experienced radio TV t...

Page 5: ...a minimum of 1 5 cm from the body Use of other accessories may not ensure compliance with FCC RF exposure guidelines Canadian Compliance Statement This Class B Digital apparatus meets all requirement...

Page 6: ...is designed so that there is no human access to harmful laser light during normal operation user maintenance or prescribed service operations The laser safety warning label required by the DHHS IEC fo...

Page 7: ...al performance it is advised that rechargeable batteries be replaced every year or when 500 charge discharge cycles are achieved It is normal that the battery balloons or expands beyond one year or th...

Page 8: ...uld damage the batteries and shorten their charging life cycle CAUTION Do not charge batteries at a temperature lower than 0 C This will increase the internal resistance to cause heat and make the bat...

Page 9: ...mited warranty Lithium Ion battery 6 month limited warranty Warranty becomes void if equipment is modified improperly installed or used damaged by accident or neglect or if any parts are improperly in...

Page 10: ...HS Statement iii TaiwanNCC Warning Statement iv Laser Information iv Battery Notices v Battery charge notice vi Storage and safety notice vi Warranty vii Chapter 1 Getting Started 1 Introducing the PA...

Page 11: ...16 Inserting the SIM card 16 Using the Barcode Laser Scanner 17 Chapter 3 Getting Connected 19 Establishing Device PC Connection 19 Installing Microsoft ActiveSync 19 Connecting the Device to Your Co...

Page 12: ...are Reset 33 Performing a Warm Boot 33 Performing a Cold Boot 34 Performing a Clean Boot 35 Chapter 6 RFID Manager for UHF model 37 Appendix I System Specification 41 Appendix II Disinfecting and Clea...

Page 13: ...o empower your mobile workforce in today s aggressive business environment As productivity and efficiency define the benchmark for success the PA692 provides field based workers with a host of data co...

Page 14: ...ooth Headset Camera Built in 5M AF camera with 2 flash LEDs Audio MIC Speaker Receiver Headphone Expansion slot MicroSD memory card slot supporting up to 32GB Wireless connectivity WLAN 802 11a b g n...

Page 15: ...3 PA692 Product Introduction Accessory Kit PA692 Terminal Manual CD Stylus Battery Elastic Stylus String Hand Strap Power Adaptor Plugs...

Page 16: ...unit and then select OFF The unit will not mute nor will it vibrate when you scan PA692 Front and Right View 1 2 3A 3B 4 5 6 7 8 9 10 11 12 1 LED indicators 7 Power button 2 LCD touch screen 8 Univer...

Page 17: ...2 1 2 3 4 5 6 7 8 9 10 1 Barcode scanner window 7 Speaker 2 Earphone jack 8 5M AF camera 3 Microphone 9 LED flash light 4 Battery compartment 10 Battery compartment tab 5 Antenna 11 Scanner trigger bu...

Page 18: ...12 1 2 3 4 5 6 7 8 9 10 1 Barcode scanner window 7 Speaker 2 Earphone jack 8 5M AF camera 3 Microphone 9 LED flash light 4 Battery compartment 10 Battery compartment tab 5 Antenna 11 Scanner trigger...

Page 19: ...NOT attempt to open or service the battery pack Dispose of used batteries according to local recycling guidelines in your area A backup battery cell is embedded into your device to prevent data loss...

Page 20: ...are aligned with the contacts in the compartment 4 Use your thumb to snap the battery in place 5 Replace the battery compartment cover by pushing down on the tabs and sliding them back into place as s...

Page 21: ...backup battery has been adequately charged CAUTION Operating the terminal for the first time without the AC adapter and without fully charging the backup battery may result in loss of data stored in R...

Page 22: ...lid Green Fully charged Checking the Battery Status If the battery level becomes low in the course of normal use a status icon appears on the device screen indicating low or very low battery status In...

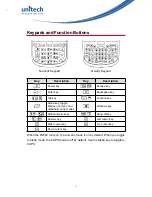
Page 23: ...Function key Alpha key toggle between numeric and alphabetic entry modes Windows key Alphanumeric keys Hang off key Answer key Left cursor key Right cursor key Up cursor key Down cursor key When the...

Page 24: ...tkey 2 Softkey 1 END TALK TALK Scanner setting Task manager execution Device information Power management For Numeric Keypad Key Description Key Description Calibration Screen backlight toggling Keypa...

Page 25: ...keys Key Alpha Off Alpha On CAPS Off CAPS On 0 Space 0 Space 0 1 1 1 2 a b c 2 A B C 2 3 d e f 3 D E F 3 4 g h i 4 G H I 4 5 j k l 5 J K L 5 6 m n o 6 M N O 6 7 p q r 7 P Q R 7 8 t u v 8 T U V 8 9 w x...

Page 26: ...14...

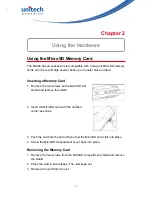
Page 27: ...two screws on the MicroSD slot shield and remove the shield 2 Insert the MicroSD card with the notched corner as shown 3 Push the card into the slot until you feel the MicroSD card click into place 4...

Page 28: ...attery compartment cover and the main battery 2 Slide the cover of the SIM card slot to the right to release the latch 3 Pull open the cover with thumb 4 Insert the SIM card into the cover with the no...

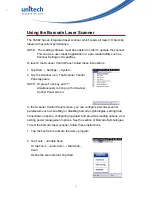
Page 29: ...icon The Scanner Control Panel appears NOTE Or press Func key and 7 simultaneously to bring up the Scanner Control Panel screen In the Scanner Control Panel screen you can configure barcode scanner pa...

Page 30: ...e scanner trigger buttons on the device If you enable Auto Scan you don t have to press any button Aim the laser scanner at the selected barcode while the laser emits light at regular intervals The sc...

Page 31: ...t the device to your computer NOTE If you have a previous version of the Microsoft ActiveSync installed in your computer uninstall it first before installing the latest version of Microsoft ActiveSync...

Page 32: ...omatically click Start Programs Microsoft ActiveSync NOTE If a message appears indicating that it is unable to detect a connection click the Cancel button and manually configure the communication sett...

Page 33: ...k settings Before following these instructions make sure if authentication information is needed Using the Summit Utilities You can use the Summit Client Utility tool to setup or change the WiFi setti...

Page 34: ...22 3 Tap Profile to scan available APs Scan Available AP 1 Under Profile tab tap Scan for available AP 2 You may select a desired AP to create a new profile Tap Configure...

Page 35: ...23 3 Tap Yes to create the new profile 4 Enter the WEP key or network key Tap OK Commit and Activate 1 Tap Commit to activate the setting...

Page 36: ...e you want to activate from the drop down menu of the Active Profile 3 Under the Status tab you can see the IP address signal strength and quality 4 Tap OK to exit the Summit Client Utility 5 If you w...

Page 37: ...your device This data is needed to accelerate GPS positioning u CenterMobile allows you to download ephemeris data from a specified Web server or satellite you may use the Internet connection on your...

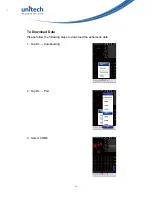
Page 38: ...26 To Download Data Please follow the following steps to download the ephemeris data 1 Tap Rx Autobauding 2 Tap Rx Port 3 Select COM4...

Page 39: ...27 4 The tool starts to download the ephemeris data current satellite position and timing information 5 When the download is finished you will see the data shown in the upper right corner...

Page 40: ...28...

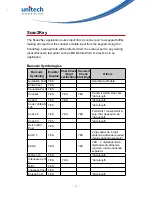
Page 41: ...Scanner Setting When it is necessary for the user to change the default barcode symbology for a different application the Scanner Control Panel provides the ability to change default symbology place d...

Page 42: ...t Others Australian Post YES Send bar width data British Post YES Canadian Post YES Codabar YES YES YES Transmit start stop char data length Code 11 YES YES data length Code 128 EAN 128 YES data lengt...

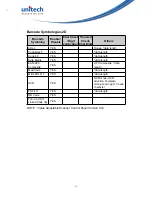
Page 43: ...Addenda required Include addenda separator Send number system UPC E YES YES 2 digit addenda 5 digit addenda Addenda required Include addenda separator Send number system Expanded UPC E UPC E1 YES YES...

Page 44: ...ES data length Code 49 YES data length Data Matrix YES data length EAN UCC Composite YES UPC composite data length MaxiCode YES data length MicroPDF417 YES data length OCR YES OCR mode OCR direction T...

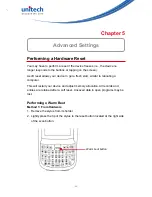
Page 45: ...start similar to rebooting a computer This will restart your device and adjust memory allocation All records and entries are retained after a soft reset Unsaved data in open programs may be lost Perf...

Page 46: ...rams you have added and will restore the device to the default factory settings Never perform a cold boot unless a warm boot does not correct your problem When you perform your next ActiveSync operati...

Page 47: ...retained Formats preferences and other settings are restored to their default factory settings Performing a Clean Boot Performing clean boot will set the terminal to the factory default settings To pe...

Page 48: ...36...

Page 49: ...RFID Tags Read RFID Tags 4 About Show the version about the reader and library 5 Exit Exit application RFID Manager for UHF model Configure Application 1 Display Format Wedge display format setup 2 R...

Page 50: ...ading sound enable disable 2 Read Alert Wav File Get tag s sound 3 Start Scan Wav File Start reading s sound 4 End Scan Wav File End reading s sound 5 Scan Duration in Seconds Wedge reading duration 6...

Page 51: ...e mask of tag 7 Select tags not matching mask Match or not match setting For example If there are two tags with the EPC code 1234 0000 0000 0000 0000 0000 and 5678 0000 0000 0000 0000 0000 Prefix Suff...

Page 52: ...setting like below Tag Selection On EPC Selection Address 1 Selection Mask 12 Select Tags not matching mask Unchecked Then it will only show the tag 1234 0000 0000 0000 0000 0000 If Select Tags not m...

Page 53: ...ive TFT LCD with touch screen backlight Barcode Scanner 1D Laser scan engine Optional 2D Imager Optional RFID Reader Optional Frequency 13 56MHz Tag Support ISO15693 ISO14443A ISO14443B and NFC Camera...

Page 54: ...temperature 0 C 40 C Storage temperature 20 C 60 C Relative humidity 5 95 non condensing Drop test to concrete 1 5 Meter Environmental sealing IP65 Models BT WIFI Camera BT WIFI Camera GPS 3 5G Regula...

Page 55: ...the monthly maintenance routine that will help keep your devices up and running Approved Cleaning Agents The cleaning agent you select must contain active ingredients from the following list lsopropyl...

Page 56: ...shed to remove contaminant residue Special notes on hand sanitizers utilized in the work environment Some hand sanitizers commonly used in the healthcare environment may contain the harmful ingredient...

Page 57: ...ood working order with a regular comprehensive cleaning routine to remove the natural build up of dirt that occurs with everyday use on connectors and the scanner exit window as well as the main surfa...

Page 58: ...ctor area by pointing the tube nozzle about 1 2 inch away from t the surface Caution When using compressed air always wear eye protection do riot point nozzle at yourself and others make sure the nozz...

Page 59: ...tative For complete contact information please visit the Web sites listed below Region Web Site Global Operation Center http www ute com Unitech Taiwan http tw ute com Unitech Asia Pacific Middle East...

Reviews: