background image


- 48 - 

MS926 User’s Manual 


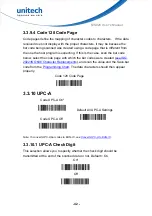
3.3.11.6 UPC-E0 Addenda 

This selection adds 2 or 5 digits to the end of all scanned UPC-E data.   
Default = Off for both 2 Digit and 5 Digit Addenda. 


3.3.12 UPC-E1 

Most U.P.C. bar codes lead with the 0 number system. For these codes, use 

UPC-E0

. If you need to read codes that lead with the 1 number system, use 

the UPC-E1 On selection.    Default = Off. 
 

Off* 


On 


2 Digit Addenda Off* 


2 Digit Addenda On 


5 Digit Addenda Off* 


5 Digit Addenda On 


Summary of Contents for MS926

Page 1: ... 2016 unitech Electronics Co Ltd All rights reserved unitech is a registered trademark of unitech Electronics Co Ltd MS926 User s Manual Wireless BT Pocket 2D Scanner MS926 User s Manual Version 1 10 ...

Page 2: ...hed version 1 0 20170202 Update contents 1 1 2017426 2017523 Add BC logo and update NFC setting 1 2 2017626 Add frequency 1 3 20170823 Update 4 10 Lookup table function 1 4 20170927 Update Data Validation 1 5 2017116 Update BT pairing information 1 6 2019 1 8 Update SPEC 1 7 2019 2 19 Update Indicator defaults 1 8 2019 4 19 Add Data Terminator 1 9 2020 06 22 Update note for screen burn in effect 1...

Page 3: ... owners Regulatory Compliance Statements FCC Warning Statement This device has been tested and found to comply with the limits for a Class B digital device pursuant to part 15 of the FCC rules These limits are designed to provide reasonable protection against harmful interference in a residential installation This equipment generates uses and can radiate radio frequency energy and if not installed...

Page 4: ...cturer may void the user s authority to operate the equipment Operation on the 5 15 5 25GHz frequency band is restricted to indoor use only The FCC requires indoor use for the 5 15 5 25GHz band to reduce the potential for harmful interference to co channel Mobile Satellite Systems Therefore it will only transmit on the 5 25 5 35 GHz 5 47 5 725 GHz and 5 725 5 850 GHz band when associated with an a...

Page 5: ... for download at https portal unitech eu public Safetyregulatorystatement CE RF Exposure Compliance This device meets EU requirements 2014 53 EU on the limitation of exposure of the general public to electromagnetic fields by way of health protection For body worn operation this device has been tested and meets the ICNIRP guidelines and the European Standard EN 62209 2 for use with dedicated acces...

Page 6: ...hazardous materials used in electrical and electronic equipment Waste electrical and electronic equipment WEEE unitech has set up a policy and process to meet the EU directive 2002 96 EC and update 2003 108 EC concerning electronic waste disposal For more detailed information of the electronic waste disposal of the products you have purchased from unitech directly or via unitech s resellers you sh...

Page 7: ...Co Ltd MS926 User s Manual Taiwan NCC Warning Statement 低功率電波輻射性電機管理辦法 第十二條 經型式認證合格之低功率射頻電機 非經許可 公司 商號或使用者 均不得擅自變更頻率 加大功率或變更原設計之特性及功能 第十四條 低功率射頻電機之使用不得影響飛航安全及干擾合法通信 經發現有 干擾現象時 應立即停用 並改善至無干擾時方得繼續使用 低功率射頻電機需忍受合法通信或工業 科學及醫療用電波輻射性電機設備 之干擾 注意事項 1 使用過度恐傷害視力 2 使用30分鐘請休息10分鐘 2歲以下幼兒不看螢幕 2歲以上每天看螢幕不要超過 1小時 3 減少電磁波影響 請妥適使用 ...

Page 8: ...cribed service operations The laser safety warning label required by the DHHS IEC for the unitech product s optional laser scanner module is located on the memory compartment cover on the back of the unit Laser information only applies to the products with laser components CAUTION Use of controls or adjustments or performance of procedures other than those specified herein may result in hazardous ...

Page 9: ... charges are better than a fully uncharged battery Charging a partially charged battery does not cause harm to the unit Keep the battery cool Avoid hot vehicles For prolonged storage keep the battery at a 40 charge level Do not leave the battery uncharged and unused for an extended period of time the battery will wear out and the longevity of the battery will be at least half of one with frequent ...

Page 10: ...within the stated range of 0 C to 40 C Charging batteries outside of the specified range could damage the batteries and shorten their life cycle CAUTION Do not charge batteries at a temperature lower than 0 C This will and make the batteries unstable and dangerous Please use a battery temperature detecting device for a charger to ensure a safe charging temperature range CAUTION To ensure the unit ...

Page 11: ...60 C however they may deplete more rapidly at higher temperatures It is recommended to store batteries at room temperature The message above only applies to the usage of the removable batteries For the products with non removable batteries without batteries please refer to the specification of each product Product Operation and Storage Notice The unitech product has applicable operation and storag...

Page 12: ...pter or same specification of adapter to charge your unitech product Using the wrong power adapter can damage your unitech product The message above only applies to the product connected to the adapter For the products without using the adapters please refer to the specification of each product Hearing Damage Warning Zx 3 Warning The warning shall be placed on the equipment or on the packaging or ...

Page 13: ... 19 5015 BB Tilburg the Netherlands http eu ute com China Japan Tel 86 59 2310 9966 Tel 81 3 35232766 E mail info cn ute com E mail info jp ute com Address Website Room401C 4F RIHUA International Mansion Xinfeng 3nd Road Huoju Hi tech District Xiamen Fujan China http cn ute com Address Website Kayabacho Nagaoka Building 8F 1 5 19 Shinkawa Chuo Ku Tokyo 104 0033 Japan http jp ute com Asia Pacific M...

Page 14: ...mited Warranty are free from defects during normal use The warranty period is varied from each country Please consult with your supplier or unitech local office for actual length of warranty period to your purchased product Warranty becomes void if equipment is modified improperly installed or used damaged by accident or neglect or if any parts are improperly installed or replaced by the user ...

Page 15: ...g Damage Warning x Worldwide Support xi Warranty Policy xii Chapter 1 Overview 1 1 1 Package 1 1 2 Scanner Detail 2 1 3 Specifications 3 1 4 Getting Started 6 1 5 Battery Charging 7 1 6 LED Indicator Beeper Sequence 8 1 7 Display Menu Tree 9 Chapter 2 Installation 19 2 1 Mobile Devices pairing with without NFC 19 2 2 BT HID 21 2 3 BT SPP 22 2 4 BT SPP Slave 23 2 5 USB SPP 24 Chapter 3 Symbology 25...

Page 16: ...s Manual 4 1 System setting 67 4 2 BT pairing 69 4 3 Output data transmit 70 4 4 BT Config 73 4 5 Beep Vibration Indicators 76 4 6 Scan mode Parameter Selection 79 4 7 Prefix Suffix selections 91 4 8 Data formatting 96 4 9 Data Validation 117 4 11 Manually set up 119 Appendix A Symbology Charts 122 Appendix B Programming Charts 127 ...

Page 17: ...contents MS926 Scanner Quick Reference Guide Micro USB to USB Cable Hand Strap Optional accessories 1 Slot Charging cradle 5 Slot Charging cradle USB Adapter NOTE 1 The scanner s default power off time is 5 minutes 2 Please charge scanner for at least 2 hours prior to initial use 3 The barcode with an asterisk which appears in the following chapters indicates that it is the default option for the ...

Page 18: ...can Power Button Power On Off Scan barcode Charging Status LED Red LED It will light up while the scanner is charging Scan LED Green LED It will light up while the barcode is successfully scanned Page up Page down keys on the side of MS926 Move up down through list of menu items Product Label NFC Pairing Label Hand Strap Hole Reset Key press one time power off ...

Page 19: ...own Scan with power on off feature Optical Performance Receiving Device CMOS sensor with 640 x 480 pixel resolution Illumination Aiming White LED illumination Red LED dot aimer Motion Tolerance Up to 100 cm s 4 in s for13 mil UPC at optimal focus Typical frame rate 30 frames per second Skew Angle 45 Pitch Angle 45 Printing Contrast Scale 35 minimum print contrast ratio Depth of Field DOF PCS 80 ...

Page 20: ...elligent Mail Bar Code Japanese Post KIX Netherlands Post GS1 Composite Korea Post Planet Code Postal Postnet Scan Mode Trigger mode Pulse mode Flash mode Continuous Mode Buffer mode Environmental ESD Protection Functional after 8K Contact and 12K Air Mechanical Shock 1 5m onto concrete scanner only IP Rate IP42 Operating Temperature 0 C to 50 C Storage Temperature 30 C to 70 C Relative Humidity 9...

Page 21: ...les Range Up to 30 Feet Open space Interface supported Micro USB Mechanical Scanner Dimension H21 1 W36 9 L95 9mm Scanner Weight 63g Switch life 10 million times Regulation Approvals CE FCC BSMI VCCI Radio type Description Transmitter Frequency Maximum Output Power Bluetooth Bluetooth 2400 2483 5MHz 3dBm ...

Page 22: ...After powering on you will see the following screen on the scanner display The scanner is now under standby mode Now you can scan the desired barcode or start the BT pairing mode The standby display will show the current Battery Status Scanner Type Operation Mode and Time The aiming beam can be centered over the bar code with any direction and have the proper alignment for a good read see example ...

Page 23: ... 7 MS926 User s Manual 1 5 Battery Charging Insert the Micro USB connector into the port on the scanner and the standard USB connector of the USB cable into a USB port on the host PC ...

Page 24: ... Green Light blinks once One short Beep Barcode reading Wedge Auto When BT Disconnect Green Light blinks once One short Beep Data sent to PC successfully Batch Green Light blinks once Dee Du sound Data sent to PC Fail sent data to PC Batch Red Light blinks once Dee Dee Dee sound Data delete Green Light blinks once All Data delete Deleting Green light always on BT connection Low Medium High Beeps B...

Page 25: ... selection The Display Menu Tree below is based on Auto Mode Top Menu Sub Menu Level 1 Sub Menu Level 2 Options Result Options Result Default Setting 1 1 BT HID 1 2 USB SPP 1 3 BT SPP 1 Scanner Type 1 4 BT SPP Slave n a BT HID 2 1 Wedge Mode 2 2 Batch Mode 2 Operation Mode 2 3 Auto Mode n a Auto Mode 3 1 View Date Time Show Date Time 3 2 Set Date Time Set Date Time 2014 01 01 08 00 00 3 3 1 Auto 3...

Page 26: ...n 7 1 Show Firmware Version V0 x n a 8 Serial Number 8 1 Show SERIAL NUMBER XXXXXXXXX n a n a 9 Exit n a n a n a Top Menu Sub Menu Level 1 Sub Menu Level 2 Options Result Options Result Default Setting Data Memory 1 View Edit Buff 1 1 Show Buffer Data 1 1 1 Exit Erase View If choose Exit back to DATA MEMORY Page If choose Erase delete data If choose View continue to view the buffer data For Auto B...

Page 27: ...s selected 3 Free MEM Space 3 1 Show FREE BUFFER MEM n a 4 1 CR 4 2 None 4 3 TAB 4 4 CRLF 4 Data Separator 4 5 LF CR 5 Sending BlkDly 5 1 Sending BlkDelay 10ms 3 Sec 1 Sec 500 ms 100 ms 50 ms 10ms 6 Date Time Stamp 6 1 DATE STAMP Disable DDMMYYYY DD MM YYYY DD MM YYYY DD MM YYYY MMDDYYYY MM DD YYYY MM DD YYYY MM DD YYYY YYYYMMDD YYYY MM DD YYYY MM DD YYYY MM DD Disable ...

Page 28: ... 6 2 TIME STAMP Disable HHMMAM HHMM HH MM AM HH MM HHMMSSAM HHMMSS HH MM SS AM HH MM SS Disable 7 1 Disable Disable Enable Disable 7 2 1 N Checking CHECKING START POSITION CHECKING LENGTH 7 2 1 1 Checking CHECKING START POSITION CHECKING LENGTH 7 Data Validation 7 3 Lookup Table Download Lookup 8 Exit n a n a n a ...

Page 29: ...ring 2 MAC Address 2 1 12 Characters Bluetooth MAC Address 3 Paired Device 3 1 Show PAIRED DEV NAME Show PAIRED DEV ADDR 4 Remove Pair 4 1 Remove pair 5 Signal Strength 5 1 Signal Strength Detection Enable Disable Enable 6 BT FW Version 6 1 Show BT FW VERSION Bluetooth CONFIG 7 Exit ...

Page 30: ...Vibrator Vibrator Beeper None Beeper 3 4 System Setting 3 4 1 Beeper Vibrator Vibrator Beeper None Beeper 3 5 System Warn Err 3 5 1 Beeper Vibrator Vibrator Beeper None Beeper 3 6 PwrOn 3 6 1 Beeper Vibrator Vibrator Beeper None Beeper 3 7 PwrOff Alarm 3 7 1 Beeper Vibrator Vibrator Beeper None Beeper 3 8 Checking Pass 3 8 1 1 1 1 N Checking Pass Indicator Beeper Vibrator 3 9 Checking Fail 3 9 1 1...

Page 31: ...ed 2 12 GS1DataBar Omn Enabled Disabled Enabled 2 13 GS1DataBar Ltd Enabled Disabled Enabled 2 14 GS1DataBar Exp Enabled Disabled Enabled 2 15 CODE 11 Enabled Disabled Disabled 2 16 MSI Enabled Disabled Disabled 2 17 UPC E1 Enabled Disabled Disabled 2 18 S 2 of 5 Indus Enabled Disabled Disabled 2 19 S 2 of 5 IATA Enabled Disabled Disabled 2 20 Matrix 2 of 5 Enabled Disabled Disabled 2 1D CODE SETT...

Page 32: ...abled 5 11 Han Xin Code Enabled Disabled Disabled 5 12 Exit Enabled Disabled 6 1 OFF OFF 6 2 Australian Enabled Disabled Disabled 6 3 British Enabled Disabled Disabled 6 4 Canadian Enabled Disabled Disabled 6 5 China Post Enabled Disabled Disabled 6 6 InfoMail Enabled Disabled Disabled 6 7 Intelligent Mail Enabled Disabled Disabled 6 8 Japanese Enabled Disabled Disabled 6 9 KIX Enabled Disabled Di...

Page 33: ... Disabled Disabled 6 21 Planet Postnet w B B Enabled Disabled Disabled 6 22 Planet Postal 4i Enabled Disabled Disabled 6 23 Planet Intelligent Mail Enabled Disabled Disabled 6 24 Planet Postnet Postal 4i Enabled Disabled Disabled 6 25 Planet Postnet Intelligent Mail Enabled Disabled Disabled 6 26 Planet Postal 4i Intelligent Mail Enabled Disabled Disabled 6 27 Postnet Postal 4i Intelligent Mail En...

Page 34: ...Sub Menu Level 1 Result Default Setting 1 iOS Soft Keypad 1 1 iOS SOFT KEYPAD by DblClick Disable Enable Disable 2 KBD Language 2 1 US English Japanese Partial ALT Danish ALT Mode French German Italian Norwegian Spanish Swedish Swiss UK English US English 3 KBD Case 3 1 Auto Trace Upper Lower Auto Trace 4 KBD ChrDelay 4 1 1ms 100ms 50ms 20ms 10ms 5ms 1ms HID KEYBOARD SETTING 5 Exit n a n a Top Men...

Page 35: ...n older than 2 4 please hold Page Down key and Scan button simultaneously to enter BT pairing mode 3 Turn both NFC Bluetooth on your mobile device 4 Touch the back of the MS926 scanner to your mobile phone until the device prompts to accept pairing 5 Press ok to respond your Bluetooth pairing request 6 MS926 is now connected to your mobile phone For NFC setting video please check on our website ht...

Page 36: ...de please enter the number 2926 to finish pairing 2 1 3 Pairing with PC Notebook 1 Open Devices and Printers by clicking the Start button and then on the Start menu clicking Devices and Printers 2 MS926 will automatically enter BT pairing mode For firmware version older than 2 4 please hold Page Down key and Scan button simultaneously to enter BT pairing mode 3 Click Add a device and then follow t...

Page 37: ...ersion older than 2 4 please hold Page Down key and Scan button simultaneously to enter BT pairing mode 3 Double click Bluetooth Device icon in the toolbar on your PC Select Add New Devices When you see a device list windows choose MS926 XXXX and then press Next PC now is establishing BT connection 4 MS926 will beep when your PC successfully establish a BT connection with MS926 ...

Page 38: ...2 4 please hold Page Down key and Scan button simultaneously to enter BT pairing mode 4 Double click Bluetooth Device icon in the toolbar on your PC Select Add New Devices When you see a device list windows choose MS926 XXXX and then press Next 5 When PC is establishing a BT connection in BT SPP mode with MS926 windows system will automatically install the required drivers 6 Back to your PC toolba...

Page 39: ...n older than 2 4 please hold Page Down key and Scan button simultaneously to enter BT pairing mode 4 Double click Bluetooth Device icon in the toolbar on your PC Select Add New Devices When you see a device list windows choose MS926 XXXX and then press Next 5 When PC is establishing a BT connection in BT SPP Slave mode with MS926 windows system will automatically install the required drivers 6 Bac...

Page 40: ...CDC driver please check on the product section on unitech website http www ute com 2 Use MS926 to scan USB SPP barcode 3 Connect MS926 to your PC with a Micro USB USB cable 4 Go to PC device manager to check the COM information for example CDC USB Demonstration COM40 5 Back to the application and select the corresponding COM port number MS926 will beep when your pc successfully establish the conne...

Page 41: ...ded Note When All Symbologies On is scanned 2D Postal Codes are not enabled 2D Postal Codes must be enabled separately All Symbologies On All Symbologies Off 3 2 Message Length Description You are able to set the valid reading length of some of the bar code symbologies You may wish to set the same value for minimum and maximum length to force the scanner to read fixed length bar code data This hel...

Page 42: ...codes on the Programming Chart The minimum and maximum lengths and the defaults are included with the respective symbologies 3 3 1D 3 3 1 Codabar Codabar On Default All Codabar Settings Codabar Off 3 3 1 1 Codabar Start Stop Characters Start Stop characters identify the leading and trailing ends of the bar code You may either transmit or not transmit Start Stop characters Default Don t Transmit Tr...

Page 43: ...ta with or without a check character When Check Character is set to Validate and Transmit the scanner will only read Codabar bar codes printed with a check character and will transmit this character at the end of the scanned data When Check Character is set to Validate but Don t Transmit the unit will only read Codabar bar codes printed with a check character but will not transmit the check charac...

Page 44: ...e with the D characters omitted Select Require to prevent the scanner from decoding a single D Codabar symbol without its companion This selection has no effect on Codabar symbols without Stop Start D characters On Off Require 3 3 1 4 Codabar Message Length Scan the bar codes below to change the message length Refer to Message Length Description for additional information Minimum and Maximum lengt...

Page 45: ... All Code 39 Settings Code 39 Off 3 3 2 1 Code 39 Start Stop Characters Start Stop characters identify the leading and trailing ends of the bar code You may either transmit or not transmit Start Stop characters Default Don t Transmit Transmit Don t Transmit ...

Page 46: ...ed data When Check Character is set to Validate and Transmit the scanner only reads Code 39 bar codes printed with a check character and will transmit this character at the end of the scanned data Default No Check Character No Check Character Validate but Don t Transmit Validate and Transmit 3 3 2 3 Code 39 Message Length Scan the bar codes below to change the message length Refer to Message Lengt...

Page 47: ...haracter s it buffers Code 39 bar codes until it reads a Code 39 bar code that does not have the append trigger The data is then transmitted in the order in which the bar codes were read FIFO Default Off Off On 3 3 2 4 Code 32 Pharmaceutical PARAF Code 32 Pharmaceutical is a form of the Code 39 symbology used by Italian pharmacies This symbology is also known as PARAF Note Trioptic Code must be tu...

Page 48: ...within the bar code symbol will be interpreted as a single character For example V will be decoded as the ASCII character SYN and C will be decoded as the ASCII character Default Off Character pairs M and N decode as a minus sign and period respectively Character pairs P through Y decode as 0 through 9 Off On ...

Page 49: ...e that is different from the one the host program is expecting If this is the case scan the bar code below select the code page with which the bar codes were created see ISO 2022 ISO 646 Character Replacements and scan the value and the Save bar code from the Programming Chart The data characters should then appear properly Code 39 Code Page 3 3 3 Interleaved 2 of 5 Interleaved 2 of 5 On Default A...

Page 50: ... Check Digit is set to Validate and Transmit the scanner only reads Interleaved 2 of 5 bar codes printed with a check digit and will transmit this digit at the end of the scanned data Default No Check Digit No Check Digit Validate but Don t Transmit Validate and Transmit 3 3 3 2 Interleaved 2 of 5 Message Length Scan the bar codes below to change the message length Refer to Message Length Descript...

Page 51: ...s Code 93 Off 3 3 4 1 Code 93 Message Length Scan the bar codes below to change the message length Refer to Message Length Description for additional information Minimum and Maximum lengths 0 80 Minimum Default 0 Maximum Default 80 Minimum Message Length Maximum Message Length ...

Page 52: ...ts the appended data when it reads a Code 93 bar code that starts with a character other than a space Default Off Off On 3 3 4 3 Code 93 Code Page Code pages define the mapping of character codes to characters If the data received does not display with the proper characters it may be because the bar code being scanned was created using a code page that is different from the one the host program is...

Page 53: ...al Message Length Scan the bar codes below to change the message length Refer to Message Length Description for additional information Minimum and Maximum lengths 1 48 Minimum Default 4 Maximum Default 48 Minimum Message Length Maximum Message Length 3 3 6 Standard 2 of 5 IATA two bar start stop Standard 2 of 5 IATA Industrial On Default All Standard 2 of 5 IATA Industrial Settings Standard 2 of 5...

Page 54: ...ault 4 Maximum Default 48 Minimum Message Length Maximum Message Length 3 3 7 Matrix 2 of 5 Matrix 2 of 5 On Default All Matrix 2 of 5 Settings Matrix 2 of 5 Off 3 3 7 1 Matrix 2 of 5 Message Length Scan the bar codes below to change the message length Refer to Message Length Description for additional information Minimum and Maximum lengths 1 80 Minimum Default 4 Maximum Default 80 Minimum Messag...

Page 55: ...gits are required with Code 11 bar codes Default Two Check Digits One Check Digit Two Check Digits 3 3 8 2 Code 11 Message Length Scan the bar codes below to change the message length Refer to Message Length Description for additional information Minimum and Maximum lengths 1 80 Minimum Default 4 Maximum Default 80 Minimum Message Length Maximum Message Length ...

Page 56: ...se of ISBT formats requires a paid license The ISBT 128 Application Specification describes 1 the critical data elements for labeling blood products 2 the current recommendation to use Code 128 due to its high degree of security and its space efficient design 3 a variation of Code 128 that supports concatenation of neigh boring symbols and 4 the standard layout for bar codes on a blood product lab...

Page 57: ...aximum Message Length 3 3 9 3 Code 128 Append This function allows the scanner to append the data from several Code 128 bar codes together before transmitting them to the host computer When the scanner encounters a Code 128 bar code with the append trigger character s it buffers Code 128 bar codes until it reads a Code 128 bar code that does not have the append trigger The data is then transmitted...

Page 58: ...de below select the code page with which the bar codes were created see ISO 2022 ISO 646 Character Replacements and scan the value and the Save bar code from the Programming Chart The data characters should then appear properly Code 128 Code Page 3 3 10 UPC A Code UPC A On Default All UPC A Settings Code UPC A Off Note To convert UPC A bar codes to EAN 13 see Convert UPC A to EAN 13 3 3 10 1 UPC A...

Page 59: ... beginning of the scanned data but the unit can be programmed so it will not transmit it Default On On Off 3 3 10 3 UPC A Addenda This selection adds 2 or 5 digits to the end of all scanned UPC A data Default Off for both 2 Digit and 5 Digit Addenda 2 Digit Addenda Off 2 Digit Addenda On 5 Digit Addenda Off 5 Digit Addenda On ...

Page 60: ...PC A bar codes that have addenda You must then turn on a 2 or 5 digit addenda Default Not Required Not Required Required 3 3 10 5 UPC A Addenda Separator When this feature is on there is a space between the data from the bar code and the data from the addenda When turned off there is no space Default On On Off ...

Page 61: ...des If you scan the Allow Concatenation code when the scanner sees the coupon code and the extended coupon code in a single scan it transmits both as one symbology Otherwise it transmits the first coupon code it reads If you scan the Require Concatenation code the scanner must see and read the coupon code and extended coupon code in a single read to transmit the data No data is output unless both ...

Page 62: ...d with the 1 number system use UPC E1 Default On Code UPC A On Default All UPC E Settings Code UPC A Off 3 3 11 1 UPC E0 Expand UPC E Expand expands the UPC E code to the 12 digit UPC A format Default Off Off On 3 3 11 2 UPC E0 Addenda Required When Required is scanned the scanner will only read UPC E bar codes that have addenda Default Not Required Not Required Required ...

Page 63: ... turned Off there is no space Default On On Off 3 3 11 4 UPC E0 Check Digit Check Digit specifies whether the check digit should be transmitted at the end of the scanned data or not Default On On Off 3 3 11 5 UPC E0 Leading Zero This feature allows the transmission of a leading zero 0 at the beginning of scanned data To prevent transmission scan Off Default On On Off ...

Page 64: ...ault Off for both 2 Digit and 5 Digit Addenda 3 3 12 UPC E1 Most U P C bar codes lead with the 0 number system For these codes use UPC E0 If you need to read codes that lead with the 1 number system use the UPC E1 On selection Default Off Off On 2 Digit Addenda Off 2 Digit Addenda On 5 Digit Addenda Off 5 Digit Addenda On ...

Page 65: ...ted UPC A bar codes are converted to 13 digit EAN 13 codes by adding a zero to the front When Do not Convert UPC A is selected UPC A codes are read as UPC A Do not Convert UPC A UPC A Converted to EAN 13 3 3 13 2 EAN JAN 13 Check Digit This selection allows you to specify whether the check digit should be transmitted at the end of the scanned data or not Default On On Off ...

Page 66: ...EAN JAN 13 data Default Off for both 2 Digit and 5 Digit Addenda 3 3 13 4 EAN JAN 13 Addenda Required When Required is scanned the scanner will only read EAN JAN 13 bar codes that have addenda Default Not Required Not Required Required 2 Digit Addenda Off 2 Digit Addenda On 5 Digit Addenda Off 5 Digit Addenda On ...

Page 67: ...is no space Default On Note If you want to enable or disable EAN13 with Extended Coupon Code refer to UPC A EAN 13 with Extended Coupon Code On Off 3 3 14 EAN JAN 8 EAN JAN 8 On Default All EAN JAN 8 Settings EAN JAN 8 Off 3 3 14 1 EAN JAN 8 Check Digit This selection allows you to specify whether the check digit should be transmitted at the end of the scanned data or not Default On On Off ...

Page 68: ... EAN JAN 8 data Default Off for both 2 Digit and 5 Digit Addenda 3 3 14 3 EAN JAN 8 Addenda Required When Required is scanned the scanner will only read EAN JAN 8 bar codes that have addenda Default Not Required Not Required Required 2 Digit Addenda Off 2 Digit Addenda On 5 Digit Addenda Off 5 Digit Addenda On ...

Page 69: ...AN JAN 8 Addenda Separator When this feature is On there is a space between the data from the bar code and the data from the addenda When turned Off there is no space Default On On Off 3 3 15 MSI MSI On Default All MSI Settings MSI Off ...

Page 70: ...er s and will transmit the character s at the end of the scanned data When Check Character is set to Validate Type 10 11 but Don t Transmit the unit will only read MSI bar codes printed with the specified type check character s but will not transmit the check character s with the scanned data Validate Type 10 but Don t Transmit Validate Type 10 and Transmit Validate 2 Type 10 Characters but Don t ...

Page 71: ...imum and Maximum lengths 4 48 Minimum Default 4 Maximum Default 48 Minimum Message Length Maximum Message Length 3 3 16 GS1 DataBar Omnidirectional GS1 DataBar Omnidirectional On Default All GS1 DataBar Omnidirectional Settings GS1 DataBar Omnidirectional Off 3 3 17 GS1 DataBar Limited GS1 DataBar Limited On Default All GS1 DataBar Limited Settings GS1 DataBar Limited Off ...

Page 72: ...3 3 18 1 GS1 DataBar Expanded Message Length Scan the bar codes below to change the message length Refer to Message Length Description for additional information Minimum and Maximum lengths 4 74 Minimum Default 4 Maximum Default 74 Minimum Message Length Maximum Message Length 3 3 19 PDF 417 PDF 417 On Default All PDF 417 Settings PDF 417 Off ...

Page 73: ...m Default 1 Maximum Default 2750 Minimum Message Length Maximum Message Length 3 3 20 QR Code QR Code On Default All QR Code Settings QR Code Off 3 3 20 1 QR Code Message Length Scan the bar codes below to change the message length Refer to Message Length Description for additional information Minimum and Maximum lengths 1 7089 Minimum Default 1 Maximum Default 7089 Minimum Message Length Maximum ...

Page 74: ...put in the order specified in the bar codes Default On On Off 3 3 20 3 QR Code Page QR Code pages define the mapping of character codes to characters If the data received does not display with the proper characters it may be because the bar code being scanned was created using a code page that is different from the one the host program is expecting If this is the case scan the bar code below selec...

Page 75: ...s Data Matrix Off 3 3 21 1 Data Matrix Message Length Scan the bar codes below to change the message length Refer to Message Length Description for additional information Minimum and Maximum lengths 1 3116 Minimum Default 1 Maximum Default 3116 Minimum Message Length Maximum Message Length ...

Page 76: ...elect the code page with which the bar codes were created see ISO 2022 ISO 646 Character Replacements and scan the value and the Save bar code from the Programming Chart The data characters should then appear properly Data Matrix Code Page 3 3 22 MaxiCode MaxiCode On Default All MaxiCode Settings MaxiCode Off 3 3 22 1 MaxiCode Message Length Scan the bar codes below to change the message length Re...

Page 77: ...Settings Han Xin Off 3 3 23 1 Han Xin Code Message Length Scan the bar codes below to change the message length Refer to Message Length Description for additional information Minimum and Maximum lengths 1 7833 Minimum Default 1 Maximum Default 7833 Minimum Message Length Maximum Message Length ...

Page 78: ...owed Only one 2D postal code selection can be active at a time If you scan a second 2D postal code selection the first selection is overwritten Default 2D Postal Codes Off 2D Postal Codes Off 3 4 1 1 Single 2D Postal Codes Australian Post On British Post On Canadian Post On Intelligent Mail Bar Code On Japanese Post On KIX Post On Planet Code On ...

Page 79: ...Postnet with B and B Fields On InfoMail On 3 4 1 2 Combination 2D Postal Codes InfoMail and British Post On Postal 4i and Postnet with B and B Fields On Postnet and Postal 4i On Planet Code and Postal 4i On Postal 4i and Intelligent Mail Bar Code On ...

Page 80: ... and Intelligent Mail Bar Code On Intelligent Mail Bar Code and Postnet with B and B Fields On Planet Code Postal 4i and Postnet with B and B Fields On Postnet and Intelligent Mail Bar Code On Postal 4i Intelligent Mail Bar Code and Postnet with B and B Fields On Planet Code and Postnet with B and B Fields On ...

Page 81: ...B Fields On Planet Code and Intelligent Mail Bar Code On Planet Code Postal 4i Intelligent Mail Bar Code and Postnet On Planet Code Postnet and Intelligent Mail Bar Code On Postnet Postal 4i and Intelligent Mail Bar Code On Planet Code Intelligent Mail Bar Code and Postnet with B and B Fields On ...

Page 82: ...f 5 Settings China Post Hong Kong 2 of 5 Off 3 4 1 4 China Post Hong Kong 2 of 5 Message Length Scan the bar codes below to change the message length Refer to Message Length Description for additional information Minimum and Maximum lengths 2 80 Minimum Default 4 Maximum Default 80 Minimum Message Length Maximum Message Length ...

Page 83: ...ng 4 1 1 Default Scan below bar code to restore the factory setting Factory Default 4 1 2 Display FW version Data Format Scan below bar code to show the current F W BT version FW version Scan the bar code below to show current data format settings Data Format Settings ...

Page 84: ...5 Minutes 20 Minutes Disable 4 1 4 Power Saving Scan below bar code to set the time frame for power saving 5 Seconds 20 Seconds 10 Seconds 30 Seconds 15 Seconds Disable Note Strongly recommend not to disable the power saving setting The device might experience the screen burn in an after image effect on the OLED screen if the screen is on for the long hours ...

Page 85: ...ter Pairing mode Scan below bar code to enter BT pairing mode BT Pairing 4 2 2 Paired device info Scan below bar code to show the current paired device information Paired Device 4 2 3 Remove the pair Scan below bar code to remove BT pair Remove Pair ...

Page 86: ...t data automatically when back to in range Auto mode 4 3 1 1 Erase last memory entry Scan below bar code to erase last scanned data in memory Erased Last Memory Entry 4 3 1 2 Erase all data in buffer Erase Memory Scan below bar code to erase all data in the memory Erase Memory 4 3 1 3 Check buffer memory space Scan below bar code to check buffer memory space Free Memory Space ...

Page 87: ...The purpose of signal strength detection is to enhance the data transmission for a better stability For example if operating with the weak RF signal strongly suggest to enable signal strength detection to avoid any data loss Meanwhile it will also slow down the transmission speed Disable Signal Strength Detection Enable Signal Strength Detection ...

Page 88: ... 4 1 Send batch Scan below bar code to send the stored data to host Send Batch 4 3 4 2 Erase last memory entry Scan below bar code to erase last scanned data in batch memory Erase Last Memory Entry 4 3 4 3 Erase all data in batch Erase memory Scan below bar code to erase all data in batch memory Erase Memory 4 3 4 4 Free batch memory space Scan below bar code to check batch memory space Free Memor...

Page 89: ... 73 MS926 User s Manual 4 4 BT Config 4 4 1 HID keyboard block delay In BT HID mode scan below bar code to set the block delay time Default is 10ms 10 ms 50 ms 100 ms 500 ms 1 Sec 3 Sec ...

Page 90: ...fault is 1ms 1 ms 5 ms 10 ms 20 ms 50 ms 100 ms 4 4 3 HID keyboard Case In BT HID mode scan below bar code to change the alphabet case Scan to lower barcode to output data in lower case or scan to upper barcode to output data in upper case Default setting auto trace to have original scanned data transmitted Auto Trace To Lower To Upper ...

Page 91: ...4 HID keyboard language In BT HID mode scan below bar code to change keyboard language Default is US English US English UK English Swiss Swedish Norwegian Italian German French Danish Partial ALT Japanese OADG109 Spanish ALT Mode ...

Page 92: ...to adjust beep volume Default Medium volume 4 5 1 1 High volume High Volume 4 5 1 2 Medium volume Medium Volume 4 5 1 3 Low volume Low Volume 4 5 1 4 Mute Mute 4 5 2 Vibration The vibration is off in default Scan below bar code to open vibration function Enable Vibrator Disable Vibrator ...

Page 93: ...Beep Vibration Main Menu Beep Vibrate Indicators Button Beeper Vibrator None Beeper Vibrator 4 5 4 Indicators 4 5 4 1 Good Read Indicator Beeper Beeper Vibrator Vibrator None 4 5 4 2 Connection Indicator Beeper Beeper Vibrator Vibrator None 4 5 4 3 Button Indicator Beeper Beeper Vibrator Vibrator None ...

Page 94: ... Indicator Beeper Beeper Vibrator Vibrator None 4 5 4 5 System Warning Error Indicator Beeper Beeper Vibrator Vibrator None 4 5 4 6 Power On Indicator Beeper Beeper Vibrator Vibrator None 4 5 4 7 Power Off Alarm Beeper Beeper Vibrator Vibrator None ...

Page 95: ...LED Illumination Manual Trigger If you wish to set the illumination LED brightness scan one of the bar codes below This sets the LED illumination for the scan engine when the trigger is pressed Default High Note The LEDs are like a flash on a camera The lower the ambient light in the room the brighter the LEDs need to be so the scan engine can see the bar codes High Medium Manual Trigger Normal ...

Page 96: ...scan engine has timed out you can activate the scan engine either by pressing the trigger or using a serial trigger command After scanning the Read Time Out bar code set the time out duration from 0 300 000 milliseconds by scanning digits on the Programming Chart then scanning Save Default 30 000 ms Read Time Out 4 6 3 Presentation Mode Presentation Mode uses ambient light to detect bar codes The ...

Page 97: ...as difficulty waking up to read bar codes you may need to set the Idle Illumination to a brighter setting Note LED Illumination Presentation Mode does not apply to Poor Quality PDF Codes or Mobile Phone Read Mode High 4 6 3 2 Presentation Sensitivity Presentation Sensitivity is a numeric range that increases or decreases the scan engine s reaction time to bar code presentation To set the sensitivi...

Page 98: ...mer Delay for the most error free operation in applications where multiple codes are spaced closely together Using the Aimer Delay and Centering features the scanner can emulate the operation of older systems such as linear laser bar code scanners If a bar code is not touched by a predefined window it will not be decoded or output by the scan engine If centering is turned on by scanning Centering ...

Page 99: ...ntation Centering is turned on by scanning Presentation Centering On the scanner only reads codes that pass through the centering window you specify using the Top of Presentation Centering Window Bottom of Presentation Centering Window Left and Right of Presentation Centering Window bar codes In the example below the white box is the centering window The centering window has been set to 20 left 30...

Page 100: ... must set the In Stand Sensor to Off You may program a Streaming Presentation Mode Normal Enhanced or Mobile Phone you wish to use for in stand scanning and a Manual Trigger mode Normal Enhanced or Mobile Phone you wish to use for out of stand scanning To do this you must first scan the preferred Streaming Presentation mode see below then scan the Manual Trigger mode you want to use Presentation C...

Page 101: ...2D bar code reading Default Poor Quality 1D Reading Off Poor Quality 1D Reading Off Poor Quality 1D Reading On 4 6 4 2 Poor Quality PDF Codes This setting improves the scanner s ability to read damaged or badly printed PDF codes by combining information from multiple images When Poor Quality PDF On is scanned poor quality PDF code reading is improved but the scanner s snappiness is decreased makin...

Page 102: ... 4 6 6 Hands Free Time Out The Scan Stand and Presentation Modes are referred to as hands free modes If the scanner s trigger is pulled when using a hands free mode the scanner changes to manual trigger mode You can set the time the scanner should remain in manual trigger mode by setting the Hands Free Time Out Once the time out value is reached if there have been no further trigger pulls the scan...

Page 103: ...ve in minimizing accidental rereads Use shorter delays in applications where repetitive bar code scanning is required Reread Delay only works when in a Presentation Mode Default Medium Short 500 ms Medium 750 ms Long 1000 ms Extra Long 2000 ms 4 6 8 Aimer On Off This feature allows you to turn the aimer on and off When the Interlaced bar code is scanned the aimer is interlaced with the illuminatio...

Page 104: ...sing an EZConfig Scanning Tool Scan Data Window an NR appears when a code cannot be read If No Read is turned Off the NR will not appear Default Off If you want a different notation than NR for example Error or Bad Code you can edit the output message see Data Formatting The hex code for the No Read symbol is 9C Off On ...

Page 105: ...ead only inverted bar codes Scan Video Reverse and Standard Bar Codes to read both types of codes Note After scanning Video Reverse Only menu bar codes cannot be read You must scan Video Reverse Off or Video Reverse and Standard Bar Codes in order to read menu bar codes Note Images downloaded from the unit are not reversed This is a setting for decoding only Video Reverse Off Video Reverse and Sta...

Page 106: ...ive For example KIX codes and OCR can misread when scanned sideways or upside down Use the working orientation settings if your direction sensitive codes will not usually be presented upright to the scanner Default Upright Upright Vertical Bottom to Top Upside Down Vertical Top to Bottom ...

Page 107: ...add AIM I D scan 5 C 8 1 To add a backslash scan 5 C 5 C To add a backslash as in Step 7 you must scan 5C twice once to create the leading backslash and then to create the backslash itself Step 5 Scan the 2 digit hex value from the Programming Chart Step 6 Repeat Steps 4 and 5 for every prefix or suffix character Step 7 Scan Save to exit and save or scan Discard to exit without saving Repeat Steps...

Page 108: ...ecific character from a symbology When you Clear All Prefixes Suffixes all the prefixes or suffixes for a symbology are deleted Step 1 Scan the Clear One Prefix or Clear One Suffix symbol Step 2 Determine the 2 digit Hex value from the Symbology Chart included in the Symbology Charts for the symbology from which you want to clear the prefix or suffix Step 3 Scan the 2 digit hex value from the Prog...

Page 109: ...to add a carriage return suffix to all symbologies at once This action first clears all current suffixes then programs a carriage return suffix for all symbologies Add CR SuffixAll Symbologies Prefix Selections Add Prefix Clear All Prefixes Clear One Prefix Suffix Selections Add Suffix Clear One Suffix Clear All Suffixes ...

Page 110: ... 94 MS926 User s Manual 4 7 4 Data Terminator Scan the following bar code to set up data terminator CR None CRLF LF TAB ...

Page 111: ...logy Charts for the single character code that identifies each symbology This action first clears all current prefixes then programs a Code I D prefix for all symbologies This is a temporary setting that will be removed when the unit is power cycled Add Code I D Prefix toAll Symbologies Temporary Show Data Format Scan the bar code below to show current data format settings Data Format Settings ...

Page 112: ... order in which formats are applied 1 Specific Terminal ID Actual Code ID Actual Length 2 Specific Terminal ID Actual Code ID Universal Length 3 Specific Terminal ID Universal Code ID Actual Length 4 Specific Terminal ID Universal Code ID Universal Length 5 Universal Terminal ID Actual Code ID Actual Length 6 Universal Terminal ID Actual Code ID Universal Length 7 Universal Terminal ID Universal C...

Page 113: ...an AT wedge Note 099 indicates all terminal types Step 4 Code I D In the Symbology Charts find the symbology to which you want to apply the data format Locate the Hex value for that symbology and scan the 2 digit hex value from the Programming Chart If you wish to create a data format for all symbologies with the exception of some specific symbologies refer to B8 If you are creating a data format ...

Page 114: ...lternate format scan 1 2 or 3 depending on the format you are clearing Scan the Terminal Type and Code I D see Symbology Charts and the bar code data length for the specific data format that you want to delete All other formats remain unaffected Clear all Data Formats This clears all data formats Save to exit and save your data format changes Discard to exit without saving any data format changes ...

Page 115: ...cter Syntax F1xx where xx stands for the insert character s hex value for its ASCII code Refer to the ASCII Conversion Chart Code Page 1252 for decimal hex and character codes Send a number of characters F2 Include in the output message a number of characters followed by an insert character Start from the current cursor position and continue for nn characters or through the last character in the i...

Page 116: ...0 is the number of characters to send for the first line 0D is the hex value for a CR F1 is the Send all characters command 0D is the hex value for a CR The data is output as 1234567890 ABCDEFGHIJ CR Send all characters up to a particular character F3 Include in the output message all characters from the input message starting with the character at the current cursor position and continuing to but...

Page 117: ...position and continuing to but not including the search string s s The cursor is moved forward to the beginning of the s s string Syntax B9nnnns s where nnnn stands for the length of the string and s s stands for the string to be matched The string is made up of hex values for the characters in the string Refer to the ASCII Conversion Chart Code Page 1252 for decimal hex and character codes B9 Exa...

Page 118: ...Syntax F4xxnn where xx stands for the insert character s hex value for its ASCII code and nn is the numeric value 00 99 for the number of times it should be sent Refer to the ASCII Conversion Chart Code Page 1252 for decimal hex and character codes E9 and F4 Example Send all but the last characters followed by 2 tabs Send all characters except for the last 8 from the bar code above followed by 2 t...

Page 119: ...asterisks Using the bar code above send all characters up to but not including AB Insert 2 asterisks at that point and send the rest of the data with a carriage return after Command string B900024142BA00022A2AF10D B9 is the Send all characters up to a string command 0002 is the length of the string 2 characters 41 is the hex value for A 42 is the hex value for B BA is the Insert a string command 0...

Page 120: ...logy name and length Send the symbology name and length before the bar code data from the bar code above Break up these insertions with spaces End with a carriage return Command string B3F42001B4F42001F10D B3 is the Insert symbology name command F4 is the Insert a character multiple times command 20 is the hex value for a space 01 is the number of times the space character is sent B4 is the Insert...

Page 121: ...e key number For example B501021F inserts an A on a 104 key U S style keyboard B5 the command 01 number of keys pressed without the key modifier 02 is the key modifier for Shift Right and 1F is the a key If a lower case a were to be inserted B501001F would be entered If there are three keystrokes the syntax would change from B5xxssnn for one keystroke to B5xxssnnssnnssnn An example that would inse...

Page 122: ...umber of characters to move the cursor F1 is the Send all characters command 0D is the hex value for a CR The data is output as 4567890ABCDEFGHIJ CR Move the cursor backward a number of characters F6 Move the cursor back nn characters from current cursor position Syntax F6nn where nn is the numeric value 00 99 for the number of characters the cursor should be moved back Move the cursor to the begi...

Page 123: ...sage forward for xx character from the current cursor position leaving the cursor pointing to the xx character Syntax F8xx where xx stands for the search character s hex value for its ASCII code Refer to the ASCII Conversion Chart Code Page 1252 for decimal hex and character codes F8 Example Send bar code data that starts after a particular character Search for the letter D in bar codes and send a...

Page 124: ...999 and S consists of the ASCII hex value of each character in the match string For example B0000454657374 will search forward for the first occurrence of the 4 character string Test Refer to the ASCII Conversion Chart Code Page 1252 for decimal hex and character codes B0 Example Send bar code data that starts after a string of characters Search for the letters FGH in bar codes and send all the da...

Page 125: ...rom the current cursor position leaving the cursor pointing to the non xx character Syntax E6xx where xx stands for the search character s hex value for its ASCII code Refer to the ASCII Conversion Chart Code Page 1252 for decimal hex and character codes E6 Example Remove zeroes at the beginning of bar code data This example shows a bar code that has been zero filled You may want to ignore the zer...

Page 126: ...sition as the cursor is advanced by other commands When the FC command is encountered the suppress function is terminated The cursor is not moved by the FB command Syntax FBnnxxyy zz where nn is a count of the number of suppressed characters in the list and xxyy zz is the list of characters to be suppressed FB Example Remove spaces in bar code data This example shows a bar code that has spaces in ...

Page 127: ...xample Replace zeroes with CRs in bar code data If the bar code has characters that the host application does not want included you can use the E4 command to replace those characters with something else In this example you will replace the zeroes in the bar code above with carriage returns Command string E402300DF10D E4 is the Replace characters command 02 is the total count of characters to be re...

Page 128: ...0454657374 will compare the string at the current cursor position with the 4 character string Test Refer to the ASCII Conversion Chart Code Page 1252 for decimal hex and character codes Check for a number EC Check to make sure there is an ASCII number at the current cursor position The format is aborted if the character is not numeric EC Example Only output the data if the bar code begins with a n...

Page 129: ... 5 starting from the current cursor position Syntax EFnnnn where nnnn stands for the delay in 5ms increments up to 9999 This command can only be used with keyboard emulation a Discard Data B8 Discards types of data For example you may want to discard Code 128 bar codes that begin with the letter A In step 4 select 6A for Code 128 and in step 5 select 9999 for all lengths Enter FE41B8 to compare an...

Page 130: ...format and prefixes and suffixes are transmitted Data Formatter On Not Required Drop Prefix Suffix Scanned data is modified according to your data format If a data format is found for a particular symbol those prefixes and suffixes are not transmitted If a data format is not found for that symbol the prefixes and suffixes are transmitted Data Format Required Keep Prefix Suffix Scanned data is modi...

Page 131: ...are not transmitted Any data that does not match your data format requirements generates an error tone If you wish to process this type of bar code without generating an error tone see Primary Alternate Data Formats Choose one of the following options Default Data Formatter On Not Required Keep Prefix Suffix Data Formatter On Not Required Keep Prefix Suffix Data Format Required Keep Prefix Suffix ...

Page 132: ...our data formats and switch between these formats Your primary data format is saved under 0 Your other three formats are saved under 1 2 and 3 To set your device to use one of these formats scan one of the bar codes below Primary Data Format Data Format 1 Data Format 2 Data Format 3 ...

Page 133: ...ction please enter 1 Main Menu Data Memory Data Validation 2 Select 1 1 Checking or 1 N Checking 3 Select CHECKING START POSITION for Data 1 and Data 2 Data1 is valid data Start Position 1 255 Data 2 is data to be checked with Data1 Start Position Any 1 255 4 Select CHECKING LENGTH All Characters 1 255 All Characters means from Data 1 start position to its end 5 Enable Disable PAUSE SCAN WHEN CHEC...

Page 134: ... Lookup Table Name Size 1 Main Menu Data Memory Data Validation Lookup Table Download Lookup 2 Connect MS926 to your PC with a Micro USB cable 3 Go to PC device manager to check the COM information for example CDC USB Demonstration COM40 4 Open serial communication tool and select the corresponding COM port number for example CDC USB Demonstration COM40 And then choose the form you would like to u...

Page 135: ...e stamp Display Date Time stamp Display Date Stamp Settings Time Stamp Settings D T Stamp Order Data Entry Order Field Delimiter Disable YYYY MM DD YYYY MM DD YYYY MM DD YYYYMMDD MM DD YYYY MM DD YYYY MM DD YYYY MMDDYYYY DD MM YYYY DD MM YYYY DD MM YYYY DDMMYYYY Disable HH MM SS HH MM SS AM HHMMSS HHMMSSAM HH MM HH MM AM HHMM HHMMAM Data Time Time Data Data Stamp Stamp Data None Comma Space Semico...

Page 136: ...hortcut key to exit to main menu iOS Soft Keypad Please follow the steps to set up iOS Soft Keypad Main Menu HID KBD Setting iOS Soft Keypad by DblClick SCAN key Enable Disable 4 11 3 Data View Erase Function Please follow the steps to view erase data in Batch mode Auto mode 1 In Batch Mode 2 In Auto Mode Main Menu Data Memory Batch Data Press trigger key Exit Erase View Main Menu Data Memory Buff...

Page 137: ... 1 second 3 seconds 4 11 5 BT Signal Strength Detection Setting Please follow the steps to detect BT signal strength Main Menu Bluetooth CFG Signal Strength Detection Enable Disable 4 11 6 BT Pairing by Scanning Barcode Label Please set up a label format A BT Address and generate a barcode corresponding to it scan the barcode for BT pairing Example 1 A50b7c3b01939 Example 2 A50 B7 C3 B0 19 39 ...

Page 138: ...to International Technical Specification Symbology Identifiers for AIM modifier character details Prefix Suffix entries for specific symbologies override the universal All Symbologies 99 entry Refer to Data Editing and Data Formatting for information about using Code ID and AIM ID Linear Symbologies ...

Page 139: ... 123 MS926 User s Manual ...

Page 140: ...racters can be represented in 3 different ways as shown below The CTRL X function is OS and application dependent The following table lists some commonly used Microsoft functionality This table applies to U S style keyboards Certain characters may differ depending on your Country Code PC regional settings ...

Page 141: ... If the data received does not display with the proper characters it may be because the bar code being scanned was created using a code page that is different from the one the host pro gram is expecting If this is the case select the code page with which the bar codes were created The data characters should then appear properly ...

Page 142: ... 126 MS926 User s Manual ...

Page 143: ... 127 MS926 User s Manual Appendix B Programming Charts 0 1 2 3 4 5 6 7 8 9 ...

Page 144: ... 128 MS926 User s Manual A B C D E F Save Discard Reset ...

Reviews: