background image


HT630 Product Reference Guide


Chapter 3 Operation 


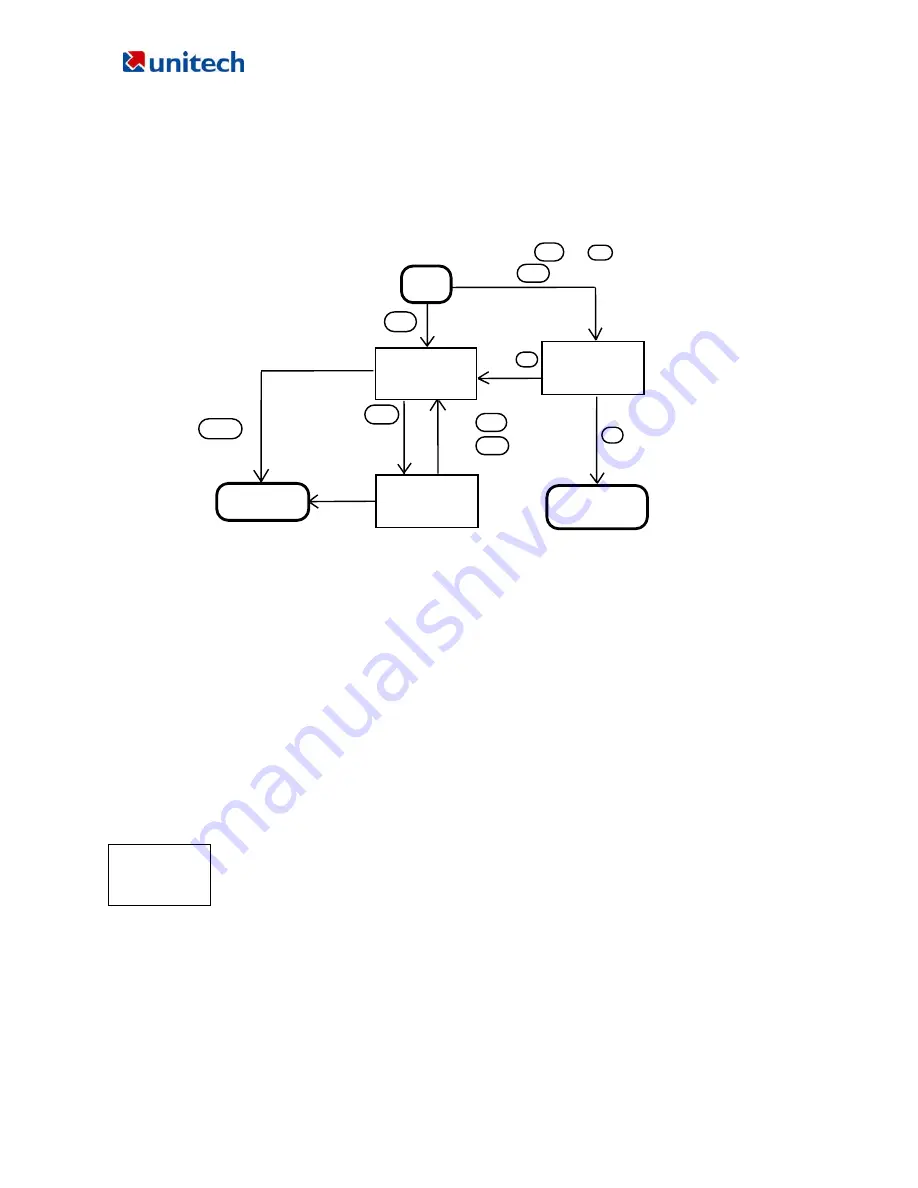
The HT630 is set up several operating modes.  The system of terminal may operate in various modes for 
different purposes.  The figure below shows the operating flow of the terminal.  The following diagram 
summarized these operating modes to switch between different modes. 


press

press


press and hold down

enter


program


then press


press


and

keys


 CMD

 EXIT

 ENTER


CMD


then press   PWR

  PWR

name


(for two

press   2

press

 1

seconds)

OFF

SUPERVISOR


mode

1.SUPERVISOR
2.WARM START

APPLICATION


mode


3.COLD START

<<START MENU>>


MEM 512KB
>


HT630 V1.00

3.COM     4.DIR
5.ERA      6.TYP
7.CPY      8.SET

1.RUN      2.TER

RUN


command


USER mode

Alpha

then


System configurations are categorized in two groups, users can select “8.SET” command in User mode to 
set general system configurations or enter Supervisor mode to set advanced system configurations. The 

Supervisor mode

 is also protected with password checking to prevent unauthorized personnel from 

changing the system configuration. 

(For HT630 detail setup procedures please refer to HT630 Technical Binder).  

It is likely that your unit 

came pre-configure by your software vender or system developer.  In this case, please be caution when 
changing these settings. 


3.1 Ready Mode 


The terminal performs a Power-On-Test and Warm-Start when it is switched on.  After the Warm Start, the 
system enters Ready mode and shows the Ready mode prompt. 
 

The first line indicates the model code and version number (e.g. V1.00).  The second 
line shows the size of the total installed RAM (i.e. 4608 KB). The third line prompts a 
">" which indicates that the terminal passed the Power-on-test and is ready to be used. 

Ready mode 
promp


HT630 Vx.xx 
MEM 4608 KB


>


Summary of Contents for HT630

Page 1: ...HT630 Product Reference Guide Unitech Version 1 4...

Page 2: ...ight be low due to storage Recharge the battery when required For procedures on how to charge the battery please refer to 1 5 Quick Start Please note to switch on backup battery and to ensure fully ch...

Page 3: ...er System 6 2 1 Power System 6 2 2 Power Low Indication 6 2 3 Battery Replacement 6 2 4 Recharging the Battery Pack 7 2 5 Storage and Safety Precautions 8 Chapter 3 Operation 9 3 1 Ready Mode 9 3 2 Us...

Page 4: ...ese attributes we believe the HT630 is going to satisfy your needs totally Depending on the model you had purchased your terminal might be equipped with 3 different memory RAM configuration range from...

Page 5: ...static Discharge ESD 4 KV for contact discharge 8 KV for air discharge Back Lit Display Yes Keypads 26 alphanumeric keys one scan trigger phosphorescent material Performance Characteristics CPU X86 Co...

Page 6: ...to further chapters for detail explanation HT630 Illustrations Figure 0 1 HT630 front view Figure 0 2 HT630 head view Figure 0 3 HT630 tail view Figure 0 4 HT630 side view Figure 0 5 HT630 back view...

Page 7: ...from the back of the cradle to any power outlet During charging LED above power icon will be displayed red Once it is fully charged LED will be turned to green 2 Or use the standard charging cable wh...

Page 8: ...fully charged the light will turn to green This LED light shows the power status of the cradle itself When the light is on it is indicated the cradle is powered on Power On After charging completely L...

Page 9: ...keyboard is initialized to normal mode after being powered on In normal mode the cursor is a block and the keyboard is mainly used to input numeric data and use F1 F4 four function keys COMMAND mode...

Page 10: ...can be programmed by the high level Windows based JobGen Plus program generation software or programmed by commonly used C compilers including Microsoft C Borland C and Turbo C An executable program...

Page 11: ...tery used up all data within the terminal will be lost So it is very important to backup all data when replacing backup battery 2 2 Power Low Indication Main Battery When the main power source reaches...

Page 12: ...star the new unit Make sure to back up your data in terminal before making the replacement the lithium back up battery 2 4 Recharging the Battery Pack When the terminal shows Main battery low message...

Page 13: ...s may appear to have minimal capacity This type of failure can be remedied by temporarily depleting the battery of its power and recharging it to rejuvenate it This condition can be prevented by avoid...

Page 14: ...d in User mode to set general system configurations or enter Supervisor mode to set advanced system configurations The Supervisor mode is also protected with password checking to prevent unauthorized...

Page 15: ...computer In this mode data input from bar code reader or keyboard is displayed on screen and output to RS 232 port Data received from the serial port is displayed on the LCD screen Communication param...

Page 16: ...le to display power on logo see next section 3 3 Configure the Terminal in SET command There are three categories of general system configuration available in SET command Select the corresponded numbe...

Page 17: ...ribed in section 3 2 will need the operator to set the terminal to Kermit server mode by selecting user command 3 COM in User mode or calling system function in application program The hardware and so...

Page 18: ...th and maximum field length 3 DATA TYPE 1 NUMERIC 2 ALPHANUM numeric data 0 9 or alphanumeric data 20H FCH 4 DEVICE TYPE 1 KEY ONLY 2 SCAN ONLY input by keyboard only bar code scanning only or both 3...

Page 19: ...is necessary to delete the FORM DAT in order to change the configuration of FormCaching 4 3 How to Run FormCaching When FormCaching is enabled the built in application can be run by selecting 2 TER c...

Reviews: