background image

035-20646-001 Rev. A (1004)

8

Unitary Products Group

ATTIC INSTALLATION

This appliance is design certified for line contact when the furnace is
installed in the horizontal left or right position. The line contact is only
permissible between lines are formed by the intersection of the top and
two sides of the furnace and the building joists, studs or framing. This
line may be in contact with combustible material.

IMPORTANT: 

In either a horizontal left or right installation, a minimum

of 8" (20.3 cm) clearance is required beneath the furnace to allow for
the installation of the condensate trap and drain pipe. Refer to "CON-
DENSATE PIPING" section of this manual for more information.

SUSPENDED FURNACE / CRAWL SPACE 

INSTALLATION

The furnace can be hung from floor hoists or installed on suitable blocks
or pad. Blocks or pad installations shall provide adequate height to
ensure the unit will not be subject to water damage. Units may also be
suspended from rafters or floor joists using rods, pipe angle supports or
straps. Angle supports should be placed at the supply air end and near
the blower deck. Do not support at return air end of unit. All four sus-
pension points must be level to ensure quite furnace operation. When
suspending the furnace use a secure a platform constructed of plywood
or other building material secured to the floor joists. Refer top Figure 7
for typical crawl space installation.

SECTION IV: GAS PIPING

GAS SAFETY

IMPORTANT: 

Plan your gas supply before determining the correct gas

pipe entry. Use 90-degree service elbow(s), or short nipples and con-
ventional 90-degree elbow(s) to enter through the cabinet access holes.
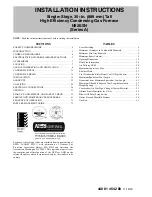
 FIGURE 6:  

Typical Attic Installation

When a furnace is installed in an attic or other insulated space,
keep all insulating materials at least 12 inches (30.5 cm) away from
furnace and burner combustion air openings.

If this furnace is installed over a finished space, a condensate
safety pan must be installed.

 FIGURE 7:  

Typical Suspended Furnace / Crawl Space Installation

LINE CONTACT ONLY PERMISSIBLE
BETWEEN LINES FORMED BY THE
INTERSECTION OF FURNACE TOP
AND TWO SIDES AND BUILDING
JOISTS, STUDS OR FRAMING

FILTER RACK MUST BE A
MINIMUM DISTANCE
OF 18” (45.7 cm)
FROM THE FURANCE

COMBUSTION
AIR

GAS
PIPING

VENT PIPE
(maintain required
clearances to
combustible)

RETURN
AIR

SUPPLY
AIR

12” CLEARANCE
FOR SERVICE

30” MIN.
WORK AREA

ANGLE IRON
BRACKET

1” MAX. BETWEEN
ROD & FURNACE

6” MIN. BETWEEN
ROD & FURNACE

1” MAX. BETWEEN
ROD & FURNACE

SUPPORT
BRACKET

In any application where temperatures below freezing are possible,
see “BELOW FREEZING LOCATIONS”.

An overpressure protection device, such as a pressure regulator,
must be installed in the gas piping system upstream of the furnace
and must act to limit the downstream pressure to the gas valve so it
does not exceed 0.5 PSI (14" w.c. (3.48 kPa). Pressures exceeding
0.5 PSI (14” w.c. (3.48 kPa) at the gas valve will cause damage to
the gas valve, resulting in a fire or explosion or cause damage to
the furnace or some of its components that will result in property
damage and loss of life.

 FIGURE 8:  

Gas Valve

INLET

WRENCH
BOSS

INLET
PRESSURE
PORT

ON

OFF

ON/OFF SWITCH
(Shown in ON position)

MAIN REGULATOR
ADJUSTMENT

OUTLET

OUTLET
PRESSURE
PORT

VENT PORT

CHECKING THE GAS PRESSURES

1.

The pressure ports on the gas valve are marked OUT P and IN
P. 

2.

The manifold pressure must be taken at the port marked OUT P. 

3.

The inlet gas supply pressure must be taken at the port marked
IN P. 

4.

Using a 3/32” (0.2 cm) Allen wrench, loosen the set screw by
turning it 1 turn counter clockwise. DO NOT REMOVE THE
SET SCREW FROM THE PRESSURE PORT. 

5.

Push one end the 3/8” (0.9 cm) ID flexible tubing over the pres-
sure port so that the body of the port is inside the tubing. 

6.

Use a reducer connector to connect the 3/8” (0.9 cm) ID flexible
tube to a 1/4” (0.6 cm) ID flexible tube that is connected to a "U”
tube manometer or digital pressure measuring equipment.

IMPORTANT: 

The inlet gas pressure operating range table specifies

what the minimum and maximum gas line pressures must be for the
furnace to operate safely. The gas line pressure 

MUST BE

7” W.C. (1.74 kPA) for Natural Gas

11” W.C. (2.74 kPA) for Propane (LP) Gas

in order to obtain the BTU input specified on the rating plate and/or
the nominal manifold pressure specified in these instructions and on
the rating plate.

TABLE 5: 

Inlet Gas Pressure Range

INLET GAS PRESSURE RANGE

Natural Gas

Propane (LP)

Minimum

4.5” W.C. (1.12 kPa)

8.0” W.C. (1.99 kPa)

Maximum

10.5” W.C. (2.61 kPa)

13.0” (3.24 kPa) W.C.

Summary of Contents for PS9

Page 1: ...n Kit Assembly 5 Dimensions 6 Accessory Downflow Filter Rack 7 Return Filter Grill and Return Duct Installation 7 Typical Attic Installation 8 Typical Suspended Furnace Crawl Space Installation 8 Gas...

Page 2: ...ational vehicles Failure to carefully read and follow all instructions in this manual can result in furnace malfunction death personal injury and or property damage Furnaces for installation on combus...

Page 3: ...nd repairs are performed Clearances for access Ample clearances should be provided to permit easy access to the unit The following minimum clearances are recommended 1 Twenty four 24 inches 61 cm betw...

Page 4: ...proper fur nace operation Use the Example below to help you in calculating the duct area to deter mine whether the ducts have sufficient area so that the furnace oper ates at the specified external s...

Page 5: ...T The furnace transition kit and the cooling coil cabinet MUST BE SEALED as needed to prevent leaks AND SECURED Refer to the assembly drawing in Figures 2 IMPORTANT On all installations without a coil...

Page 6: ...recommended on all installations The connection of the plenum to the furnace and all the ducts connecting to the plenum must be sealed to prevent air leakage The sheet metal should be crosshatched to...

Page 7: ...allation 1 Install the return filter rack on the top of the furnace return air opening Secure the filter rack to the front and back flanges with screws The return air plenum can be placed over the fil...

Page 8: ...RAMING FILTER RACK MUST BE A MINIMUM DISTANCE OF 18 45 7 cm FROM THE FURANCE COMBUSTION AIR GAS PIPING VENT PIPE maintain required clearances to combustible RETURN AIR SUPPLY AIR 12 CLEARANCE FOR SERV...

Page 9: ...ere the altitude is greater than 2 000 ft 610 m above sea level on natural gas or the altitude is greater than 4 000 ft 1219 m above sea level on propane LP gas Refer to Table 7 or the instructions in...

Page 10: ...ion leads and wiring box may be relo cated to the left side of the furnace Remove the screws and cut wire tie holding excess wiring Reposition on the left side of the furnace and fas ten using holes p...

Page 11: ...an what one furnace can deliver twinning can be used to make two furnaces operate in tandem When two furnaces are installed using the same duct system it is very important that the two furnace cir cul...

Page 12: ...Cooling On a call for cooling Y signal from the wall thermostat both furnace blowers will come on at the same time in cooling speed When the thermostat is satisfied both blowers will stay on for 60 se...

Page 13: ...5 elbows in the combustion air piping and a maximum of 5 elbows in the vent piping 4 Three vent terminal elbows two for vent pipe and one for air intake pipe are already accounted for as vent terminat...

Page 14: ...cement must conform to ASTM D2564 for PVC or ASTM D2235 for ABS piping 7 All joints must provide a permanent airtight and watertight seal 8 Support the combustion air and vent piping such that it is a...

Page 15: ...ion2 A Clearance above grade veranda porch deck or balcony 12 inches 30 cm 12 inches 30 cm B Clearance to window or door that may be opened 6 inches 15 cm for applications 10 000 Btuh 3kW 12 inches 30...

Page 16: ...eet elbow on the vent connec tion 2 Place the 2 5 08 cm PVC WYE Y assembly on the 2 5 08 cm 45 PVC street elbow 3 Locate the rubber condensate hose in front of the blower access panel 4 Slide the hose...

Page 17: ...TION AIR This is a sealed combustion air configuration where the combustion air is supplied through a PVC or ABS pipe that is connected to the PVC coupling attached to the burner box and is terminated...

Page 18: ...ea of a specific louver or grille is not known refer to Table 10 to estimate free area Do not use less than 1 4 0 635 cm mesh Free area or louvers and grilles varies widely the installer should follow...

Page 19: ...materials in the SEALED COM BUSTION AIR SUPPLY section in these instructions when installing the combustion air pipe from the unit and into a ventilated attic space or crawl space DO NOT terminate ven...

Page 20: ...w the heat tape manufacturer s recommendations CONDENSATE DRAIN HOSE PART NUMBERS DOWNFLOW HORIZONTAL CONDENSATE INTERNAL DRAIN CONFIGURATIONS Downflow Furnace is shipped with one end of condensate ho...

Page 21: ...all hose 6 between the top drain of the rain gutter of the inducer and the remaining open end of 3 8 barbed tee 13 Ensure that all hoses are properly installed have no kinks and are draining properly...

Page 22: ...er smaller dogleg end of hose 10 should be installed into the large recessed drain in the condensate trap 7 Install the condensate trap bracket with the condensate trap on to the front side of the fur...

Page 23: ...n air blower heat exchanger or a blocked vent pipe connection Corrective action is required These are manual reset controls that must be reset before operation can continue PRESSURE SWITCHES This furn...

Page 24: ...will start and come up to speed Shortly after inducer start up the hot surface igniter will glow for about 17 seconds b After this warm up the ignition module will energize open the main gas valve c...

Page 25: ...ivided by the time it took to measure 2 cubic ft 0 0566 m3 of gas from the gas meter For Propane LP Gas multiply the Heat content of the gas MJ m3 or Default 93 14 times 0 00283 m3 of gas measured at...

Page 26: ...gas valve as described in E above There will be no second connection to the manometer as it will reference atmo spheric pressure Refer to Figure 36 for connection details IMPORTANT The cap for the pre...

Page 27: ...by positioning the jumper on two of the four positions as shown in Figure 38 The furnace control board also allows user selection of the blower speed that is energized during continuous fan operation...

Page 28: ...4 1554 44 1532 43 1502 43 1457 41 1409 40 1327 38 1221 35 Medium Low 1256 36 1275 36 1275 36 1288 36 1275 36 1265 36 1232 35 1187 34 1126 32 1023 29 Low 937 27 939 27 936 26 945 27 942 27 936 26 912 2...

Page 29: ...peed blower it is found that total system static is 0 58 w c To determine the system airflow complete the following steps 1 Obtain the airflow values at 0 50 0 60 ESP Airflow 0 50 2125 CFM Airflow 0 6...

Page 30: ...035 20646 001 Rev A 1004 30 Unitary Products Group SECTION XII WIRING DIAGRAM FIGURE 39 Wiring Diagram...

Page 31: ...035 20646 001 Rev A 1004 Unitary Products Group 31 NOTES...

Page 32: ...to change without notice Printed in U S A 035 20646 001 Rev A 1004 Copyright by York International Corp 2004 All rights reserved Supersedes Nothing Unitary 5005 Norman Product York OK Group Drive 7306...

Reviews: