Union Community AC-5000 User Manual Download Page 40

AC-5000 / 5100 User Guide                                                                                                                               

40


UNIONCOMMUNITY Co., Ltd. / 12F, Daemyung Valeon, 127, Beobwon-ro,


Songpa-gu, Seoul, 05836, Republic of Korea 

TEL: +82-2-6488-3000 / FAX: +82-2-6488-3100 E-Mail :[email protected] 
http://www.unioncomm.co.kr 

3.5.2. Time Schedule 


3.5.2.1. Setting to Access Control / Time & Attendance 


Select 

  [ENT~] 

 [3. Application] 

 [2. Time Schedule] in the initial screen 

, and 

the following screen appears: 
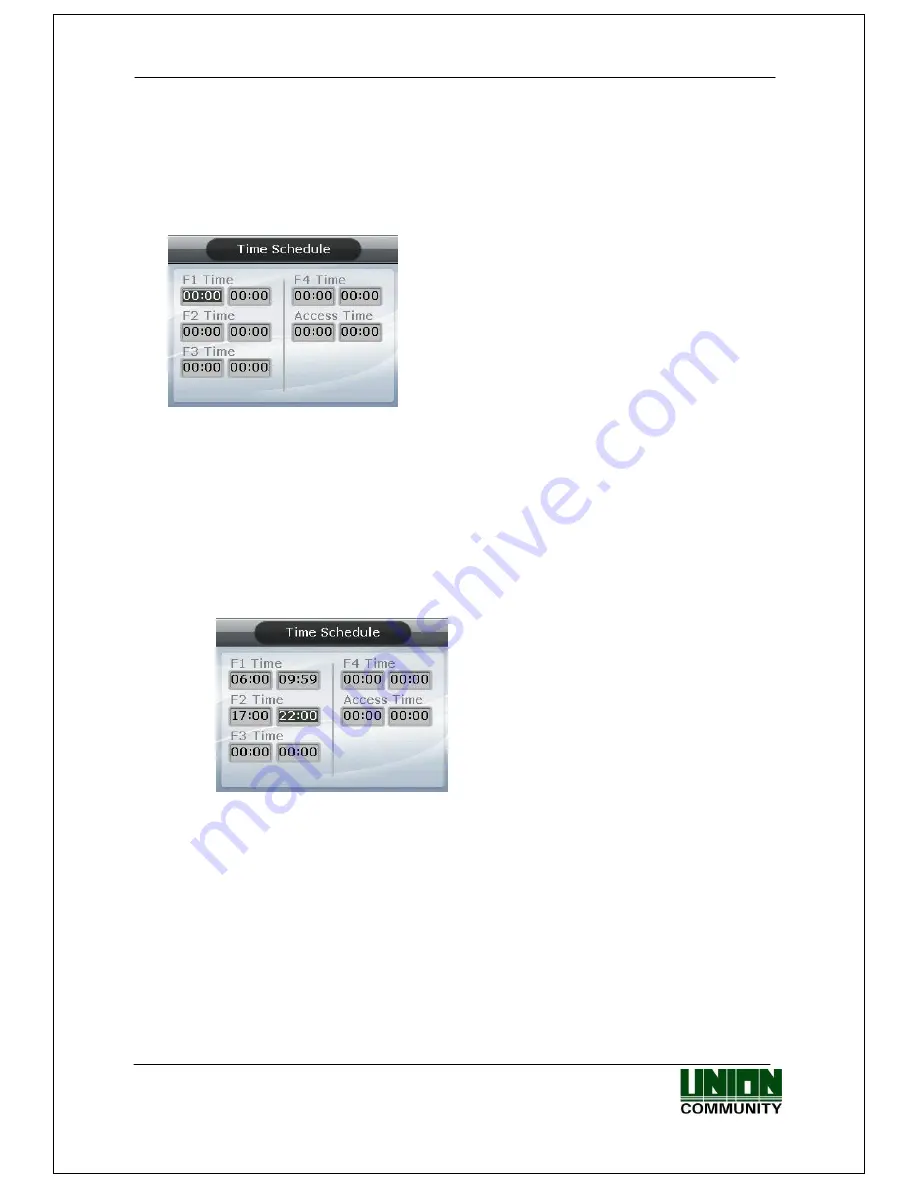


  Initial  setting:  Identical  with  the  screen  on  the 

left. 


The  user  can  set  the  time  period  for  authentication 

mode; otherwise, set to ‘00:00-00:00’. 


Input after deleting the existing value using [F4 (

)] 

to change the value. 
Input HHMM (Hour/Minute) in order - can be set from 

00:00 to23:59 


In a preset time period, it’s always shown in the preset mode unless the user presses 

another function key. Although the user pressed the other function key to authenticate 

with  another  mode  the  terminal  display  mode  automatically  changes  to  authentication 

mode, which is suitable for the management of time & attendance. 


As shown in the example below, each time period must be set without overlapping; the 

mode is determined F1

F2

F3

F4

Access sequentially if they do overlap. 

----------------------------------------------------------------------------------------------------------- 

(Example) Office start=06:00~09:59, Office leave=17:00~22:00 


----------------------------------------------------------------------------------------------------------- 


Exit  to  the  parent  menu  to  apply  the  changed  value,  after  finishing  the  settings,  by 

pressing the [ENT~] key. Press the [F4 (

) ~] key to cancel the input value. 


Summary of Contents for AC-5000

Page 1: ...Copyright 2000 By Union Community Co LTD AC 5000 5100 User Guide Version eng 2 07 ...

Page 2: ...figuration 30 62 00 000 01 2 02 2015 11 18 3 6 1 System Setting 3 6 4 Language 30 62 00 000 02 2 03 2016 01 07 3 6 2 Authentication 30 62 00 000 03 2 04 2016 03 28 2 1 Features Various register and changing Auth Type 13 12 3 7 1 Terminal Option Big character use 3 6 5 Data Time 1 4 LED Signal Shown During Operation 3 3 1 1 Auth Type 3 3 1 5 FP Option 3 6 1 System Setting 3 7 6 Connection device se...

Page 3: ...hat searches for a corresponding user only with fingerprint This method is called 1 N authentication as it searches for the identical fingerprint from the registered fingerprints without a user ID or card being entered 1 N Security Level This is the level used for fingerprint authentication displayed from 1 to 9 depending on how both fingerprints match against each other Authentication is only suc...

Page 4: ... 1 3 Screen Description During Operation 8 1 3 1 Icons Shown During Operation 8 1 4 LED Signal Shown During Operation 12 1 5 Keys Used During Operation 12 1 6 Used Voices During Operation 12 1 7 Buzzer Sounds Used During Operation 13 1 8 How to Register and Input Fingerprint 13 2 Product Introduction 15 2 1 Features 15 2 2 Configuration 17 2 2 1 Standalone Access 17 2 2 2 Connect with PC SERVER Ac...

Page 5: ... 3 6 1 System Setting 44 3 6 2 Authentication 45 3 6 3 Fingerprint 46 3 6 4 Language 47 3 6 5 Date Time 48 3 6 6 Database 48 3 7 Terminal 51 3 7 1 Terminal Option 51 3 7 2 Volume Control 52 3 7 3 Door 53 3 7 4 Wiegand 54 3 7 5 Card Reader 55 3 7 6 External Device 56 3 8 Information 58 3 8 1 System Info 58 3 8 2 Network Info 58 3 8 3 Database Info 59 3 8 4 View Log 59 3 8 5 Version Info 59 3 9 Down...

Page 6: ...ange the color of the unit Avoid high humidity or dust It may cause the unit to malfunction Avoid using water benzene thinner or alcohol for cleaning the unit It may cause an electric shock or fire Do not place a magnet near the unit The unit may break down or malfunction Avoid getting the fingerprint input area dirty It may prevent the unit from recognizing the fingerprint Avoid using insecticide...

Page 7: ...2 2 6488 3000 FAX 82 2 6488 3100 E Mail sales unioncomm co kr http www unioncomm co kr 1 2 Terminal Description LCD Fingerprint Sensor Touch Key Normally the figures are invisible as the LED is off LED turns on and the figures illuminate when the user lightly touches this area Card Input Area Camera AC5100 only State Display LED ...

Page 8: ...when fire is detected by a fire sensor subject to the appropriate fire sensor connection Warning None Normal Abnormal state when terminal is disassembled or door has encountered a problem Door Status Door status is unknown Door is closed Door is open Forced door open Door related error Connection of Server None LAN cable is not connected LAN cable is connected but not yet to the server Connected w...

Page 9: ...C5000 When authentication is successful When authentication has failed When any unregistered user ID is input When fingerprint authentication is attempted where the server is not connected or there is no registered fingerprint in the terminal When any unregistered card is input When fingerprint input has failed If the user removed their finger too quickly before the fingerprint was identified When...

Page 10: ...onse from the server when attempting authentication to the server When network is disconnected during an authentication attempt to the server When the user is not authorized for authentication even if they are registered or the user attempted authentication when access is not allowed When the terminal is set to Locked When it s not a meal time if being used for Cafeteria operation When the authent...

Page 11: ...ser Status waiting for fingerprint input from the user Status waiting for card input from the user During fingerprint card authentication it shows the status when the card reads fingerprint data The user must put the card for 1 2 seconds until the message disappears When waiting for a response after the user attempted authentication by the server When upgrading the terminal program Make sure the t...

Page 12: ...e input Used for cancelling input and moving to a parent menu in menu mode F4 It means to press the F4 key for 2 seconds or longer When input cursor is located in the input box it cancels the input and exits to the parent menu if pressed and held for 2 seconds or longer ENT or MENU Used for modifying the mode Used for saving the values set in menu mode or moving to the screen configuration ENT It ...

Page 13: ...t Brrrrrrp When standing by for input When notifying the status of waiting for the user s input of fingerprint or password Beeeep Success When succeeding in authentication or completing the settings 1 8 How to Register and Input Fingerprint How to Input Fingerprint Please input your fingerprint as if you are sealing a document using your forefinger Avoid inputting your fingerprint with the fingert...

Page 14: ...system Any fingerprint that is damaged or thin may not be used In such cases the user should operate with a password If a finger is in a dry condition we advise breathing lightly on the finger for a smooth operation For children due to their small size and the tender properties of their fingerprints it may be difficult or impossible to use their fingerprints It is necessary to register their finge...

Page 15: ...associated with forgetting a password loss theft of a card or key by using biometric fingerprint recognition technology reinforces the security of self authentication through the use of your own fingerprint Access Management System Using a Network LAN Communication is carried out between the fingerprint recognition device and authentication server using TCP IP protocol and allows for easy expansio...

Page 16: ...on fails FP PW Fingerprint and Password Registration Fingerprint Authentication and then Password Authentication Card Card Registration Card Authentication Card or FP Card and Fingerprint Registration Card or Fingerprint Authentication Card FP Card and Fingerprint Registration Card Authentication and then Fingerprint Authentication Card or PW Card and Password Registration Card or Password Authent...

Page 17: ...r 2 2 Configuration 2 2 1 Standalone Access 2 2 2 Connect with PC SERVER Access Time Attendance Cafeteria TCP IP Cafeteria Management Program Time Attendance Management Program Internet WAN LAN TCP IP TCP IP Remote Admin Program User and terminal setting management TCP IP TCP IP TCP IP DC12V Adapter Electromagnetic Lock Lock Lock Monitor Fingerprint Authentication Server Fixed IP UDB Server Databa...

Page 18: ...ger 1 N 15000 User 1 1 5002 User 128M NAND FLASH 63 488 Log About 17 000 Pics Fingerprint Sensor Optical Authentication Speed Within 1 sec Scan Area Resolution 15 17mm 500 DPI FRR FAR 0 1 0 001 Temperature Humidity 20 50 Lower than 90 RH AC DC Adapter INPUT Universal AC 100 250V OUTPUT DC 12V Option DC 24V UL CSA CE Approved Lock Control EM Strike Motor Lock Auto Door I O 3 In 1 Exit 2 Monitor 2 O...

Page 19: ...myung Valeon 127 Beobwon ro Songpa gu Seoul 05836 Republic of Korea TEL 82 2 6488 3000 FAX 82 2 6488 3100 E Mail sales unioncomm co kr http www unioncomm co kr Card Reader 125KHz RF or 13 56MHz Smart 1 Sam Socket or HID Card Option SIZE 88 0mm 175 0mm 43 4mm ...

Page 20: ...r can transfer to and have access to each sub menu by pressing the relevant number key If the Admin User is already registered Verify Admin screen appears as shown below Figure 3 2 In adherence with the registered authentication method such as card fingerprint or password users can access each menu subject to successful identification after the admin verification has finished Verify Admin appears ...

Page 21: ...nal to open the lid With the lid open as shown in the figure below connect pin 1 to pin 3 and pin 2 to pin 4 of connector J404 Figure 3 3 Access the menu by pressing and holding the F4 key for 2 seconds or longer Enter Admin ID as 0 on the Verify Admin screen Figure 3 2 and press the ENT key The user can now access the menu selected and the buzzer sounds Brrrrrrp After modifying the configuration ...

Page 22: ... pressing the ENT key if the highlight is located in the input box as shown in Figure 3 5 Figure 3 5 Move Highlight using the ENT key As shown in the figure on the left the number is displayed in reverse color when the highlight is in the input box In the figure on the right the applicable letters are displayed in black instead of grey when the highlight moves to Fake Finger Detect Check Box The u...

Page 23: ... functions as a DEL key which deletes figures one by one Press the F4 key for two seconds or longer to cancel input and exit to the parent menu Press the ENT key for two seconds or longer to save the current configuration and move to the parent menu 3 1 4 Move to page Below is the way to go to next page previous page Figure 3 5 To move to the next menu press the F2 button on the keypad The next me...

Page 24: ...the new configuration or 2 No to cancel it Then press the ENT key In this instance if after a period of time there is no input the system returns to the initial screen If there is no new content the system exits from the environment settings menu without the aforementioned Save process When the settings are changed in the menu and if there is no input after a certain period of time the system exit...

Page 25: ...y 4 Delete All 2 Network 1 IP 1 Static IP 2 DHCP IP Address Subnet Mask Gateway 2 Server IP 1 Static IP Server IP Server Port 2 DDNS DDNS ID DDNS IP Server port 3 Terminal ID Terminal ID Authentication 3 Application 1 Application Application 1 Access 2 Time Attendance 3 Cafeteria 2 Time Schedule F1 Time F2 Time F3 Time F4 Time Access Time NO Limit when setting to catering management 3 Function Key...

Page 26: ...7 Beobwon ro Songpa gu Seoul 05836 Republic of Korea TEL 82 2 6488 3000 FAX 82 2 6488 3100 E Mail sales unioncomm co kr http www unioncomm co kr 4 Extended Key Extended Key of Extended Key 5 Display Background Screensaver Clock position 6 RS485 ID Setting RS485 ID Setting ...

Page 27: ...Authentication User Group IP Enable 1 N Card Only Template On Card Verify Multi FP Blocking Time sec NetErrTime Sec 3 Fingerprint 1 1 Level 1 9 1 N Level 3 9 Fake Finger Detect Template types Check Same FP 4 Language 5 Data Time Time Sync Display Time Set Current Time Calendar 6 Database 1 Init Config 2 Delete All Users 3 Clear Log Data 4 Initialize Terminal 5 Terminal 1 Terminal Option Terminal A...

Page 28: ...n Duration Warn Door Open 4 Wiegand Bypass Wiegand Out Site Code 5 Card Reader Card Format Read Card NO Dummy Mode 6 External Device Printer Lock Controller Connection Device Setting Mode 6 Information 1 System Info 2 Network Info 3 Database Info 4 View Log 5 Version Info 3 3 User Select 1 User in the main menu and the following screen appears Press 1 key to register new user 2 key to delete user ...

Page 29: ...pears if the ID is not yet registered The icon on the left mean as shown below Authentication type Number of Fingerprints Registered 0 10 Number of Cards Registered 0 10 Whether or not Password is Registered Registered Not Registered As shown on the screen the user registers by pressing 2 for fingerprint 3 for card and 4 for password Basically it is registered in the name of the user Using the key...

Page 30: ...ter fingerprint Fingerprint must be input twice as below according to the screen guidance When the fingerprint sensor is lit and the message Place Finger on sensor is displayed place a finger on the window for fingerprint input for 2 3 seconds until the light goes off When the message Place same Finger on sensor is displayed enter the fingerprint once again When entering the fingerprint for the se...

Page 31: ...stration screen appears put the card on it If you want to exit without registration press the F4 key 3 3 1 4 PW Register Input the password in 1 8 digits on the password input screen and press the ENT key The Confirm Password window appears Input the same password and press the ENT key Press the F4 key for 2 seconds or longer to cancel and exit 3 3 1 5 FP Option This is the setting related to fing...

Page 32: ...istration process is complete press Ent key to save it The user settings are not saved if the user doesn t press Ent key and exits by pressing the F4 key The following is the LCD guidance message indicating the user can exit from the registration process When registered normally with ENT key pressed When registration failed after 6 Save key pressed Means the user is not registered properly in acco...

Page 33: ...istered In case of 2 FP Register when the user tried to register a fingerprint that has already been registered If the user wants to register the same fingerprint with another ID again they must the release 4 System 3 Fingerprint Check Same FP function This is however not suitable for Time Attendance as the same fingerprints could be authenticated with different ID s In case of 2 FP Register or 3 ...

Page 34: ...ing from the terminal doesn t mean deletion from the server Therefore it is necessary to delete from the server to make the deletion complete Special care should be taken when deleting since deletion is performed regardless of User Admin In particular the user registered in the terminal may not be restored after deletion unless registered on the network server The following are the LCD information...

Page 35: ...ght Authentication type FP Number of Registered Fingerprints 1 Number of Registered Cards 0 Whether or not the Password is Registered Not registered For the method of changing see 3 3 1 Add as it is the same as shown in the registration method 3 3 4 Delete All Select ENT 1 User 4 Delete All in the initial screen and the following screen appears If the user is sure they want to delete all users pre...

Page 36: ...10 50 sequentially to input 192 168 10 50 Select 1 when a fixed IP address is assigned to the connected network and select 2 in cases where there is a DHCP server in the connected network which is assigning the address Set IP Subnet Mask and Gateway if it is a fixed IP There s no need to set the address if the user selected a flexible IP address The user can exit to the parent menu using the ENT k...

Page 37: ...tings Select ENT 2 Network 2 Server IP 1 StaticIP in the initial screen and the following screen appears Set the Server IP and Port To change the port move the input highlight to the server port by pressing the ENT key Initial Setting Server Port 9870 The default port value of the authentication server is 9870 for the UNIS server and 2201 for the Access server Special care should be taken since if...

Page 38: ...he server program After finishing the setting press ENT key to apply the changed value or press F4 key to exit the parent menu 3 4 3 Terminal ID Select ENT 2 Network 3 Terminal ID on the initial screen and the following screen appears Set Terminal ID and Authentication Initial setting Terminal ID 1 Authentication 2 terminal server Terminal ID is the unique ID used by the authentication server for ...

Page 39: ...uthentication cannot be performed unless the server is connected Flexible designation is allowed depending on the circumstance such as the number of terminals connected to the server the number of users authenticated or network errors etc It is recommended to use 2 Terminal Server so concurrent authentications can be attempted if 10 terminals are connected to the server or if frequent network erro...

Page 40: ...using F4 to change the value Input HHMM Hour Minute in order can be set from 00 00 to23 59 In a preset time period it s always shown in the preset mode unless the user presses another function key Although the user pressed the other function key to authenticate with another mode the terminal display mode automatically changes to authentication mode which is suitable for the management of time atte...

Page 41: ...elect ENT 3 Application 3 Function Key in the initial screen and the following screen appears Initial setting Identical with the screen on the left Function key refers to the keys F1 F4 ENT Auto Sensing used to change the authentication mode such as office start office leave etc If you press a function key the authentication mode changes to the applicable mode When a box is not checked authenticat...

Page 42: ...p to 40 as required in addition to the basic function keys F1 F4 ENT The screen for selecting the extended keys when the user presses the F4 key is shown below Select the applicable mode with 0 9 keys If the number of extended keys exceeds 10 select them by changing the page with the F1 F4 keys Example If the number of the extended keys is 16 press F4 key in the initial screen and the following sc...

Page 43: ...entially at every preset interval seconds But it is not represented in the order of setting rather it is represented from the first Screen Saver 0 10 1800sec If there is no input for a time you set LCD screen turns off automatically However if set to 0 LCD screen always turns on 10 seconds to 1800 seconds can be set The user can exit to the parent menu using the ENT key to apply the changed values...

Page 44: ...r must set it to 6 if the ID registered in the server program is 000075 which is 6 digits long Display Option When set to 1 None only the authentication result message is displayed when the authentication is successful but when set to 2 the user ID is displayed If set to 3 user name 4 UserKey 5 User s statement will be displayed on LCD screen if the terminal does not store the corresponding user i...

Page 45: ...e Where the user inputs 12 to attempt authentication when the user ID is a 4 digit figure If checked 1 N authentication is attempted from users having ID 1200 1299 If unchecked 1 1 authentication is attempted from fingerprints of users whose ID is 12 Enable 1 N If checked this option enables fingerprint only authentication without inputting user ID or card Even if the user is registered with 1 N a...

Page 46: ...gle occurrence of authentication failure Blocking Time sec This function prevents duplicate authentication for the same user within the preset time period When set to 0 it has no restriction However when set to a value larger than 0 the user can be successful in re authentication if the preset time sec has elapsed after the success of the previous authentication NetErrTime Sec Network error time s...

Page 47: ... may not read well Template type It sets the type of the fingerprint template In this setting all the users are deleted and the terminal is rebooted It selects one of the UNION ISO_ Standard ISO_Extended Default UNION Check Same FP If checked is the function that during registration checks whether or not the fingerprint is already registered to prevent overlapped registration of the same fingerpri...

Page 48: ...1 Auto to perform it automatically while 2 Manual is for manual setting Display Time The method of displaying the current time of the terminal set to 1 for 24 hour clock and 2 for AM PM system Set Current Time Changes the current time of the terminal No change is required if it s synchronized and linked with the server time and with the aforementioned Time Sync set to 1 Auto Calendar To configure ...

Page 49: ...o value is input for a certain period of time in this state it returns to the initial screen instead of initialization Initializes all the configurations of the terminal except MAC physical address but it doesn t delete the user and authentication record When the configuration is successfully initialized it proceeds to the parent menu accompanied by the success buzzer sound 3 6 6 2 Delete All User...

Page 50: ...hentication and the deleted logs cannot be restored after deletion When deletion is successfully completed it proceeds to the parent menu accompanied by the success buzzer sound 3 6 6 4 Initialize Terminal Select ENT 4 System 6 Database 4 Initialize Terminal in the initial screen and the following screen appears Press the 1 Yes key to initialize the terminal to the factory default state or select ...

Page 51: ...the previous page 3 7 1 Terminal Option Select ENT 5 Terminal 1 Terminal Option in the initial screen and the following screen appears Initial setting Identical with the screen on the left Door open Door opens when the 0 key is pressed Appears only when the terminal is locked This option is not normally shown Tamper Alarm If checked a warning sound is generated when the lid of the terminal is open...

Page 52: ...d For the download method see 3 9 Download customized file Camera Use If checked use camera Camera images can be viewed via UNIS server 단 AC5100 only User Text If checked when you press F1 F2 F3 F4 key each function message will appear on the screen Displayed only when the language is set to Hangul The clock is locked at the bottom Door Open This menu shows that the terminal administrator is allow...

Page 53: ...ion 7 Emergency detection NO or 8 Emergency detection NC An emergency situation sensor in connection Configure NO NC depending on the pin status upon detection 9 Controller authorization result It sends the authorization result to the external controller You should connect the RED led of the controller with DM1 or DM2 through the board toward TR and the pin should be set 9 Controller result You sh...

Page 54: ...erated in cases where the door is unexpectedly not closed within the preset time although the door should be closed This warning allows proper action to be taken for the door to be closed To use this function the lock must be the one that enables the monitoring of the door door status and the monitoring pin of the lock should be connected to the terminal In addition such settings are enabled only ...

Page 55: ...nsmits the data received by Wiegand Import at the time when authentication was successful to the Wiegand Out as it is The user can exit to the parent menu using the ENT key to apply the changed values Use the F4 key to cancel input during setting 3 7 5 Card Reader Select ENT 5 Terminal 5 Card Reader in the initial screen and the following screen appears Initial setting Identical with the screen on...

Page 56: ...Expression 1 Default 529D06E3 Expressed as an 8 digit hexadecimal number 2 Hexadecimal number E3069D52 Expressed as an 8 digit hexadecimal number changing the order of byte 3 Decimal number 1386022627 Hexadecimal number 529D06E3 to be expressed as a 10 digit decimal number 4 Decimal number 35 3808861522 Hexadecimal number E3069D52 to be expressed as a 10 digit decimal number 5 Hexa_1 069D52 Only t...

Page 57: ...l for the entrance control If the lock is directly connected to the terminal select 4 None And if the LC010 is connected select 5 LC And if MCP040 is connected select MCP Connection device setting It is set when connecting the slave reader using card or fingerprint to the terminal to use as the supplementary authorization device Set 7 to connect the Wiegand card reader and set 8 to connect the SR1...

Page 58: ...en appears Menu to view the terminal settings Press 1 key to view various terminal configurations 2 key to view network configuration such as IP 3 key to view the user registration status etc 4 key to view log data 5 key to view firmware version 3 8 1 System Info Select ENT 6 Information 6 System Info in the initial screen Press the F4 key to exit to the parent menu 3 8 2 Network Info Select ENT 6...

Page 59: ...r of registered administrators Max User Maximum number of users that can be registered Registered FP Number of whole fingerprints that are registered Max FP Maximum number of fingerprints that can be registered Press the F4 key to exit to the parent menu 3 8 4 View Log Select ENT 6 Information 4 View Log in the initial screen All Log Number of logs saved in the terminal Max Log Maximum number of l...

Page 60: ...ear Select the terminal on the terminal list window and click the Send button again The file will be transmitted with the downloaded result displayed The file name can be up to 15 characters long including the extension name with a jpg file size of 320 240 If any data in a different format is downloaded the transmission result will be displayed as a version error To change the background image you...

Page 61: ...nge the user s defined voice into the default voice release the check mark in the User Voice item in 3 5 5 Display 3 9 3 Change User Text When selecting Download customized file in UNIS program the following screen appears Designate the file as Defined Text File csv select CSV file csv and click the Send button The terminal select window will appear Select the terminal from the terminal list windo...

Page 62: ...ge of Authentication Mode Figure 4 1 Normally it s not visible but when the user touches their hand on the card input area as shown in the Figure at the left the LED s are powered ON and the keypad appears as shown in the Figure at the right When the keys are visible press the desired function key to change the authentication mode such as office start F1 office leave F2 going out F3 return F4 acce...

Page 63: ...ENT key after inputting ID causes the fingerprint input or password input screen to appear depending on the method of user authentication However authentication will fail if a card user inputs ID first Therefore be sure to use the card 4 3 Authentication 4 3 1 Fingerprint Authentication When placing a fingerprint on the sensor a buzzer sounds with the sensor lamp ON and the fingerprint is duly inp...

Page 64: ...this device may not cause interference and 2 this device must accept any interference including interference that may cause undesired operation of the device Le présent appareil est conforme aux CNR d Industrie Canada applicables aux appareils radio exempts de licence L exploitation est autorisée aux deux conditions suivantes 1 l appareil nedoit pas produire de brouillage et 2 l utilisateur de l a...

Page 65: ... interference to radio communications However there is no guarantee that interference will not occur in a particular installation If this equipment does cause harmful interference to radio or television reception which can be determined by turning the equipment off and on the user is encouraged to try correct the interference by one or more of the following measures 1 1 Reorient or relocate the re...

Reviews: