C.I.B. UNIGAS
- M039213CB
34
Oil Flow Rate Settings by means of Berger STM30../Siemens SQM40.. actuator
1
Once the air and gas flow rates are adjusted, turn the burner off, switch it on again by turning the
CM
switch to the oil operation
(OIL, on the burner control panel (see page 38).
2
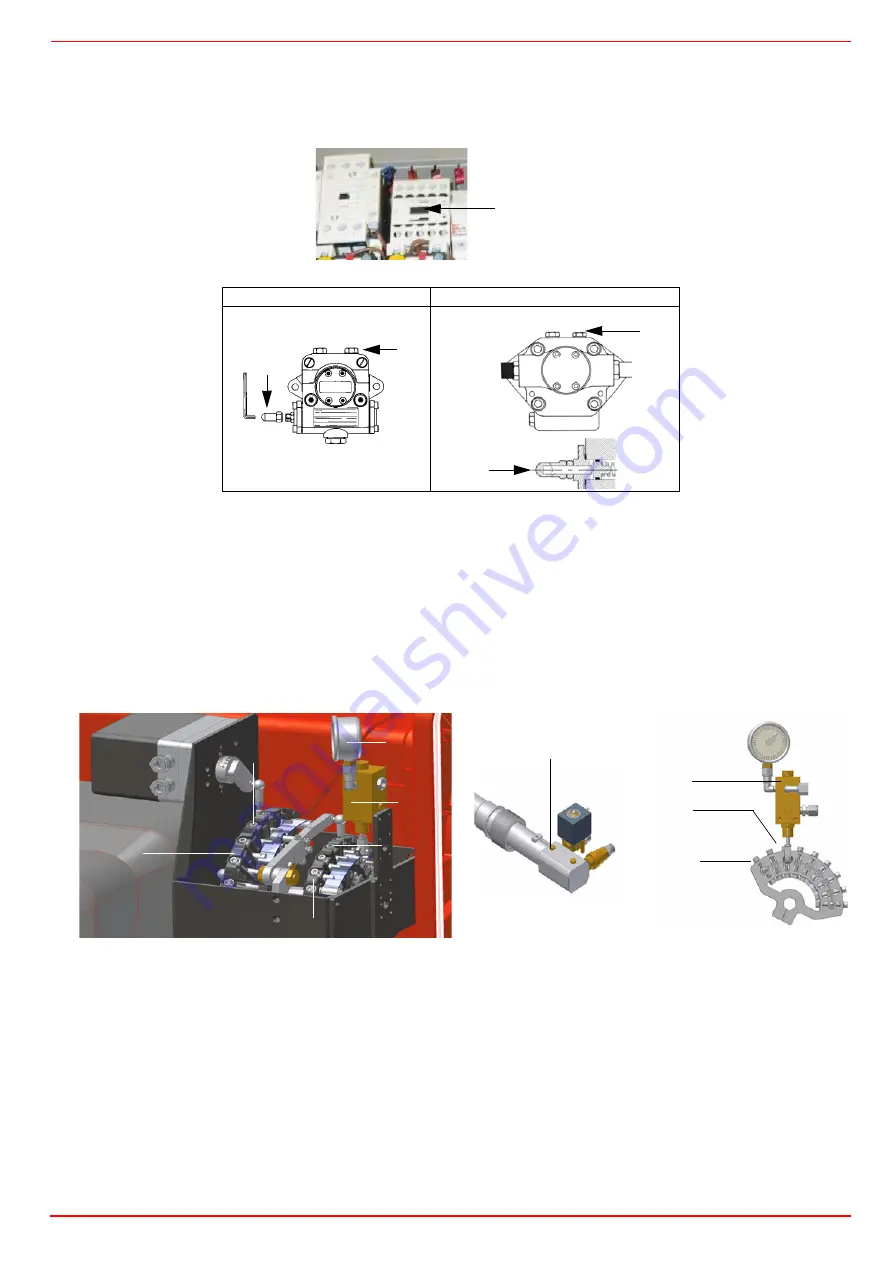
with the electrical panel open, prime the oil pump acting directly on the related
CP
contactor (see next picture): check the pump
motor rotation and keep pressing for some seconds until the oil circuit is charged;
3
bleed the air from the
M
pressure gauge port (Fig. 22) by loosing the cap without removing it, then release the contactor.
Fig. 22
4
Before starting the burner up, drive the high flame actuator microswitch matching the low flame one (in order to let the burner ope-
rates at the lowest output) to achieve safely the high flame stage .
5
record the high flame value set during the gas operation adjustments (see previous paragraphs);
6
start the burner up by means of the thermostat series and wait until the pre-purge time comes to an end and that the bruner starts
up;
7
drive the burner to high flame stage, by means fo the thermostat
TAB
(high/low flame thermostat - see Wiring diagrams), as far as
fully-modulating burners, see related paragraph.
8
Then move progressively the microswitch to higher values until it reaches the high flame position; always check the combustion
values and eventually adjusting the oil pressure (see next step).
9
the nozzle supply pressure is already factory-set and must not be changed. Only if necessary, adjust the supply pressure as fol-
lows (see related paragraph);insert a pressure gauge into the port shown on Fig. 22 and act on on the pump adjusting screw
VR
(see Fig. 22 and page 22) as to get the nozzle pressure at 25bar (Fluidics nozzles - see page 33).
10 in order to get the maximum oil flow rate, adjust the pressure (reading its value on the
PG
pressure gauge) without changing the air
flow rate set during the gas operation adjustments (see previous paragraph): checking always the combustion parameters, the
adjustment is to be performed by means of the
SV2
adjusting cam screw (see picture) when the cam has reached the high flame
position.
11 as for the point-to-point regulation in order to set the cam foil shape, move the oil low flame microswitch a little lower than the maxi-
mum position (90°);
12 set the
TAB
thermostat to the minimum(as far as fully-modulating burners, see related paragraph) in order that the actuator moves
progressively towards the low flame position;
13 move the low flame cam towards the minimum to move the actuator towards the low flame until the two bearings find the adjusting
screw that refers to a lower position: screw
V2
to increase the rate, unscrew to decrease, in order to get the pressure as showed
on chart/diagram on “Adjusting light oil flow rate” on page 33, according to the requested rate.
Suntec TA..
Suntec T..
Fig. 23
Fig. 24
CP
VR
M
M
VR
SV1
V1
SV2
RP
PG
SC
V2
Pressure gauge port
RP
PG
V2
SV2
Summary of Contents for HR93A
Page 45: ...C I B UNIGAS M039213CB 45...


