background image

9.2 Call History

UIP312 keeps a history of the calls you have made and you have received. It let you find a 
specific call information and redial that number as well. 

It stores up to 16 most recently dialed calls information and 16 most recently received calls 
information.

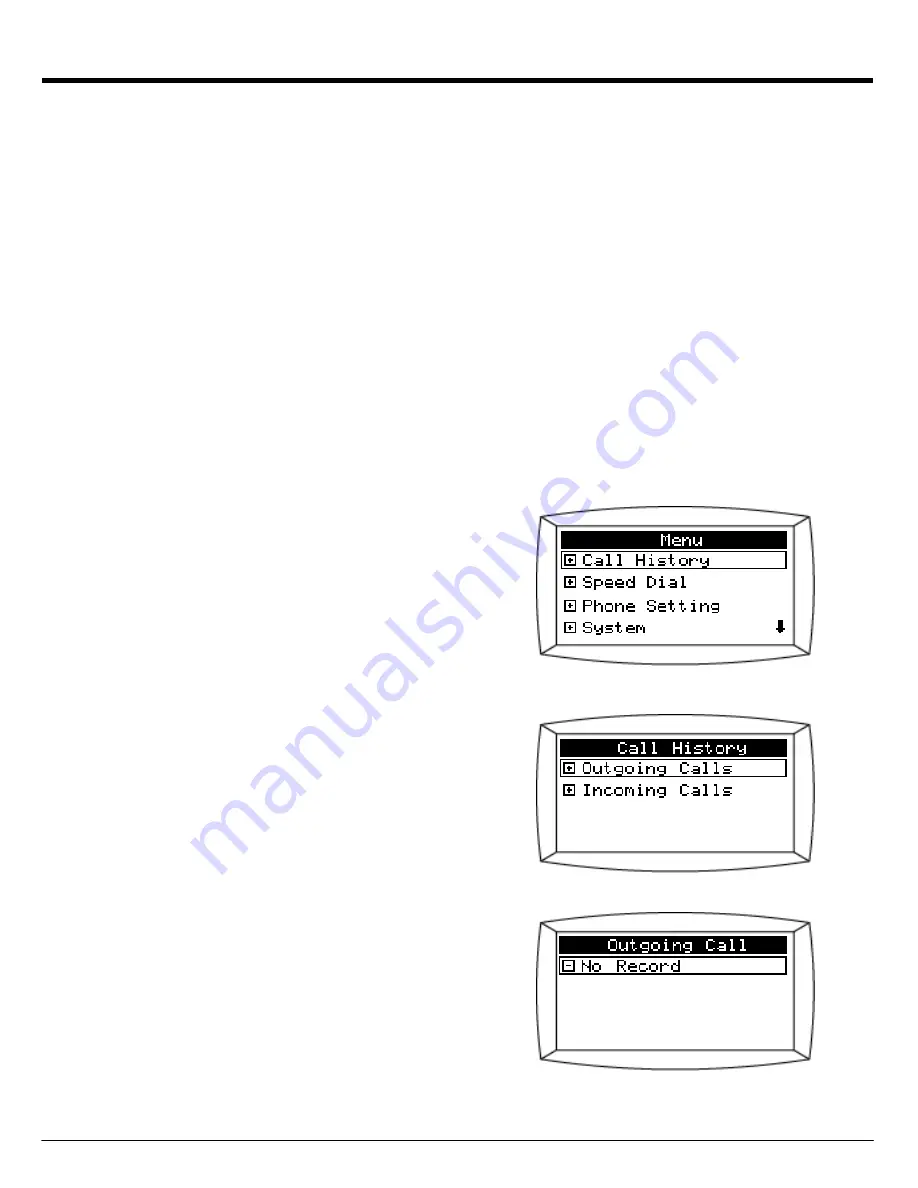
Call History consists of Outgoing Calls and Incoming Calls, and you can find this at
MENU 

Call History

How to go to Call history Menu

1. Press the 

MENU

button.

2. In the MENU screen, select 

Call History

.

Call History is user password protected 

3. There are two items in the Call History menu. 

No Record

” is displayed when there is no call

information to show.

Page 25

Summary of Contents for UIP312

Page 1: ...User Guide V 1 6 S W v1 2 8 Bootrom v3 1 2 UIP312 CENTREX IP TELEPHONE...

Page 2: ...Revision History No change T Ryu 07 22 03 1 6 Change the Incoming Call log 9 2 2 T Ryu 04 01 03 1 5 DESCRIPTION RESP ENGR DATE Version i...

Page 3: ...ll 8 Phone Operation 8 1 How to Use the Handset and Speakerphone 8 2 Adjusting the Handset and Speakerphone Volume 8 3 Adjusting the Ringer Volume 8 4 Muting a Call 8 5 Redialing the Last Number 8 6 H...

Page 4: ...6 Information 9 6 1 Version 9 6 2 Network 9 6 3 IP Phone 10 Using the SETUP menus 10 1 Address Setting 10 1 1 GK Address 10 1 2 ALIAS Number 10 1 3 H235 Password 10 2 Voice 10 2 1 Select Codec 10 2 2...

Page 5: ...red power source The proper power source required for this phone is written on the power adaptor you received with this phone If you are unsure of the type of power supplied to your premises consult y...

Page 6: ...ut interference from other data signals Furthermore to provide consistent superior voice quality over varying and congested IP network conditions the Phone is equipped with advanced Quality of Service...

Page 7: ...cluded in your Phone package One phone body One Handset Cord One DC 18V 600mA Adapter One User Guide One UTP Cable 2m One Headset Adapter One Foot Stand Foot Stand Phone Body Handset Cord Power Adapto...

Page 8: ...T Key FLASH Button REDIAL Button MUTE Button Function Keys F1 F14 Speed dial label Display LCD Soft Keys Handset Arrow Keys Volume Key Dial Pad Speakerphone Button Moves to upper menu Moves Up Moves D...

Page 9: ...arrow key moves the cursor to the right In menu items such as in Speed dial Name that allow space input the RIGHT arrow key is also used as a way to input a space along with the DTMF 0 button i The UP...

Page 10: ...most recently dialed number MUTE Pressing the MUTE button prevents the party you are speaking to from hearing what you say SPEAKERPHONE Pressing the Speakerphone button allows you to make a call with...

Page 11: ...to the UPLINK port on the back of the Phone as shown in Figure 1 Connect the power adapter to an AC outlet and connect the jack to the DC IN 18V on the back of the Phone See Note If you use this phone...

Page 12: ...t into the Headset Adapter RJ 11 4P Speaker MIC Note You can use any standard headset since UIP312 s headset pin map conforms to the standard When using RJ 11 Adapter use a headset with the pin map fo...

Page 13: ...apter at the same time 1 If you plug in the adapter first to the phone and then plug in the POL capable UTP cable the phone will continue to receive power from the adapter At this point if you disconn...

Page 14: ...state 3 The Registration state 4 The DND state 5 The Missed Call state if any 7 2 1 Network state icon If you see icon on the screen either UIP312 s network configuration is incorrect or there is a pr...

Page 15: ...e handset or pressing the speakerphone button will let you make a call on LINE1 2 If only one line between LINE1 and LINE2 is registered picking up the handset or pressing the speakerphone button will...

Page 16: ...ling The screen shot to the right is when you dialed 4800000 You should be hearing ring back tone shortly after 7 3 Receiving a call 7 3 1 When there is one incoming call When the telephone receives a...

Page 17: ...a call while you are receiving or making another call this phone will display Caller ID flash the Message Waiting Lamp and ring If you choose to answer the second call select the appropriate line to a...

Page 18: ...s user will hear music Phone A is now talking to Phone B Step 5 Phone A s user press the FLASH button again Phone B is placed on hold Phone A and Phone C are now talking to each other Step 6 Phone A d...

Page 19: ...utomatically be reconnected to Line 1 If you disconnected Line 2 by returning the handset to the handset cradle you will be reconnected to Line 1when you pick up the handset Should you forget to pick...

Page 20: ...se LINE 1 is on hold and LINE 2 is the active line The handset is being used At this point the user disconnects the LINE 2 call by hanging up LINE 1 is still on hold and LINE1 LED keeps blinking If th...

Page 21: ...e Volume To increase or decrease the volume of your handset and speakerphone first lift the handset or press the Speakerphone button and press the up or down VOLUME key to the desired level The range...

Page 22: ...ng the handset Speakerphone Volume control Press the Volume UP DOWN keys while using the speakerphone Headset Volume control Press the Volume UP DOWN keys while using the headset Ringer Volume control...

Page 23: ...tton will redial the most recently dialed number regardless of whether it was dialed on Line 1 or Line 2 8 6 Holding a call There are two ways to place the current line on hold in the multi line phone...

Page 24: ...with your administrator Note The Phone provides Caller ID as default If Caller ID does not work contact your administrator 8 8 Call information If you want to see the dialing info of a call you made...

Page 25: ...were using the handset If you plug the headset in while you were using the handset you will speak and hear through the headset At this point if the headset adapter is plugged back out you will be able...

Page 26: ...o a vertical bar cursor Alphabet letters are lowercase by default To change the current letter to uppercase press the Volume UP key Also you can press the LEFT or DOWN arrow Navigation key to delete t...

Page 27: ...entering 4466P 000 FONT 0 9 8 7 6 5 4 3 2 1 1 0 9 8 7 6 5 4 3 2 1 Dial Pad Step 1 For 4 4 Step 2 For 4 4 Step 3 For 6 6 Step 4 For 6 6 Step 5 For P REDIAL Press the REDIAL button for a Pause input St...

Page 28: ...m Information Ring Type Network F1 MAC Address MANUAL Address Settings Time Reboot VMS Number Incoming Calls F14 Version IP Config DNS AUTO Display Name Phone Function Disable Redial Do Not Disture Ne...

Page 29: ...rmation and 16 most recently received calls information Call History consists of Outgoing Calls and Incoming Calls and you can find this at MENU Call History How to go to Call history Menu 1 Press the...

Page 30: ...ems in the Call History menu Select Outgoing Calls 3 to see a history of the calls you have made 4 On the Outgoing Calls screen select one of the following REDIAL to make a Redial DELETE Call informat...

Page 31: ...In the MENU screen select Call History 2 Select Incoming Calls to see a history of the calls you have received 3 Incoming Calls does not display calls you missed while on another call 4 On the Incomi...

Page 32: ...atever the number you need to enter in addition TIP Example Let s say you want to use an automated telephone banking service to check you balance You normally would have to go through the following st...

Page 33: ...eed Dial 2 To program the F1key select F1 No Data 3 Select the name field and press the right arrow key 4 Input a name using the dial pad Up to 18 Alphanumeric characters can be entered in the name fi...

Page 34: ...p to 32 digits of the phone number are visible in the read only Speed Dial window that is shown on the right Note 1 To enter a flash press the FLASH button To enter a pause press the REDIAL button Eac...

Page 35: ...you want to call 3 On the Speed Dial 1 screen select one of the following Dialing to make a call Name to change the name Number to change the number For the number field up to 32 digits can be displa...

Page 36: ...is displayed for about 2 seconds If no name its number is displayed instead To access Function keys F8 through F14 first press the SHIFT key and then press the desired key When the shift key is presse...

Page 37: ...tem Number UIP312 has the Voice Message Lamp which informs you of incoming voice mails When the Voice Message Lamp flashes indicating you have a voice message you can call the VMS machine and enter yo...

Page 38: ...To program a pause press the REDIAL button To program a flash press the FLASH button Input method of VMS number is basically the same as that of Speed Dial number 3 The VMS button is lit when you hav...

Page 39: ...ring when a call came in on LINE1 from when a call came in on LINE2 1 Press the MENU button On the MENU screen select Phone Setting 2 There are four items on the Phone Setting screen Select Ring Type...

Page 40: ...of the LCD screen when the phone is idle 3 On the Display Name screen select Line 1 or Line 2 Input your display name using the Dial Pad and press OK Display Name is password protected Consult your ne...

Page 41: ...pability These two functions are Do Not Disturb and Disable Redial Note These two functions go back to their default settings after power on or reset 1 Press the MENU button On the MENU screen select...

Page 42: ...on by enabling Disable Redial function In order to disable the redial function select Disable Redial and press the right arrow key to prevent others from using Redial on your phone Pressing the REDIAL...

Page 43: ...User or administrator password are as follows Call History User password VMS Number User password Change Password User password Address Setting Administrator password Voice Administrator password Prio...

Page 44: ...OK at the Enter New Password prompt without entering any text Press the OK again without entering any text at the Retype Password prompt TIP Wrong input for old password or retype will display the fo...

Page 45: ...set password If no password is currently set you will see New Password submenu instead of Change Password submenu 1 Press the MENU button On the MENU screen select System 2 Select Change Password 3 T...

Page 46: ...no password is currently set you will see New Password submenu instead of Change Password submenu 1 Press the MENU button On the MENU screen select System 2 Select Change Password 3 Type the currently...

Page 47: ...administrator 1 Press the MENU button On the MENU screen select System and then select Time 2 Select Mode on the Time screen and press the right arrow key until AUTO mode is selected The default is A...

Page 48: ...r assistance This Time Server s address is valid only when the network is set to Manual IP 6 Follow the same process for Time Offset After selecting Time Offset search for an appropriate time offset u...

Page 49: ...Eastern No GMT 04 00 Atlantic Daylight Savings Time Summer Time Standard time Daylight Saving Time Summer Time When in DHCP mode UIP312 will automatically adjust to the daylight saving time by accessi...

Page 50: ...L submenu while Mode is in AUTO you will be warned with Invalid Mode and won t be able to access it 3 When entering the time manually use military time format For example 11 00 p m is entered as 23 00...

Page 51: ...ia Brazil China Germany Hong Kong Korea Mexico Netherlands Philippines Singapore Taiwan France India Poland Spain Service Provider U S A Optus Brazil ABNT China Guangdong ARCOR Hongkong Telecom Hanaro...

Page 52: ...n select System and then select Reboot By doing this the phone can be rebooted without resetting power 2 Press the right arrow key to confirm the reboot process 3 The phone will be rebooted with the f...

Page 53: ...urrently installed in you UIP312 1 On the Menu screen select Information 2 On the Information screen select Version to obtain information about your phone s application software Bootrom and hardware v...

Page 54: ...nt network setting of your UIP312 1 On the Menu screen select Information 2 Select Network 3 To obtain your IP address select IP Config 4 Follow the same procedure to obtain Information about your pho...

Page 55: ...erify gatekeeper address and your phone s frame size and jitter buffer size 3 Select Address 4 The gatekeeper address and alias telephone number information will be displayed Note GK address and alias...

Page 56: ...5 Select Codec 6 The Codec information will be displayed 7 Select Jitter Buffer 8 The default value of each jitter buffer is G 711 20 ms G 723 1 60 ms G 729A 40 ms Page 52...

Page 57: ...or on how to configure 10 1 Address Setting 10 1 1 GK Gatekeeper Address UIP312 must register to GK Address in order to be able to perform basic call operations 1 On the Menu screen select Setup 2 In...

Page 58: ...network administrator to obtain your GK address 4 Using the dial pad input your GK address To key in a period when entering an IP address press Note If GK Address is not correctly set you won t be abl...

Page 59: ...by administrator password if your UIP312 has the administrator password set you will be asked to enter the password 2 Select Alias 1 3 Input your alias and press OK Up to 16 digits are allowed Please...

Page 60: ...P Line 1 and Line 2 cannot have the same alias If you enter the same alias of the other line you will be notified with the warning message saying Duplicate Alias and that alias will not be saved Page...

Page 61: ...menu is protected by administrator password if your UIP312 has the administrator password set you will be asked to enter the password 2 Select H235 Password 3 Enter your H235 password and press OK ke...

Page 62: ...etting 1 On the Setup menu screen select Voice Note Since Voice menu is protected by administrator password if your UIP312 has the administrator password set you will be asked to enter the password 2...

Page 63: ...trator 1 On the Setup menu screen select Voice Note Since Voice menu is protected by administrator password if your UIP312 has the administrator password set you will be asked to enter the password 2...

Page 64: ...sired G 723 1buffer size between 10ms and 180ms by using the arrow keys The default value is 60ms 7 Select G 729A Buffer 8 To manually select the G 729A Buffer select the desired G 729Abuffer size bet...

Page 65: ...ignal DiffServ 1 In the Setup menu screen select Priority Note Since Priority menu is protected by administrator password if your UIP312 has the administrator password set you will be asked to enter t...

Page 66: ...tor password if your UIP312 has the administrator password set you will be asked to enter the password 2 Select Voice DiffServ Please consult your network administrator for assistance 3 To manually se...

Page 67: ...m the DHCP server UIP312 will reboot after the message Note If the sequence of DHCP Expired message followed by reboot keeps repeating consult your administrator for assistance 11 3 IP Address Duplica...

Page 68: ...a call no response Contact the administrator 4 Can hear through the handset but cannot hear through the speaker phone Check if the headset adapter is plugged in 5 Phone not ringing when there is an i...

Page 69: ...refer to the Administrative Guide to reset the password to the Clear Bootrom 5 How to use Headset Uniden has provided an adapter for the UIP312 hardware to make the headset jacks located on the left s...

Page 70: ...articular installation If this equipment does cause harmful interference to radio or television reception which can be determined by turning by equipment off and on the user is encouraged to try to co...

Page 71: ...ns in a single chip The term codec is also an acronym that stands for compression decompression Gateway A gateway is a network point that acts as an entrance to another network In IP Telephony gateway...

Page 72: ...The deviation can be in terms of amplitude phase timing or the width of the signal pulse VoIP VoIP voice over IP that is voice delivered using the Internet Protocol is a term used in IP Telephony for...

Reviews: