background image

Table of Contents

Important Information ..................

Interference Information ..............

Telephone Network Information ..

REN Number .................................3

Hearing Aid Compatibility ............3

Licensing .......................................3

FCC RF Radiation Exposure 

Statement ...................................3

Introduction ...................................6

Before You Begin ..........................6

Parts Checklist

 ...................................

6

Telephone Jack Requirements

 ...........

6

Important Installation 

Information.................................7

Base Layout ..................................8

Installing the Phone .....................9

Desktop Installation

 ............................

9

Wall Mounting the Phone .................

10

Important Instructions for Moving the 

Answerer .....................................

11

Answering System Setup ..........11

Recording the Outgoing 

Announcement ............................

11

Reviewing the Announcement..........

12

Telephone Operation ..................1

Using the Speakerphone

..................

12

Speakerphone Location

 ................

12

Speakerphone Use

 .......................

12

Receiving a Phone Call

 ....................

13

Placing a Phone Call

 ........................

13

Switching between Speaker and 

Handset

 ...................................

13

Temporary Tone Dialing

 ...................

13

Flash

 ................................................

14

Redial

 ...............................................

14

Mute .................................................

14

Telephone Set Up .......................15

Setting the Rings to Answer .............

15

Setting the Incoming Message or 

Memo Length ..............................

16

Setting the Recording Quality 

 .........

16

Setting the Security Code

 ................

17

Setting the Display Contrast

.............

17

Setting Your Local Area Code ..........

18

Setting the Dialing Mode ..................

18

Setting Day of Week ........................

18

Setting the Time and Date

................

19

Setting the Language

 .......................

20

Message Volume ..............................

20

Ringer Volume ..................................

20

Speakerphone Volume .....................

21

Caller ID Features .......................

Summary Screen

 .............................

22

Caller ID with Call Waiting ................

23

Receiving and Storing Calls

 .............

23

Reviewing Call Records

 ...................

23

Deleting CID Records

 ......................

24

Dialing Back

 .....................................

24

Summary of Contents for 1380

Page 1: ...User s Guide Model 1380 Speakerphone Telephone with Digital Answerer and Caller ID on Call Waiting...

Page 2: ...and uses radio frequency energy which may interfere with residential radio and television reception if not properly installed and used in accordance with instructions contained in this manual Reasona...

Page 3: ...ices connected to one line should not exceed 5 To be certain of the number of devices you may connect to your line as determined by the REN you should contact your local telephone company REN Number i...

Page 4: ...sing the Speakerphone 12 Speakerphone Location 12 Speakerphone Use 12 Receiving a Phone Call 13 Placing a Phone Call 13 Switching between Speaker and Handset 13 Temporary Tone Dialing 13 Flash 14 Redi...

Page 5: ...ging a Stored Number 29 Dialing a Number Stored in Memory While On hook 29 Dialing a Number Stored in Memory 29 Reviewing Stored Numbers 30 Chain Dialing from Memory 31 Answering System Operation 32 C...

Page 6: ...how to get one installed Introduction CAUTION When using telephone equipment there are basic safety instructions that should always be followed Refer to the IMPORTANT SAFETY INSTRUCTIONS provided wit...

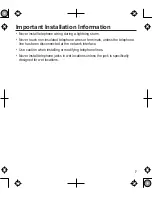
Page 7: ...Never touch non insulated telephone wires or terminals unless the telephone line has been disconnected at the network interface Use caution when installing or modifying telephone lines Never install...

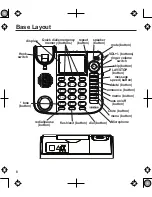
Page 8: ...button announce button VOL buttons flash exit button redial pause button Hook switch skip button Microphone PLAY STOP button repeat button dial button tone button message speed button display mute but...

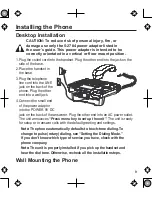
Page 9: ...he other end into a wall jack 4 Connect the small end of the power adaptor into the POWER 9V DC jack on the back of the answerer Plug the other end into an AC power outlet The unit announces Press men...

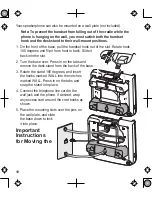
Page 10: ...from front to back Slide it back into the slot 2 Turn the base over Press in on the tabs and remove the desk stand from the back of the base 3 Rotate the stand 180 degrees and insert the hooks marked...

Page 11: ...tem answers a call If you don t record a greeting callers hear a default greeting which says We are not available to take your call Please leave a message Thank you for calling When recording the gree...

Page 12: ...ick up these sounds and prevent the speakerphone from going into the receiving mode when you finish talking Surfaces affected by vibration Recessed areas such as in a corner under a cupboard or next t...

Page 13: ...in entering the number press DELETE to erase the last digit 4 You can adjust the volume of the caller s voice by pressing the VOL or buttons Switching between Speaker and Handset You can switch betwee...

Page 14: ...ou dialed as many as 32 digits If you pressed any numbers after dialing the phone number for example when accessing a voice menu system those numbers also are redialed IMPORTANT In the event of a powe...

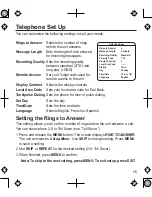
Page 15: ...Date Sets the time and date Language Selects English French or Spanish Setting the Rings to Answer This setting allows you to set the number of rings before the unit answers a call You can choose from...

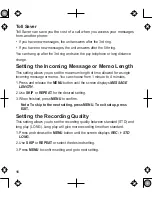
Page 16: ...g message or memo You can choose from 1 minute to 4 minutes 1 Press and release the MENU button until the screen displays MESSAGE LENGTH 2 Use SKIP or REPEAT for the desired setting 3 When finished pr...

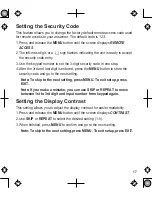
Page 17: ...is entered press the MENU button to store the security code and go to the next setting Note To skip to the next setting press MENU To exit setup press EXIT Note If you make a mistake you can use SKIP...

Page 18: ...ote To skip to the next setting press MENU To exit setup press EXIT Setting the Dialing Mode This adjustment allows you to select tone touch tone or pulse rotary mode dialing The phone is automaticall...

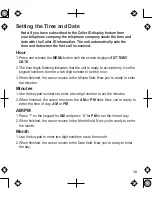
Page 19: ...numbers to enter a two digit number to set the hour 3 When finished the cursor moves to the Minute field Now you re ready to enter the minutes Minutes 1 Use the keypad numbers to enter a two digit nu...

Page 20: ...d view Caller ID prompt messages in English French or Spanish 1 Press and release the MENU button until the screen displays ENG FRA ESP indicates which set up the unit is currently in 2 Use SKIP or RE...

Page 21: ...Handset Volume Use the VOL or buttons to adjust the handset listening volume while it is in use Speakerphone Volume Use the VOL or buttons to adjust the speakerphone listening volume while it is in u...

Page 22: ...lays CID information transmitted by your local telephone company This information can include the phone number date and time or the name phone number and date and time Summary Screen The summary scree...

Page 23: ...one company This information can include the phone number date and time or the name phone number date and time The unit can store up to 60 CID memories for later review When the Caller ID memory is fu...

Page 24: ...be a valid number for dialing back used only in very limited areas Once you pickup the phone the number is automatically dialed If You Programmed Your Local Area Code 1 Use the SKIP or REPEAT buttons...

Page 25: ...r i e 555 5555 10 digits 3 digit area code 7 digit telephone number i e 425 555 5555 11 digits long distance code 1 3 digit area code 7 digit telephone number i e 1 425 555 5555 4 To dial the displaye...

Page 26: ...save The unit will not dial a phone number in this mode The cursor automatically moves to the text line for name entry 5 Use the number keys to enter the name of the person associated with the teleph...

Page 27: ...telephone number you just entered More than one letter is stored in each of the number keys For example to enter the name BILL SMITH press the 2 key twice for the letter B Press the 4 key 3 times for...

Page 28: ...ess the STORE button 4 Press the memory location 0 9 A B C The number flashes if there is a number already stored in the memory location 5 Press the STORE button to enter the edit mode and then press...

Page 29: ...me and Number in Memory and use the DELETE button to delete the old number before entering the new number Dialing a Number Stored in Memory While On hook 1 Press the DIAL button 2 To select a memory p...

Page 30: ...line for name entry Use the number keys to enter the name of the person associated with the telephone number you just entered More than one letter is stored in each of the number keys For example to...

Page 31: ...hows how you can use chain dialing to make a call through a long distance service The Number For Memory Location Long distance access number 6 Authorization code ID 7 Long distance phone number 8 1 Pi...

Page 32: ...ssage if desired Disconnect the caller by pressing the PLAY STOP button Auto Disconnect Auto disconnect is a feature that tells the unit to stop playing the greeting or recording when a extension phon...

Page 33: ...ssage press and release SKIP While playing message user can press MESSAGE SPEED button to listen to message playback at a lower speed Each press of the MESSAGE SPEED button change message playback spe...

Page 34: ...ecurity code the default security code is 1 2 3 but you can change it Be aware that remote functions do not work with rotary or push button pulse dialing phones To access your answerer 1 Call your tel...

Page 35: ...mmand then disconnects Remote Access Commands Play messages 2 Repeat messages during message playback 1 Skip to next message during message playback 3 Erase message during message playback 0 Stop play...

Page 36: ...t linked to yours If UNKNOWN NAME appears along with a calling number the name information for that number was not available BLOCKED NUMBER The caller is registered as Private Number and the Caller ID...

Page 37: ...e volume settings Can t be heard by other party Make sure the phone cord is securely plugged in Make sure the MUTE function is OFF Memory dialing Make sure you entered the numbers correctly See Memory...

Page 38: ...extension phone is picked up This is normal operation Auto disconnect is delayed for 1 second after the unit answers a call If you are near the unit press PLAY STOP to stop the greeting No informatio...

Page 39: ...generate electrical noise for example motors or fluorescent lamps DO NOT expose to direct sunlight or moisture Avoid dropping product and or other rough treatment Clean with a soft cloth Never use a...

Page 40: ...nals You re too close to appliances such as microwaves stoves computers etc Atmospheric conditions such as strong storms Base is installed in the basement or lower floor of the house Base is plugged i...

Page 41: ...ection with the performance of this warranty Warrantor at its option may replace the unit with a new or refurbished unit THE LIMITED WARRANTY SET FORTH ABOVE IS THE SOLE AND ENTIRE WARRANTY PERTAINING...

Page 42: ...er Stored in Memory While On hook 29 Dialing Back 24 E Erase Messages 33 Erasing a Stored Number 28 F FCC RF Radiation Exposure Statement 3 Flash 14 G General Product Care 39 H Hearing Aid Compatibili...

Page 43: ...ing Message or Memo Length 16 Setting the Language 20 Setting the Recording Quality 16 Setting the Rings to Answer 15 Setting the Security Code 17 Setting the Time and Date 19 Setting Your Local Area...

Page 44: ...niden s Phone Number have a question or problem Customer Care Line 817 858 2929 or 800 297 1023 need a part or accessory Parts Department 800 554 3988 need special assistance due to a disability Acces...

Reviews: