background image

IPOD OPERATION

27

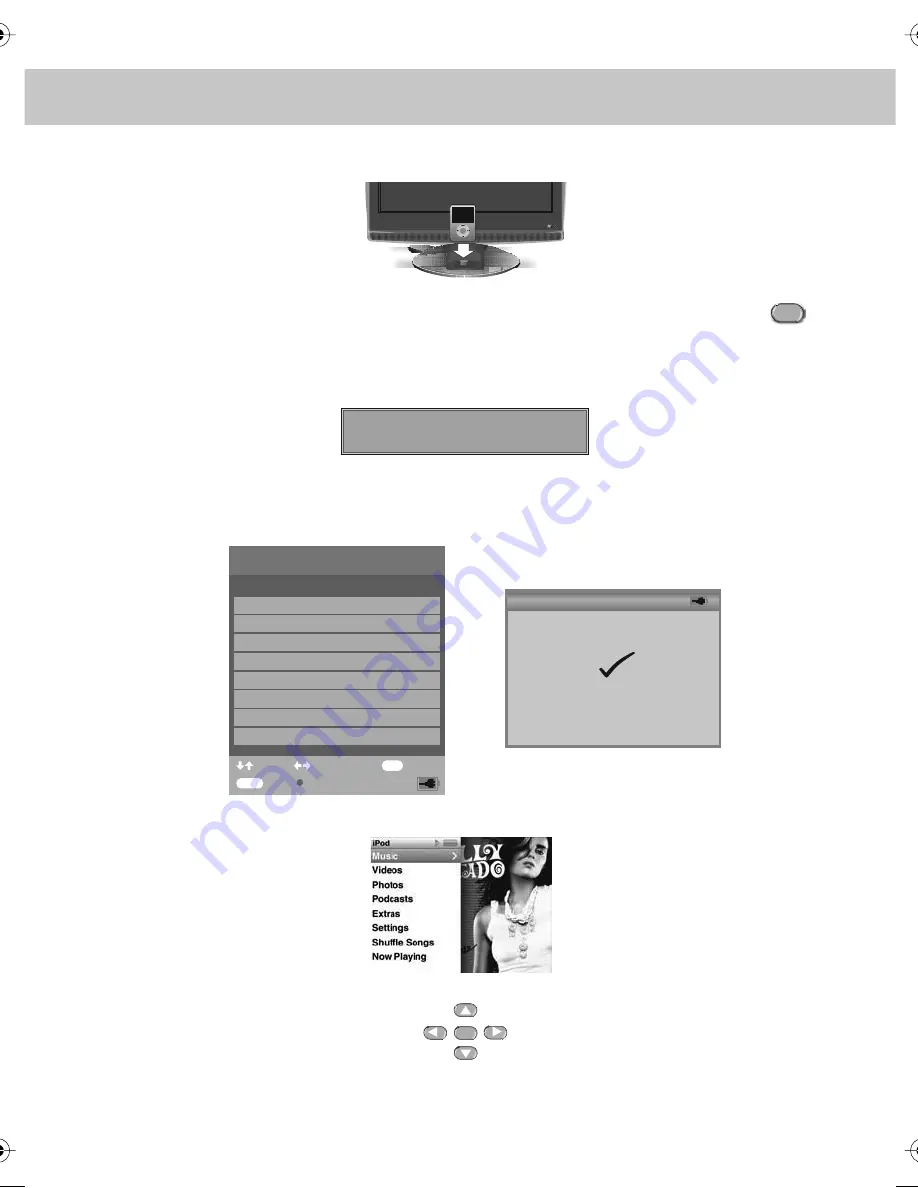
Connect iPod to TV-Dock

1. Insert your iPod to the TV-dock on the sound base. The TV will detect the insertion of the iPod and
    automatically switch to iPod mode. You can also manually switch to iPod mode by pressing
    button or selecting “iPod” in the source menu.

2. Wait about 3-5 seconds while the screen displays a message “iPod connecting”, and then the iPod
    Menu OSD will appear on the TV screen, and meanwhile the screen of iPod will change to
    the “OK to Disconnect” picture.

IMPORTANT - IF THIS DOESN’T HAPPEN REFER TO PAGE 44

3) The below menu will appear (This menu comes from the iPod so it may vary based on your settings
    on your iPod)

4) Press the [RED] button and the menu on the TV will disappear and the iPod Menu will come on

5) Using the [/\] & [\/] you can navigate through the menus and press [OK] to select.

iPod is a trademark of Apple Inc., registered in the U.S. and other countries.

IPOD

iPod Connecting

SUPERPB

1 Music

Main Menu

1/5

2 Videos
3 Shuffle Songs

5 Now Playing

4 Settings

Pg Up/Down

Select

Enter

Back

Operate Via iPod

OK

IPOD MENU

13 06

:

OK to disconnect

OK

teac english manual 24.pdf   25/03/2009   17:47:50

Summary of Contents for M22/15B-GB-TCDI-UK

Page 1: ...M22 15B GB TCDI UK HD Ready LCD TV with Freeview DVD iPod Docking Model No User Guide ...

Page 2: ...2 ...

Page 3: ... In digital freeview mode on the remote control press LCD menu quickly followed by 8 8 8 8 so press the number 8 four times You will now enter the First time installation mode if you do not please refer to the section called getting started later in this user guide Simply press OK or Enter on the remote control and your TV will retune If you do not retune your TV when advised to do so by Digital U...

Page 4: ...need to be replaced ensure that any replacement is of the same amperage and approved with the BSI mark Never try and replace the mains plug unless you have adequate qualifications and are legally authorised to do so In the event that a replacement Mains cable is required contact the manufacturer for a suitable replacement Never use the television if it is damaged in any way Always place the televi...

Page 5: ...5 Examples of images that you need to be aware of are as follows ...

Page 6: ...6 ...

Page 7: ... 23 On Screen Display Language 22 Picture Format 22 Blue Screen 22 Child Lock Key Lock 22 First Time Installation 23 Reset Television 23 CHANNEL SERVICES Using Electronic Program Guide 24 Using Digital TV teletext 25 Using Analogue TV teletext 26 IPOD OPERATION Connect iPod to TV Dock 27 Key Buttons 28 Shuffle Repeat Songs 29 Watch Videos from iPod 30 Browse Photos from iPod 30 PC OPERATION Connec...

Page 8: ...de 1x TV 1x AC Mains lead 4 x iPod Dock inserts to hold your iPod safely in the iPod dock ATV DVB DVD IPOD 1 2 3 4 5 6 7 8 9 0 DVB INFO PROGRAM ZOOM D TITLE D MENU GOTO EPG SUBTITLE FAV FAV DVB LANG FAV SOURCE ASPECT DISPLAY SLEEP CH VOL VOL LIST CH EXIT MENU OK REPEAT A B SUBT AUDIO IPOD MENU TEXT HOLD REVEAL SIZE SUBPAGE INDEX NICAM INTRO ANGLE PC AUTO PMODE BASS BASS SMODE ...

Page 9: ...L OR OUTDOOR ROOF AERIAL ALSO PLEASE CHECK YOU LIVE IN AN AREA THAT CAN RECIEVE DIGITAL FREEVIEW STATIONS WE DO NOT RECOMMEND USING WITH INDOOR AERIALS UNLESS YOU ARE IN 100 COVERAGE AREA AND ALSO THAT THE INDOOR AERIAL ISAMPLIFIED HAS BUILT IN BOOSTER AND IS CAPABLE OF RECIEVING DIGITAL FREEVIEW WE RECIEVE MANY CALLS TO OUR HELPLINE FROM CUSTOMERS ADVISING THEY CANNOT RECIEVE DIGITAL FREEVIEW CHA...

Page 10: ...s to eject disc SUBTITLE SUBT Press to switch between the different subtitle languages DVB LANGUAGE AUDIO Digital mode Press to select the digital language DVD mode Press to select DVD audio channels EPG REPEAT Digital mode Press to show the Electronic Program Guide menu in freeview digital mode DVD mode Press to set repeat DVB INFO A B Digital mode Press to display channel information DVD mode Pr...

Page 11: ...lect the input source Displays Menu OSD Volume down and menu down Volume up and menu up Program Channel down and menu down Program Channel up and menu up Standby ON OFF 1 2 3 4 5 6 7 1 2 3 4 5 6 7 1 2 3 4 5 6 7 1 2 3 4 5 6 Pause Forward a chapter Back a chapter Stop Play Pause Eject ...

Page 12: ...o receive sound you will need to connect your left and right audio to the YPbPr S Video Audio using the 3 5mm to phono cable available separately RF input PC Audio input Video Component Audio input Component input Video input Scart input VGA PC Audio input HDMI input RF IN PC AUDIO YPbPr AV AUDIO COMPONENT IN VIDEO IN SCART VGA PC HDMI A B C D E F G H A B C D E F G H TV ANALOGUE DIGITAL FREEVIEW I...

Page 13: ...hrough the various options 4 Press EXIT to exit Adjusting Contrast Only available when Picture Mode is set to Personal Switch the balance between black and white 1 Press MENU to enter menu 2 Press to highlight Contrast 3 Press to increase the contrast or to decrease the contrast 4 Press EXIT to exit Standard All settings are set to 50 Personal Lets you manually alter all the settings Movie Set to ...

Page 14: ...o enter menu 2 Press to highlight Brightness 3 Press to increase the brightness or to decrease the brightness 4 Press EXIT to exit Adjusting Colour Only available when Picture Mode is set to Personal Increase the colour from black and white to vivid 1 Press MENU to enter menu 2 Press to highlight Colour 3 Press to increase the colour or to decrease the colour 4 Press EXIT to exit ...

Page 15: ...rease the tint 4 Press EXIT to exit Adjusting Sharpness You can change the sharpness between the different preset options 1 Press MENU to enter menu 2 Press to highlight Sharpness 3 Press to navigate through the various options 4 Press EXIT to exit Normal For standard use Sharp For pictures with little movement Sharpest For pictures with nearly no movement Soft For pictures with large amount of mo...

Page 16: ...o highlight Colour Temperature 3 Press to navigate through the various options 4 Press EXIT to exit Dynamic Noise Reduction Reduces the interference in the picture 1 Press MENU to enter menu 2 Press to highlight DNR 3 Press to switch between OFF LOW MILD and HIGH 4 Press EXIT to exit Normal Standard setting Warm Increased red within the picture Cold Increased blue within the picture ...

Page 17: ...ase the volume 5 Press EXIT to exit Selecting Sound Mode Switch between different preset sound options 1 Press MENU to enter menu 2 Press to move to Sound Settings Menu 3 Press to highlight Sound Mode 4 Press to navigate through the various options 5 Press EXIT to exit Voice Emphasises voice over other sounds Music Emphasises music over voices Theatre Provides liver and full sound for movies Perso...

Page 18: ...ress to highlight Treble 4 Press to increase the treble or to decrease the treble 5 Press EXIT to exit Adjusting Balance To switch the sound between the left and right speakers 1 Press MENU to enter menu 2 Press to move to Sound Settings Menu 3 Press to highlight Balance 4 Press to increase the balance or to decrease the balance 5 Press EXIT to exit Volume Boost This is to boost the volume level i...

Page 19: ...s based on the current settings 1 Press MENU to enter menu 2 Press to move to Tuning Settings Menu 3 Press to highlight Auto Tuning 4 Press to enter Auto tuning 5 Press OK to start the tuning 6 Press EXIT to exit Manual Tuning You may wish to manual search if you can t find a certain channel or if you wish to connect to a Satellite Cable box via RF Aerial connector 1 Press MENU to enter menu 2 Pre...

Page 20: ...to do this the Child Lock function must be set ON 5b Analogue TV mode Press the to select the change you wish to move Move to the new location and press OK 6 Press EXIT to exit Common Interface Slot Only in Freeview Mode Pay per view services require a smartcard to be inserted into the TV If you subscribe to a pay per view service the provider will issue you with a CAM card smartcard The CAM can t...

Page 21: ...nu 2 Press to move to Timer Settings Menu 3 Press to highlight Sleep Timer 4 Press to increase the time to the required amount 5 Press EXIT to exit On Screen Display Timer Lets you adjust the amount of time the On Screen Menu stays on the screen before disappearing 1 Press MENU to enter menu 2 Press to move to Timer Settings Menu 3 Press to highlight OSD Timer 4 Press to increase the time and to r...

Page 22: ...o enter menu 2 Press to move to General Settings Menu 3 Press to highlight Picture Format 4 Press to change the picture format 5 Press EXIT to exit Blue Screen Changes the background when there is no input between clear and a blue background 1 Press MENU to enter menu 2 Press to move to General Settings Menu 3 Press to highlight Blue Screen 4 Press to switch between on and off 5 Press EXIT to exit...

Page 23: ...Television You may wish to reset the menus to factory settings e g if you have forgotten a changed password 1 Press MENU to enter menu 2 Press to move to General Settings Menu 3 Press to highlight Reset 4 Press OK to reset the television 5 Press EXIT to exit First Time Installation Country Language Please ensure that the aerial is connected to the connector labelled RF In on the rear of the TV Ens...

Page 24: ...upported by the broadcasted channel You can view the start and end time of all programs and on all channels for the next 7 days It is very simple to operate 1 Press EPG The following menu will appear 2 Navigate through the now and next menu using the V and buttons 3 Press the BLUE button to enter the 7 day menu Reminders can now be added by pressing OK 4 Press EPG to exit the Electronic Program Gu...

Page 25: ...xample of the BBC digital teletext service 1 To start digital teletext press RED button 2 To select the information you require you can scroll using or and press OK alternatively you can key the page number for example 3 0 0 followed by OK You can then navigate using the colour buttons Red Green Yellow Blue the buttons and numbers If you wish to exit at anytime press TEXT ...

Page 26: ... page 302 by pressing 3 0 2 b Press the colour buttons these will take you to the page indicated on screen for each colour 3 To exit Teletext press TEXT twice at any time Other buttons SIZE this increases or decreases the size of the text on screen INDEX some pages are more than one page long this button displays the number of pages REVEAL if there is an answer or something hidden this will displa...

Page 27: ...of iPod will change to the OK to Disconnect picture IMPORTANT IF THIS DOESN T HAPPEN REFER TO PAGE 44 3 The below menu will appear This menu comes from the iPod so it may vary based on your settings on your iPod 4 Press the RED button and the menu on the TV will disappear and the iPod Menu will come on 5 Using the you can navigate through the menus and press OK to select iPod is a trademark of App...

Page 28: ... won t switch off automatically when the iPod stop playing However you can set Sleep Timer to turn the TV off after a period of time VOL Decrease the volume VOL Increase the volume BASS Decrease the sub bass BASS Increase the sub bass Play pause Next track Back a track Fast forward through current track Rewind through current track Stop DVB INFO ZOOM D TITLE D MENU GOTO EPG SUBTITLE FAV FAV DVB LA...

Page 29: ...play sone song repeatedly Repeat All iPod repeats songs in current album or list iPod is a trademark of Apple Inc registered in the U S and other countries Track Title Artist Album Name Shuffle State Repeat State Vlolume Level Scrubber bar Track Time Bass Level Elapsed time Repeat Off Repeat One Song Repeat All Shuffle Off Shuffle On Main Menu iPod 1 Shuffle Off 2 Repeat Off Select Pg Up Down Oper...

Page 30: ...n TV Please tap the Yes Browse Photos from iPod To browse photos from iPod 1 Press Red button to switch to iPod Control Mode 2 For iPod nano 3Gen and iPod Classic select a photo and press button on the remote control or button on the iPod to start photo slide show 3 For iPod photo and iPod 5Gen you can only press button on the iPod to start photo slide show 4 For iPod touch you can only tap the on...

Page 31: ...nitor connected 1 Switch on your PC 2 When finished booting up right click your mouse anywhere on the screen the below will appear 3 left click your mouse on Properties this screen will appear 4 Left click your mouse on Settings this screen will appear Check the screen resolution is set to what is show in the technical specifications section You can adjust the resolution by moving the slider on sc...

Page 32: ... rate and select 60 Hertz 7 Finally click on Apply then click Yes and the settings will be saved 8 Turn off your PC 9 Connect up your LCD TV to your PC and switch on 10 Switch on your PC Windows will automatically Install the LCD TV For Windows Vista operating system the process is very similar to the above If you require additional support please contact the helpline ...

Page 33: ...gure itself 5 Press EXIT to exit Phase To adjust delay time of phase in order to reduce the noise of picture 1 Press MENU to enter menu 2 Press to select PC settings 3 Press to select Phase 4 Then press or to increase or decrease the phase 5 Press EXIT to exit Clock Alter this in order to reduce the noise within the picture 1 Press MENU to enter menu 2 Press to select PC settings 3 Press to select...

Page 34: ...o exit Vertical Position Changes the vertical position of the picture 1 Press MENU to enter menu 2 Press to select PC settings 3 Press to select V Position 4 Then press or to move the picture up or down 5 Press EXIT to exit Position Reset To position of the picture to the factory settings 1 Press MENU to enter menu 2 Press to select PC settings 3 Press to select Position Reset 4 Then press or to m...

Page 35: ... This can be done via limiting the age rating of the DVD 1 Press MENU to enter menu 2 Press to move to DVD Setting Menu 3 Press to highlight Parental Control 4 Press to enter Parental Control 5 Press or to change between the different options 6 Press EXIT to exit Parental Control Language Audio Setup Digital Setup Parental Control KIDS SAFE SETUP SETUP ...

Page 36: ... to DVD Setting Menu 3 Press to highlight Language 4 Press to enter Language You can now adjust the Audio Language Menu Language Subtitle Language within DVD mode 5 Press or to change between the different options 6 Press EXIT to exit Parental Control Language Audio Setup Digital Setup SETUP SETUP Audio Language English Menu Language French Subtitle Language English ...

Page 37: ...o Output from the Coax connection and the Downmix Audio Out options SPDIF RAW Select this option if you are connecting to a Dolby Digital 5 1 surround sounds amplifier via coax cable SPDIF PCM Select this option if you are connecting to a Stereo Hi fi via composite video cable 5 Press or to change between the different options 6 Press EXIT to exit Parental Control Language Audio Setup Digital Setu...

Page 38: ... on the disc 4 8 Set this to listen with a range equivalent to a normal television 2 8 Set this to listen with a smaller difference between the maximum and minimum volume 5 Press or to change between the different options 6 Press EXIT to exit Changing Regions This TV DVD player is pre set to play Region 2 DVDs In the event you wish to use the TV DVD in another country that uses different region di...

Page 39: ...Pr Cables Red Green Blue cables for Video picture and Audio cables Red White cables for Audio sound RED GREEN BLUE cables connect directly into the RED GREEN AND BLUE connectors on the TV where fitted these provide the video picture signal to the TV RED WHITE these provide the Sound Audio YELLOW is not used when connecting via this method Option 3 With the HDMI to HDMI cable A HDMI cable can outpu...

Page 40: ...on the TV where fitted This will give superior sound and picture quality over other connecting methods and is a very quick and simple way to connect the console to the TV If your PS3 did not come with HDMi connector or your TV does not have a HDMi socket please use option 1 below Option 1 AV Multi to SCART AV Option 2 With HDMI cable A HDMI cable can output both video and audio and enables you to ...

Page 41: ...best performance the television should be put on a hard flat surface however if you do wish to wall mount the television this can done using a full motion wall mount Wall Mounting the TV 1 Remove the four screws highlighted below 2 The wall mount can now be easily attached to the mounting holes on the rear of the TV These holes are indicated in the picture below Important If wallmounting this TV o...

Page 42: ...TV is to be connected in this way please follow the below Connecting via RF Ensure the Sky signal is switched on before you start the below 1 Connect the RF cable from the RF output socket of the sky cable box to the RF IN of the TV 2 Switch the TV into analogue TV mode 3 Press MENU to enter menu 4 Press twice to select Tuning Settings Menu 5 Press to select Manual Tuning 6 Press to enter Auto tun...

Page 43: ... BSkyB have not launched the code required for this model of TV They are due to launch a new remote control which should include the necessary code to operate the functions of the TV during 2009 called revision 9 The launch date was not known at the timeof printing this manual Please check our website for updates alternatively see below some alternative options of remote controls that are availabl...

Page 44: ...are Apple recommend you do this every few months as they release new firmware to fix any bugs found in previous versions In order to update your ipod to the correct version approved by apple please follow the instruction below 1 Connect your computer to the Internet if you have broadband it s probably already connected 2 Connect your iPod to your computer 3 Go to Start All Programs iPod iPod Updat...

Page 45: ...gnal booster it is much cheaper than a digital aerial and cures 70 of poor signal problems 4 Failing the above for now use the For best performance we recommend using an outdoor hi gain digital aerial If you are receiving some digital stations first try to connect a signal booster in between the TV and TV aerial socket analogue TV until the signal becomes stronger in your area Go into the sound se...

Page 46: ... E21 E69 CATV S1 S20 HYPER S21 S41 D K R1 R12 R21 R69 L F2 F10 B Q F21 F6 9 I UHF B21 B69 Digital VHF UHF Analogue PAL SECAM NTSC 3 58 4 43 Only video in Digital MPEG 2 MP ML Others DVD Model Name Panel Input Output Jacks Systems Power PCMCIA CAM SLOT Phono jack 1 For CVBS Component Audio input Phono jack 2 For PC RGB Audio input 500mV rms Impedance 47k ohms RAC Y 1 0 Vp p 75ohms 0 3V negative syn...

Page 47: ...ormation 1 Index 47 Initial Set Up 9 Inputs and Connections 12 Language 36 Manual Tuning 19 Nintendo Wii PS1 PS2 Xbox 39 On Screen Display Language 22 On Screen Display Timer 21 Parental Control 35 PC Menu Settings 33 34 Photos from iPod 30 Picture Format 22 Picture Mode Presets 13 PlayStation 3 40 Program Edit Channel Position 20 Remote control buttons and their functions 10 Reset Television 23 S...

Page 48: ......

Page 49: ......

Page 50: ...MMU MAN 0018 ...

Reviews: