background image

SMART SCREEN DISPLAY

56


USER MANUAL — 74-36121-ENG R2

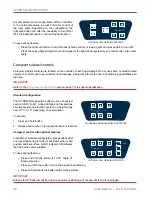
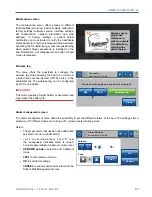
Bed status management screen (optional)

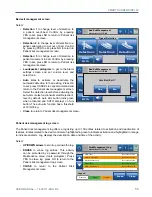
The bed status management menu offers the possibility to set the brakes, siderails, brackrest and/or elevation 

system position for bed status monitoring. The menu also includes the activation and deactivation of the monitoring 

and the possibility to set the audible signal’s volume and tone.

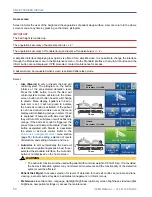
Configuration selection:

•  Select the bed sections needing monitoring 

(brakes, head and foot siderails, patient sleep 

surface and/or elevation system); button 

will turn green once selected. Once bed 

status monitoring is activated, the selected 

configuration  can  not  be  modified;  stop 

bed status monitoring to select a different 

configuration.

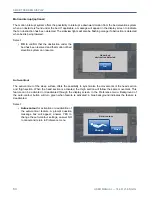
Select:

• 

START/STOP

 to activate or deactivate bed 

status monitoring.

• 

Select all

 to monitor all sections of the bed.

• 

Loudspeaker pictogram

 to get to the alarm 

settings screen and set volume level and 

select tone.

• 

Close

 to return to the Patient risk management 

screen.


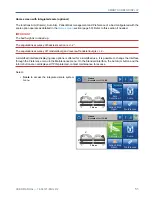
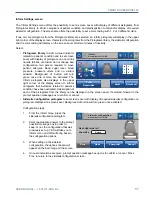
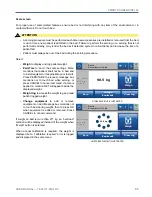
If  an  incorrect  configuration  is  detected  by  the  bed 

status monitoring, the button of the affected section 

will turn orange and a message will appear above the 

image of the bed, in orange, displaying which section 

of the bed is in the incorrect position. A message will 

also appear on the home screen.

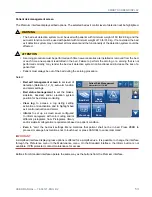
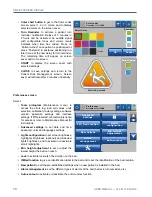
If  an  incorrect  bed  status  configuration  is  detected, 

a  notification  will  appear  to  indicate  which  section 

is incorrect. The notification will not appear if in Bed 

status management menu.

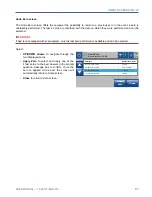
Select:

• 

Silence 1 min.

 to apply a one-minute pause 

to the alarm. Press again to open the pause 

menu and select:


Deactivate pause

 to deactivate pause completely.


Resume to 5 min.

 to extend the pause to five minutes.


Cancel

 to return to the Incorrect bed status notification window.

• 

Go to Bed Status Mgmt

 to reach Bed Status Management menu.

• 

Close

 to keep the remaining time the same and return to the Home screen. The notification will return after 

one minute if the incorrect bed status configuration has not been resolved. 

Bed Status Management

November 1st I 12:00

Start

Select all

Close

70 cm

70

cm

0

 º

Home

Arm

Detection 2

Scale

Preferences

Patient

Risk Mgmt.

70 cm

Raise left foot siderail

Auto Arm

Close

Go to Bed

Status mgmt

Silence

1 min.

70 cm

Raise left foot siderail

Incorrect bed status notification

Bed Status Management

November 1st I 12:00

Start

Select all

Close

70 cm

70

cm

0

 º

Summary of Contents for OOK Snow FL36

Page 1: ...2 0 2 2 0 3 7 4 3 6 1 2 1 E N G R 2 User manual FL36 FL36 SC MH ...

Page 2: ......

Page 3: ...2 0 2 2 0 3 7 4 3 6 1 2 1 E N G R 2 User manual FL36 FL36 SC MH ...

Page 4: ... the following markets can be contacted at European Union EMERGO EUROPE Prinsessegracht 20 2514 AP The Hague The Netherlands UK Responsible Person Contact Emergo Consulting UK Limited c o Cr360 UL International Compass House Vision Park Histon Cambridge CB24 9BZ United Kingdom Phone 44 0 1223 772 671 Email UKRPvigilance ul com Australia AUSTRALIAN SPONSOR Emergo Australia Level 20 Tower II Darling...

Page 5: ...ipment sockets 32 Accessory socket caps optional 32 Covered restraint points optional 32 Motion key lock optional 32 Patient restraint location 33 Bumpers 34 Bumpers with side view lights optional 34 Power cord support brackets 34 Short power cord optional 34 CPR release optional 35 Control on frame optional 35 Nightlight optional 36 Bed extender optional 36 Connectors ports and outlets 37 Nurse c...

Page 6: ... 1 socket FA64508 76 Left 1 folding IV pole for 1 socket FA64521 77 Right 1 folding IV pole for 1 socket FA64523 78 1 2 IV pole adapter FA64514 79 Oxygen bottle holder FA64505 80 Oxygen bottle holder with clamp FA64527 81 Patient helper FA64504 82 PREVENTIVE MAINTENANCE 83 Preventive maintenance annual checklist 84 CLEANING 85 Cleaning 85 Disinfection 85 Mattress mattress extension and siderail pa...

Page 7: ... communication protocol The hospital personnel can access the web application through an Internet browser to display the beds information such as bed statuses alarm weight logs etc The hospital can integrate the beds to their Real Time locating system RTLS using the Bluetooth Low Energy BLE or the Wi Fi tag configuration An Application Programming Interface API is available for the hospital to acc...

Page 8: ...e Reporting problems The user and or patient should report any suspected serious incident related to the device by informing the manufacturer and the competent authority of the member state in which the serious incident has occurred Umano Medical Inc 230 boulevard Nilus Leclerc L Islet QC G0R 2C0 CANADA T 418 247 3986 T 844 409 4030 information umanomedical com ...

Page 9: ...Not Applicable 5 Outpatient ambulatory care which is provided in a hospital or other medical facility under medical supervision where medical equipment is provided for the need of persons with illness injury or disability for treatment diagnosis or monitoring Applicable Mental care speciality Specialized care which is provided in a hospital or other medical facility for patients with limited permi...

Page 10: ...erail control 12 Footboard 13 Footboard control 14 Bumper 15 Frame control optional 16 Bed extender handle optional 17 Patient restraint location 18 Auxiliary power outlets optional 19 USB connector optional 20 Communication port optional 21 Patient restraint location optional 22 Drainage bag support optional 23 Foot control optional 24 Nurse call bell port optional 21 1 4 2 7 8 22 10 15 3 13 11 1...

Page 11: ...31 6 11 6 30 10 76 2 cm 25 4 cm 80 3 cm 29 5 cm 76 2 cm 25 4 cm Patient sleep surface width length extended length 35 80 84 90 88 9 cm 203 2 cm 213 4 cm 228 6 cm Under bed central zone clearance 5 12 7 cm Angulations Backrest section 0 to 60 Thigh section 0 to 30 Trendelenburg reverse Trendelenburg 16 to 16 Recommended mattress Foam mattress length extended length width maximum thickness ILD perim...

Page 12: ...ale accuracy 0 5 with a difference of maximum 1 1 lb 0 5 kg Scale accuracy EC EN45501 2015 OIML R76 1 Class III MAX 272 5 kg MIN 10 kg e 0 5 kg The bed is a manually operated device with very minor vibration level under 0 5m s2 Voltage 120 V AC 60 Hz 220 240 V AC 50 60 Hz Amperage includes power outlet and powered system 120 V AC Bed 9 25 A 220 240 V AC Bed 4 15 A Current leakage Conform with stan...

Page 13: ... or user of the FL36 Medical Bed should ensure that it is use in such an environment Immunity test IEC 60601 test level Compliance level Electromagnetic environment guidance ESD IEC 61000 4 2 8kV Contact 15kV Air 8kV Contact 15kV Air Floors should be wood concrete or ceramic tile If floors are synthetic the r h should be at least 30 EFT IEC 61000 4 4 2kV Mains 2kV Mains Mains power quality should ...

Page 14: ...test level Compliance level Electromagnetic environment guidance Conducted RF IEC 61000 4 6 Radiated RF IEC 61000 4 3 IEC60601 1 2 2014 3 Vrms 150 kHz to 80 MHz 3 V m 80 MHz to 2 7 GHz V1 3Vrms E1 3V m Portable and mobile communications equipment should be separated from the FL36 Medical Bed by no less than the distances calculated listed below Conform levels tested 385MHz 27V m 710MHz 745MHz 780M...

Page 15: ...ntified Indicates a breaker of 5 amperes 250 volts Indicates a terminal which is intended for connection to an external conductor for protection against electric shock in case of a fault or the terminal of protective earth ground electrode Indicates a warning of foot crushing hazard Indicates that on the rating plate the equipment is suitable for alternating current only to relevent terminals Indi...

Page 16: ...t maximum weight for a safe use of the equipment Indicates the total maximum charge for a safe use of equipment III Indicates the scale system accuracy class according to OIML R76 1 and EN45501 2015 2797 Indicates compliance with standard 93 42 EEC Medical Devices MYY 0050 T12175 Indicates compliance with standard 2014 32 EC Non Automatic Weighting Instrument Indicates compliance with Regulation E...

Page 17: ...cating possible activation of Backrest section AND OR the Thigh Section per use of one or both buttons located over or below the pictogram Illustration indicating possible activation of Hi Lo per use of button located over or below the pictogram Button for the vascular foot positioning Button for patient sleep surface flat positioning Button for a 30 degree angle positioning of the Backrest sectio...

Page 18: ...e recommended mattress thickness Illustration indicating the recommended mattress width Button for selection of audio signal type Illustration with LED indicators for active selection of tone Button with LED indicator for activation deactivation of bed exit control system Illustration with LED indicators for sound level from mute to high level Illustration indicating patient is subject to falls Il...

Page 19: ...n port Illustration indicating interdiction to change bed configuration Illustration indicating location for communication port Illustration indicating that patient is subject to pressure ulcers Illustration indicating the necessity to monitor blood pressure Illustration indicating the possibility to turn ON or OFF the nightlights using a switch Illustration indicating location for nurse call conn...

Page 20: ...internet connection by cable Illustration indicating that the bed is connected to the connectivity application Illustration indicating that the bed is disconnected from the wifi Illustration indicating that the bed is connected to the wifi Illustration indicating that the bed is connected to internet by cable Illustration indicating that the bed is connected to internet by cable and by wifii ...

Page 21: ...ng of safety measures included in this manual are required prior to set up usage and or maintenance of the bed Users shall be trained on product usage and knowledgeable of hazards associated with usage of electric beds DANGER ELECTRIC SHOCK HAZARD Always unplug the power cord and if applicable unplug the batteries harness before performing maintenance and or repairs on the bed If not avoided situa...

Page 22: ...ed If not avoided moderated to severe injuries and or permanent damages to bed or environment could occur It is the responsibility of the healthcare professionals to establish their contention techniques within their facility and to ensure proper restraint straps usage location and adjustment Ensure that the configuration of the bed and or access to controls is safe for the patient If not avoided ...

Page 23: ... the bed are adequate for the patient s condition and would not generate a risk in case of misuse by the patient Always ensure that usage of a power cord with reduced length is restricted only to patients with an evaluated medical condition that requires extreme protection measures Plug the power cord to a hospital grade power outlet without the usage of an extension cord Always ensure that usage ...

Page 24: ...bed is not designed nor intended for a magnetic resonance imaging use Use in intended environments only Patient must always be out of the bed during the zeroing procedure A zeroing procedure must be performed each time new accessories are installed or removed from the bed or each time a new patient is admitted in the bed Failure to perform the zeroing or a zeroing that is not performed correctly m...

Page 25: ...applicable store the remaining of the power cord on the power cord support brackets while keeping clearance in prevision for movement from elevation system A power supply of 4 to 5 hours is needed to reach a minimum battery charge In case of complete discharge bed may need a 24 hour plugging for a full recharge 8 On the footboard ensure that the green LED beside the power cord pictogram is ON Test...

Page 26: ...etection system non functional and increase the risk of a patient fall Zeroing procedure for a bed with bed exit only Procedure 1 Bed is electrically powered up Ensure that the sleep surface is completely flat the siderails are raised and put the bed elevation system at the intended height of use Apply the brakes 2 Put the required equipment accessories and mattress on the bed Patient must be out ...

Page 27: ... surface is completely flat and put the bed elevation system at intended height of use Apply the brakes 2 From the display screen on the footboard enter the Scale menu 3 Press the zero button 4 Password may be required enter password 5 Follow the instructions patient is out of bed install all required equipments accessories and mattress 6 Press START button Start on display screen again Do not tou...

Page 28: ...ommended to use the Umano Connect Configurator tool 1 Use the Umano Connect Configurator to perform the network configuration Refer to the user guide for procedure included directly in the configurator tool 2 From the display screen enter the Bed location menu through Preference menu to enter the location number 3 Verify that the connection pictogram on the display screen turns green to indicate t...

Page 29: ...ia to cause cancer and or birth defects or other reproductive harms Refer to the Disposal and recycling section from the maintenance manual for proper disposal of the batteries when replacing a battery from the bed Powered mode Powered mode is activated if the bed is power supplied or if power returns after failure All bed functionalities will operate if bed is power supplied If battery level requ...

Page 30: ...ystem The battery charge level is accessible on the footboard control or on the optional back up control on frame Low level audible signal Two LED sections of battery pictogram lighted When a movement function is activated functionalities will operate with a low battery level audible signal Recharge audible signal One red LED section of battery pictogram lighted When a movement function is activat...

Page 31: ...t system has detected a movement from the patient or that the patient has pressed the nurse call button In both cases the patient requires assistance from a caregiver Textual error message with display screen option only A textual error message can be displayed on the screen located on the footboard A reset a verification of connections a calibration or a component replacement may be required cont...

Page 32: ... in the direction of the green arrow for steer position Neutral positioning 1 Bed is in a neutral positioning when pedals at head and foot ends are in flat position 2 Activate pedal on the red arrow side for brake or on green arrow side for steer Engage steer 1 To engage steer activate completely the pedals in the direction of the green arrow 2 Move the bed on a distance of approximately 2 feet to...

Page 33: ... activate the hi lo elevation system or the backrest section To activate 1 Press and hold button 2 Release button when the required position is reached Motion interrupt optional The bed can be equipped with a motion interrupt system that detects an obstruction under the bed when the bed elevation system is being lowered The system will then interrupt the bed motion If bed is equipped with a displa...

Page 34: ...t The accessory socket caps can be removed if needed Covered restraint points optional Bed can be equipped with the option of covered restraint points To reduce the number of attachment points the upper part of the central mattress retainer is filled and the lower part is removed Also the patient sleep surface will not offer the four mattress retainers D E refer to illustration in Patient restrain...

Page 35: ... the mattress surface at foot end of the bed E the two anchors under the mattress surface at head end of the bed F WARNING It is the responsibility of the healthcare professionals to establish their contention techniques within their facility and to ensure proper restraint straps usage location and adjustment Ensure that the configuration of the bed and or access to controls is safe for the patien...

Page 36: ...n the Footboard control section page 45 Power cord support brackets Support brackets are available at the head end of bed illustrated to store the power cord during transportation or when not in use Short power cord optional The power cord length can be adjusted to meet the needs and condition of a patient in a specific environment The length of the short power cord is of 1 m 40 but can be adjuste...

Page 37: ...oduct prior to usage ATTENTION Usage shall be limited to emergency situations only An over usage could lead to mechanical degradation If bed operates on battery the thigh section will not reach flat postion IMPORTANT Thigh section will not reach flat position if master lockout of thigh section or a movement function of any control is activated during motion Control on frame optional An optional co...

Page 38: ...face from 80 to either 84 or 90 Usage of mattress extension cushion is required WARNING Siderails are designed to prevent patient to inadvertently fall from the bed Extension of patient sleep surface will reduce the ratio of the bed perimeter covered by the siderails Ensure proper monitoring to prevent patient to slip at foot end and avoid possible injuries caused by patient fall Operation 1 Flatt...

Page 39: ... nurse call bell is properly plugged in the port if no cable is plugged in ensure to insert the dummy plug inside the unused port ATTENTION Always ensure that the 1 4 phono connector is connected to a 1 4 phono jack If nurse call bell option is not used ensure the supplied dummy plug is inserted in the connector If not avoided a constant nurse call signal will be activated Always ensure that bed i...

Page 40: ...n leakage currents or electromagnetic compliance for electromedical systems IEC60601 1 2005 Ensure proper power supply and proper grounding reliability with the bed power cord connected to a hospital grade outlet Failure to comply may cause electrical hazards or result in loss of power to the connected device Do not connect devices in the auxiliary power outlet while their switch is turned ON Do n...

Page 41: ... of a bed without siderails is restricted only to patients with an evaluated medical condition that requires extreme protection measures Failure to comply could result in increased risk of patient fall or injury Filled siderails and boards optional The head and foot ends siderails as well as the headboard and footboard can optionnally be offered without openings to prevent possible injuries when b...

Page 42: ...r usage of the patient mobilization helper to prevent patient to slip at foot end and avoid possible injuries caused by patient fall ATTENTION Patient monitoring and patient authorized bed functionalities are the responsibility of the facility IMPORTANT A click confirms patient mobilization helper is in locked position If applicable ensure that mattress handles are placed under the mattress and do...

Page 43: ...form 0 degree to 60 degrees The UP DOWN press buttons offer motion of thigh and foot sections Motion can be simultaneous To activate 1 Press and hold button 2 Release button when the required position is reached Patient control with optional features In addition of standard configuration press buttons offer back lighted patient controls possibility for the patient to turn ON or OFF the nightlights...

Page 44: ... and definitions section page 15 to support identification Standard configuration The UP DOWN press buttons offer motion of backrest section form 0o to 60o motion of thigh and foot sections simultaneously and elevation system in a height range from 10 to 31 5 depending on caster option To activate 1 Press and hold button 2 Release button when the required position is reached Caregiver control with...

Page 45: ...ient control can also be locked depending on which MJB port the patient control is plugged in contact technical support if needed WARNING The use of the removable patient control option is not recommended if option of short power cord or covered restraint points applies to a patient with an evaluated medical condition that requires extreme protection measures IMPORTANT Refer to the pictograms and ...

Page 46: ...verse position would make gaps wider and could result in increased risk of patient entrapment Refer to labeling on headboard if required Boards blocking fasteners optional The option of boards blocking fasteners offers the possibility to fix the headboard and or footboard to the bed so that the boards cannot be misused by a patient with special medical condition The boards are secured in place and...

Page 47: ...ter 2 minutes of non motion the sleep mode will activate to save energy all LED indicators will turn off power cord LED indicator will be off The battery charge level is given by the battery pictogram with integrated LED No LED section ON bed is plugged and power supplied battery is fully charged 3 LED sections flashing green bed is plugged and power supplied battery charging all functions can ope...

Page 48: ...tection system must be used with patients with minimum weight of 50 lb 22 6 kg If not avoided the bed exit detection system may not detect all movements and the functionality of the detection system could be affected Bed motion lockout to the siderails controls can be set with the same steps as the standard configuration page 46 Refer to this section for more details The UP DOWN press buttons offe...

Page 49: ...sure LED indicator turns OFF The AUTO arm press button offers the possibility to automatically arm the bed exit detection system when patient gets back in the bed WARNING The auto arm function must be used with patient with minimum weight of 70 lb 31 8 kg If not avoided the bed exit detection system may not detect all movements and the functionality of the detection system could be affected To act...

Page 50: ...e Power up and modes of operation section page 27 for sleep mode details refer to Inform Settings section page 57 for screen saver details Bed exit detection levels There are three bed exit control levels of detection available Ensure to select the right level of detection according to the patient s condition Detection 1 out of bed is designed to monitor a patient getting out of the bed This level...

Page 51: ...SMART SCREEN DISPLAY USER MANUAL 74 36121 ENG R2 49 SMART SCREEN DISPLAY Images in the following section represent the 3 0 software display display may vary according to the software version of the bed ...

Page 52: ...s not set the menu display will turn flashing orange in alarm If bed is equipped of bumpers with side view lights they will turn ON solid green or will be flashing orange If the bed exit control is triggered the pre set tone and volume will activate Press the button associated with Disarm to deactivate the alarm or bed exit control Refer to the Patient risk management screen menu section page 53 f...

Page 53: ...racy of Trendelenburg and reverse Trendelenburg is 2 o A simplified interface displaying less options is offered for a simplified use It is possible to change the interface through the Preference menu in the Maintenance menu On the Standard interface the Auto Arm button and the Inform button are not displayed If PIN protected contact maintenance for access Select Scale to access the integrated sca...

Page 54: ... 5 minutes Close to keep the remaining time the same and to return to the Home screen When Auto Arm is activated and the pause finishes the system will start the auto detection When detected the patient has 60 seconds to settle in the bed before the bed exit is armed automatically When auto arm is activated and bed is in alarm while patient is still in bed press the Disarm Detection button to stop...

Page 55: ...uto arm function and alarm settings Bed status management to set the brakes siderails backrest and or elevation system position for bed status monitoring View log to access a log listing setting activation or deactivation and to highlight bed exit control activation and alarm Inform to set up a screen saver configured to inform caregivers with color coding and or different pictograms from Pictogra...

Page 56: ...his section if needed The function to perform a zeroing is found in the Scale screen page 65 Press the arrow to navigate through all the options menus IMPORTANT A simplified interface displaying less options is offered for a simplified use It is possible to change the interface through the Preference menu in the Maintenance menu On the Standard interface the Inform button is not available If PIN p...

Page 57: ...s a threshold of 70 lb 35 kg Close to return to Patient risk management screen Patient risk management log screen The Patient risk management log offers a log listing up to 100 entries related to activation and deactivation of features Entries related to bed exit control are highlighted in green to indicate activation and highlighted in orange to indicate an alarm Log displays the description date...

Page 58: ...will turn orange and a message will appear above the image of the bed in orange displaying which section of the bed is in the incorrect position A message will also appear on the home screen If an incorrect bed status configuration is detected a notification will appear to indicate which section is incorrect The notification will not appear if in Bed status management menu Select Silence 1 min to ...

Page 59: ...reen once one or more are activated The Inform pictogram also displays in the upper right corner of the display screen to inform caregivers that indicators related to patient s condition have been activated A description of each of the pictograms from the library can be displayed on the screen saver if selected Answer to the prompt question message box to confirm or cancel Siderails configuration ...

Page 60: ...oftware version password settings and interface settings If PIN protected contact maintenance for access or refer to Maintenance Manual for instructions Advanced settings to set date and time password units and languages settings Lights configuration to set screen brightness nightlights brightness optional and sideview lights brightness and to activate or deactivate smart nightlights Min height ad...

Page 61: ...nd navigate with UP DOWN arrows Year menu and navigate with UP DOWN arrows Minutes menu and navigate with UP DOWN arrows OK to set date and time and return to preference menu Language screen Select Français to set French language menus English to set English language menus Español to set Spanish language menus Português to set Portuguese language menus Close to confirm selection and return to pref...

Page 62: ...aximum of 7 digits as a text label for bed location Select Close to save or not change and return to the Preference screen Arrow upward to switch from lowercase letters to uppercase letters Color to get to the Color code screen Select one color to give a colored label to the touchscreen or select None Once selected press OK to return to the Identification screen or press CANCEL to cancel command a...

Page 63: ...e to confirm the selected options or Cancel to return to the previous screen Then the selected options will appear checked in green Clear data to reset the selected data for the new patient integrated in the bed Close to return to Preference screen New Patient November 1st I 12 00 Edit Clear Data Close Bed Status Management Inform Settings Min Height Adjustement Identification Lock Erase log Zero ...

Page 64: ...ated through the display screen will not operate if bed is on battery mode or if footboard is removed Ensure that the proper settings according to the patient s condition are in place If activated in Factory settings menu total lockout will remain operational even on battery mode Min Height Adjustment The minimum height adjustment screen offers to set minimum bed height depending on the needs of t...

Page 65: ...s mode requires a higher battery consumption and may impact the battery life Alarm management screen The Alarm management menu offers the possibility to set the different alarms of the bed The settings offer a selection of 10 different tones and a range of 4 volume levels including mute Select The proper alarm that needs to be edited bed exit alarm or turn reminder alarm or to set volume level a r...

Page 66: ... the head section and thigh section When the head section is activated the thigh section will follow the same movement This feature can be activated or deactivated through the display screen in the Preference menu Background of the auto contour button will turn green when feature is activated a blue background indicates the feature is deactivated Select Auto contour for activation or deactivation ...

Page 67: ...te prior to start Press ZERO TARE to proceed message box mentions not to touch bed while zeroing or press CANCEL to cancel command If a tare is applied a mention NET will appear beside the displayed weight Weight log to access the weight log and read patient logged weight Change equipment to add or remove equipment on bed Message box mentions not to touch bed during weight then to press OK when eq...

Page 68: ...r removed from the bed or each time a new patient is admitted in the bed Failure to perform the zeroing or a zeroing that is not performed correctly may render the bed exit detection system non functional and increase the risk of a patient fall Patient must always be out of the bed during the zeroing procedure Select Start to perform the zero on the bed Ensure the patient is not on the bed before ...

Page 69: ...e last zero performed is available and can be selected Select UP DOWN arrows to navigate through the four displayed zeros Apply Zero to select and apply one of the 4 last zeros to the bed Answer to the prompt question message box to confirm Once the zero is applied to the bed the screen will automatically return to Scale screen Close to return to Zero screen Undo Zero November 1st I 12 00 Close Ap...

Page 70: ......

Page 71: ...ill be tilted or moved away from patient Always ensure that the accessories installed on the bed are adequate for the patient s condition and would not generate a risk in case of misuse by the patient ATTENTION A zeroing procedure must be performed each time new accessories are installed or removed from the bed or each time a new patient is admitted in the bed Failure to perform the zeroing or a z...

Page 72: ...0 4 Ensure extension is locked and cushion properly installed prior to put bed back in service Mattress extension DM64506 35 x 6 x 6 Use DM64506 in conjunction with an 84 long mattress to reach 90 patient sleep surface length Installation and operation 1 Flatten patient sleep surface completely 2 Reach extension handle located at foot end under the deck Pull and extend to required length 3 Remove ...

Page 73: ...operation 1 Properly lock the siderails controls Refer to the Standard configuration in the Headboard and footboard section page 46 2 Completely raise the head and foot end siderails 3 Slip the siderail pad over the head extremity of the siderail closest to the bed s head Ensure the clear window is on the outside of the bed 4 Stretch the pad and slip it over the other extremity of the siderail tow...

Page 74: ...l pad over the head extremity of the siderail closest to the bed s head Ensure the clear window is on the outside of the bed 4 Stretch the pad and slip it over the other extremity of the siderail towards the center of the bed 5 Completely close the zippers situated under the siderails along with the two snap buttons 6 If patient s condition requires more protection lock the siderail pads in place ...

Page 75: ...ng bed or if lighting or ceiling is low IV pole will move with bed when elevation system activated Ensure proper clearance Installation 1 Remove screw from bottom of IV pole 2 Insert the fixed IV pole in one of 4 sockets one at each corner bumper illustrated 3 Using a 3 Philips screwdriver fixe IV pole with screw 4 Ensure IV pole is properly fixed Operation 1 Ensure IV pole is properly fixed 2 To ...

Page 76: ...ivated Ensure proper clearance Installation 1 Remove screw from bottom of IV pole and from the IV pole storage support 2 Insert the folding IV pole in one of both corner bumpers of head end and insert the IV pole storage support in the opposite side 1 socket as illustrated 3 Using a 3 Philips screwdriver fixe IV pole and IV pole storage support with screws 4 Ensure IV pole is properly fixed and fo...

Page 77: ... bed or if lighting or ceiling is low IV pole will move with bed when elevation system activated Ensure proper clearance Installation 1 Remove screw from bottom of IV pole 2 Insert the fixed IV pole in one of four 1 sockets one in each corner bumpers as illustrated 3 Using a 3 Philips screwdriver fixe IV pole with screw 4 Ensure IV pole is properly fixed Operation 1 Ensure IV pole is properly fixe...

Page 78: ...f 31 if transporting bed or if lighting or ceiling is low IV pole will move with bed when elevation system activated Ensure proper clearance Installation 1 Remove screw from bottom of IV pole 2 Insert the fixed IV pole in one of two 1 sockets 3 Using a 3 Philips screwdriver fixe IV pole with screw 4 Ensure IV pole is properly fixed Operation 1 Ensure IV pole is properly fixed 2 To adjust the heigh...

Page 79: ... recommended in order to prevent potential dammages to the walls Installation 1 Remove screw from bottom of IV pole and from the IV pole storage support 2 Insert the folding IV pole in the 1 left socket at head of the bed Then insert the folding IV pole storage support in the opposite side 5 8 socket as illustrated 3 Using a 3 Philips screwdriver fixe IV pole and IV pole storage support with screw...

Page 80: ...is recommended in order to prevent potential dammages to the walls Installation 1 Remove screw from bottom of IV pole and from the IV pole storage support 2 Insert the folding IV pole in 1 right socket at head of the bed Then insert the folding IV pole storage support in the opposite side 5 8 socket as illustrated 3 Using a 3 Philips screwdriver fixe IV pole and IV pole storage support with screws...

Page 81: ...for passage of the IV pole used with the accessory and consider maximum bed height of 31 if transporting bed or if lighting or ceiling is low The IV pole with adapter will move with bed when elevation system is activated Ensure proper clearance Installation 1 Remove the screw the washer and the lock washer at the bottom of the adapter for IV pole 2 Insert the adapter in one of the four supports on...

Page 82: ...stalled at the bed head end it has a maximum safe load capacity of 35 lb 16 kg Installation and operation 1 If applicable remove the retaining pin from bottom of support bar 2 Insert the support bar into one of head end corner bumper 3 Insert the retaining pin into the bottom of the support bar 4 Ensure oxygen bottle holder is properly installed and secured ...

Page 83: ...ed is increased Ensure to leave 9 22 9 cm between head end of bed and the wall to protect the wall Installation and operation on corner bumpers 1 If applicable remove retaining pin from bottom of support bar 2 Insert the support bar into one of the head end corner bumper 3 Insert the retaining pin into the bottom of the support bar 4 Ensure oxygen bottle holder with clamp is properly installed and...

Page 84: ...plicable remove the retaining pin from bottom of the lower section 2 Insert the lower section roller bumper outside into one of both 1 1 2 sockets located at head end 3 Ensure it correctly and completely slides into socket and insert the retaining pin into the bottom of the lower section 4 Pull the plunger located on the lower section and insert the upper section 5 Release plunger Operation 1 Ensu...

Page 85: ...hall perform preventive maintenance and servicing on this equipment If not avoided situation could result in electrical or electronic misconnection and lead to shock or fire hazards IMPORTANT Batteries have an intended lifetime of 5 years and should be replaced after 5 years or sooner depending on battery backup usage If device is left unplugged for a long period batteries will slowly drain Do not...

Page 86: ... applicable Casters Foot control system if applicable Ground chain Motion lock if applicable Brake neutral and steer pedal Bed status system if applicable Power cord Nightlight Actuators Battery Bumpers if applicable Mattress retainers Siderails mechanism Siderails control membranes and LED lights if applicable Headboard and footboard Bed extender if applicable CPR if applicable Footboard control ...

Page 87: ...moistened with warm soapy water Avoid build up and over saturation of water or any cleaning solution Ensure that cleaning solution does not stay on surface longer than manufacturer s cleaning solution instructions Always wipe clean and dry surfaces Disinfection Bed and accessories should be disinfected between patient uses This bed and compatible accessories are designed to be disinfected with sta...

Page 88: ......
Page 89: ... discontinued products not subject to return Limited warranty Umano Medical warrants to the original purchaser that the products shall be free structural defects in material and workmanship for a determined period after date of delivery refer to the purchase documentation for information about the available warranty time periods Umano Medical s obligation under this warranty is expressly limited t...

Page 90: ... Display screen 19 28 34 36 47 48 Drainage bag support 8 31 E EMC 11 F Footboard 8 35 44 47 Footboard control 8 28 48 Frame control 8 H Headboard 8 44 I IV pole 73 74 75 76 77 78 M Mattress extension 36 70 Motion lockout 46 N Nightlight 36 Nurse call 23 28 37 41 47 O Oxygen bottle holder 80 P Patient helper 82 Patient restraint location 8 33 Patient siderail control 8 Power cord 8 34 Product descr...

Page 91: ... 3986 844 409 4030 u m a n o m e d i c a l c o m EC REP EMERGO EUROPE Prinsessegracht 20 2514 AP The Hague The Netherlands 2797 FL36 is FL36 SC is 0086 Emergo Consulting UK Limited c o Cr360 UL International Compass House Vision Park Histon Cambridge CB24 9BZ United Kingdom UK RP ...

Reviews: