background image


!

"

#

!

$

%

&

'

Summary of Contents for Powermover PM5900

Page 1: ... 0 0 1 2 3 0 3 0 ...

Page 2: ...cians are eager to serve you in any way possible Phone 800 860 7571 Fax 800 860 4980 E mail customerservice ultra fab com Web site www ultra fab com Please take time to read and understand your operation manual before putting your Powermover into service Please follow the service guide lines set forth in the manual to ensure the best possible care of your Powermover Failure to perform the necessar...

Page 3: ...arging System 3 Steering 4 Hydraulic Lift 4 Hour Meter 4 Options 4 Safety Recommendation 4 GENERAL MAINTENANCE Motors 5 Grease Fittings 5 Batteries 5 Hydraulic Fluid Level 5 Chains 5 Tires 5 REPLACING PARTS Recommendations 5 Motors 6 Belts 6 Shaft 3 6 Tires 7 Chains 7 Differential 7 Hydraulic Pump 7 Hydraulic Cylinders 7 PARTS BREAKDOWN WIRING DIAGRAMS ...

Page 4: ...s the seven way connector mounted on the top front of the Powermover then it has a push button switch on the handle to activate the receptacle This button is used to activate the trailer brakes if they are plugged into the standard seven way connector allowing the trailer brakes to stop the load MAGNETIC BRAKING HP PERMANENT MAGNETIC MOTOR Standard PM5700 The hp motor with its standard hookup will...

Page 5: ...ailable to assist where needed FOAM FILLED TIRES It is highly recommended to foam fill the tires It adds weight Allows the tires to carry a heavier load Prevents flat tires from occurring NON MARKING TIRES Gray non marking tires are available for the Powermover ATTACHMENTS Many jobs require some type of special attachment We custom make whatever is necessary to do the job The following standard br...

Page 6: ...losion causing injury HYDRAULIC FLUID LEVELS optional Check the hydraulic reservoir at least every 150 hours If it is low bring the level back up to the full mark Also check the hose and fittings at the same time for any fluid leaks CHAINS Lubricate the chains once every year with motorcycle chain type grease TIRES optional foam filled Your Powermover may have foam filled tires This allows for the...

Page 7: ...he motor To achieve this loosen the 4 bolts holding the motor mount plate Allow the motor to slide forward in the elongated slots this will loosen the belt STEP 3 Inside the housing locate the bearing block next to the cog pulley you will see two 2 set screws loosen or back off the set screws DO NOT remove them STEP 4 On the outside of the housing belt side remove the access plate 4 5 16 bolts the...

Page 8: ...the new differential shaft making sure they are back in the same order as on the old shaft Step 4 Reverse steps 1 4 and make sure all bolts are tight HYDRAULIC PUMP STEP 1 Remove cover top plate STEP 2 Disconnect hydraulic hoses prepare for leakage of hydraulic fluid STEP 3 Disconnect wires STEP 4 Remove the 2 bolts holding the pump to the main chassis Easily accessed on the left side of the chass...

Page 9: ......

Page 10: ......

Page 11: ... ...

Page 12: ... ...

Page 13: ... ...

Page 14: ... ...

Page 15: ... 0 1 2 3 1 2 3 2 2 1 2 1 4 1 2 1 2 2 3 2 4 2 5 25 5 6 5 6 5 6 5 6 3 25 5 25 ...

Page 16: ... ...

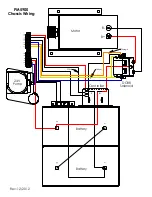
Page 17: ...Battery Battery Controller DC88 Solenoid Motor 24V Pump PM5900 Chassis Wiring Rev 12 2012 1 2 3 4 5 6 7 8 9 10 11 12 B B 1 2 3 M A2 White Yellow Orange B B ...

Page 18: ... Battery Level Ind Battery Charger Charger Inlet Relay 1 2 3 4 5 6 7 8 9 10 11 12 Battery 3 Battery 4 Solenoid 7 8 9 Controller 10 11 12 Hyd Lift 1 2 Circuit Breaker PM5900 Handle Wiring Diagram Resistor White Orange Yellow Orange Gray 2 4 4 21 14 13 22 Rev 12 2012 Lift Switch Optional White 3 2 1 1 ...

Reviews: