background image


Page 

8

 of 

16


Issue: 1 

– 03/10/2019  

7. Installation and Set-Up 


7.1  Setting up mattress 


The mattress is designed to completely replace any existing mattress which may be in use on a bed. 


Remove any existing mattress and ensure that there are no protruding parts or sharp objects on the 

bed which could cause damage to the mattress. Lay the mattress on the bed patient surface ensuring 

that the air pipe connector is situated on the bottom left hand side of the bed foot end (as viewed from 

the foot of the bed).  


The mattress can be used as a static mattress without the pump attached,  
 

7.2  Setting up power unit 


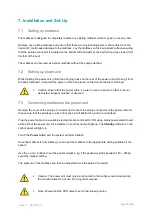
Whilst holding the power unit, unfold the hanging hooks on the rear of the power unit and hang it from 

the beds footboard. If required the power unit can be placed on the floor at the foot of the bed. 


Caution: Ensure that the power cable is routed in such a manner so that it cannot 
be twisted, trapped, crushed or stressed. 


7.3  Connecting mattress to the power unit  


Remove the cover of the air pipe connector and connect the air pipe connector to the power unit and 

then ensure that the air tubes are free from any kind of obstruction, and are not kinked. 


Plug the power cable into a suitable electrical 

socket and switch ‘ON’ using mains power switch found 

at the side of the power unit. All indicators on control panel will light up

.

 The 

Standby

 indicator on the 

control panel will light up. 


Touch the 

Power 

button and the system will start inflation  


Once the mattress is fully inflated, you can set the mattress to the appropriate setting suitable for the 

patient. 


Use the + and 

– buttons to set the patient weight in kg. if the patient weight is between 140 – 244kg 

set at the highest setting. 


The pressure of the mattress can then be adjusted to suit the patient if required.


Caution: The power unit must only be connected to the mattress recommended by 
the manufacturer. Do not use it for any other purpose. 


Note: Ensure that the CPR valve is set to the closed position. 

Summary of Contents for Diversi-Foam II

Page 1: ...Diversi Foam II Hybrid Mattress Replacement System UPRA3678H 4 and UPRA4278H 4 ________________________________________________ User Manual Issue 1 03 10 2019 UPRA3678H 4 UPRA4278H 4 UM 1...

Page 2: ...8 2 Comfort level 10 8 3 Control panel lockout 10 8 4 Function mode switch 10 8 4 1 Alternate 10 8 4 2 Constant Low Pressure CLP 10 8 5 Alarm mute 11 9 Alarms Fault Findings 11 9 1 Low pressure alarm...

Page 3: ...time The information in this User Manual may vary slightly with respect to the basic design of the product 2 Intended Use The intended use of this product is to prevent and or manage pressure ulcers w...

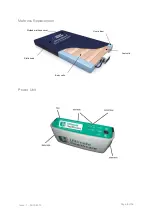
Page 4: ...Page 4 of 16 Issue 1 03 10 2019 Mattress Replacement Power Unit Welded mattress cover U core foam Foot cells Static head Body cells...

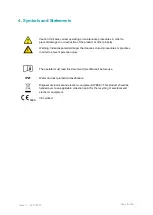
Page 5: ...icates potential danger that requires correct procedures or practises in order to prevent personal injury The operator must read this document User Manual before use IP21 Water and dust protection cla...

Page 6: ...caused by inappropriate handling of the power cable e g by kinking shearing or other mechanical damages The power cable for this product must be unplugged from the mains power outlet socket and suita...

Page 7: ...rranty 2 years Operation environment 50C to 400C 15 RH 93 RH no condensation Storage environment 25 70 93 RH no condensation Environment pressure 70 kPa 101 3 kPa Water dust protection classification...

Page 8: ...nnot be twisted trapped crushed or stressed 7 3 Connecting mattress to the power unit Remove the cover of the air pipe connector and connect the air pipe connector to the power unit and then ensure th...

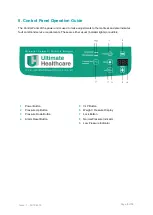
Page 9: ...ustments to the mattress and also indicates fault conditions service requirements These are either visual indicator lights or audible 1 Power Button 5 CLP Button 2 Pressure Up Button 6 Weight Pressure...

Page 10: ...er mattress 8 3 Control panel lockout If the control panel is not used for a period of 15 seconds it will lock out and inhibit the use of the functions Additionally if you wish to lock out the control...

Page 11: ...l illuminate The audible alarm may be cancelled by touching the Alarm Mute button The Low Pressure indicator will continuously illuminate until the low pressure fault condition is resolved This condit...

Page 12: ...of above steps have been checked Press Alarm Mute for system to be verified again Power Failure Alarm Indicator is flashing and sounding Check the power unit is connected to the mains power supply and...

Page 13: ...r Caution When cleaning disinfecting ensure that only a damp cloth is used Caution After cleaning dry the mattress out of direct exposure to sunlight Caution Using inappropriate detergents or disinfec...

Page 14: ...dried They may be tumble dried on a low heat for up to 90 minutes Drying temperature must not exceed 400C The mattress cover and mattress must be dry prior to refitting Caution Exceeding the temperatu...

Page 15: ...e correct rating in and replace the cover of the fuse holder back The fuse should be rated as T1a 250V 13 3 Air filter replacement 1 Replace the air filter located at the handle on the back of the pow...

Page 16: ...ue 1 03 10 2019 Ultimate Healthcare Ltd Calmore Industrial Estate Nutwood Way Totton Southampton Hampshire SO40 3WW Tel 0333 321 8996 Fax 023 8066 2388 Email info ultimatehealthcare co uk www ultimate...

Reviews: