background image

22

23

1.   Press   to turn the meter on and 

select a desired animal type, then 

press the   button to view day 

average results.

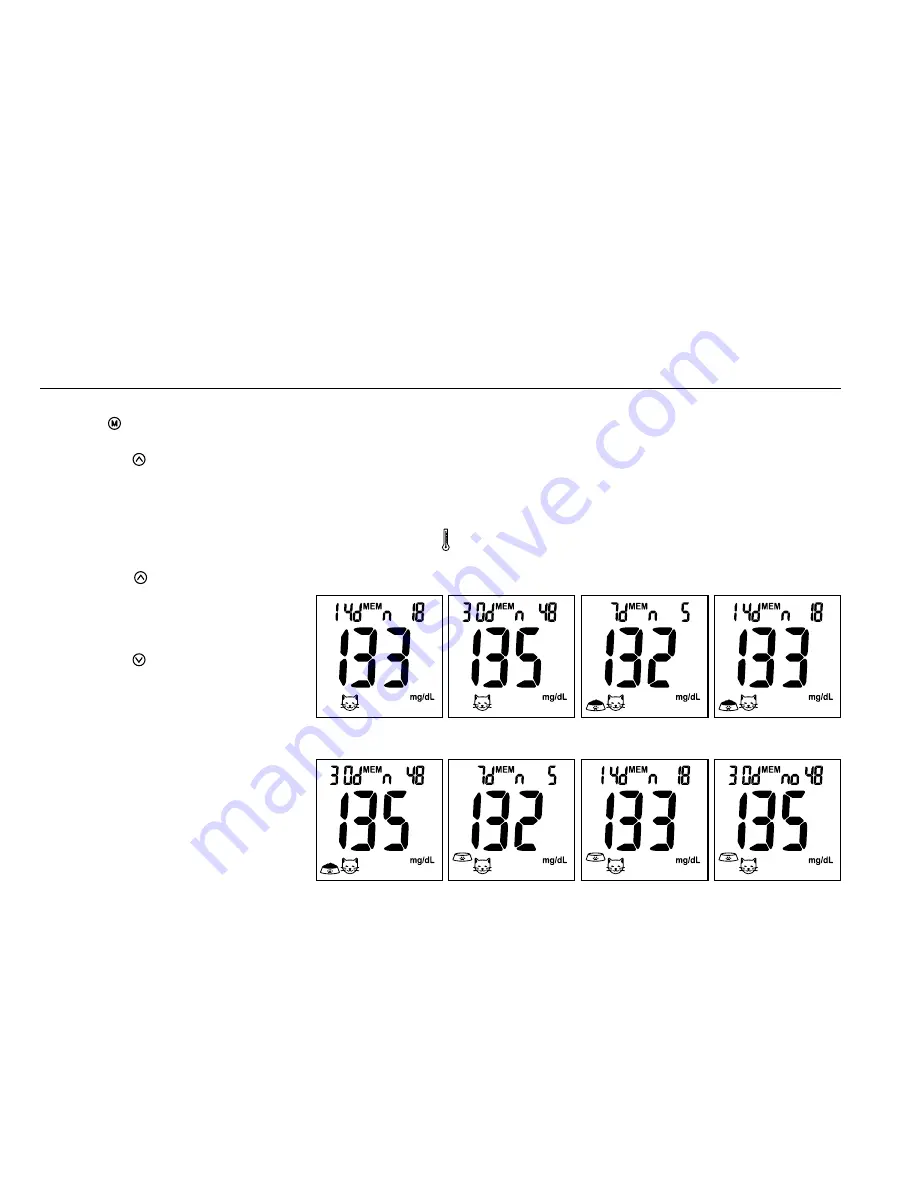
2.   7/14/30 day average results 

marked with a no meal/ pre-

meal/ post-meal will be displayed 

on the screen in sequence  

when the   button is  

pressed (Fig.43-50).

3.   When the meter displays 7 days 

with no meal status assigned, 

press the   button and the 

meter will change to view stored 

test results in memory.

Note:

1.   The consecutive 7/14/30  

day average is calculated from 

the test results obtained during 

the last consecutive 7/14/30  

day periods.

2.   A result with a   symbol indicates 

that the reading was taken out of


 the meter’s specified operating 

temperature range and may 

not be accurate. This value is 

excluded from the 7/14/30 day 

average.

3.   “LO” under 20 mg/dL 

(1.1mmol/L) and “HI” over 600 

mg/dL (33.3mmol/L) readings will 

NOT be stored in the memory.

View Day Average Results

(Fig.43)

(Fig.47)

(Fig.44)

(Fig.48)

(Fig.45)

(Fig.49)

(Fig.46)

(Fig.50)

Exiting the Memory Mode

Cleaning and Disinfection Procedure 

1.   When the meter displays a 

control solution test result,  

pressing   will turn the meter off.

2.   The meter will also be turned off 

automatically after 2 minutes 

following the last key pressed.

General Cleaning

  Switch the meter OFF.

   Using a soft cloth moistened with 

water or a mild detergent, gently 

wipe the meter surface.

   Please avoid using alcohol or 

organic solvents in cleaning.

   Do not immerse the meter in 

water when cleaning. Do not allow 

water or cleaning fluids into the 

meter or test port.

Care and Storage

  Please handle the meter with  

care. Dropping the meter may 

result in damage.

   Do not expose the meter, test 

strips, and the control solution  

to extreme conditions such as 

high humidity, heat, freezing cold, 

or dust.

   The meter should be stored at 

room temperature in a dry and 

clean area.

It is advised that you store all 

parts of iPet PRO Blood Glucose 

Monitoring System in the carrying 

case provided

.

Summary of Contents for IPET PRO

Page 1: ...User Guide Blood Glucose Monitoring System...

Page 2: ...ting Up the HI LO Alarms 12 Important Information 13 Blood Glucose Testing 14 Obtaining a Blood Sample 15 Applying a Blood Sample to iPet PRO Test Strip 16 Understanding Blood Glucose Test Results 17...

Page 3: ...erate and maintain the device Please read carefully before use Monitoring System should be considered potentially infectious and are capable of transmitting blood borne pathogens To ensure that the an...

Page 4: ...glucose meter 1 iPet PRO test strip vial 25 strips 1 glucode chip 1 lancing device 30 gauge lancets 1 bottle of control solution 1 carrying case 1 user guide 1 user quick guide 1 logbook Note 25 50 c...

Page 5: ...enter the year date time setting averages in memory or to turn the meter ON OFF 5 Strip Ejector Push to eject the test strip 6 Test Port Compatible test strips and glucode chips are inserted here 7 Ba...

Page 6: ...7 Meal Indicator Icon Pre meal and post meal 8 To select a specified animal type Hor prior to performing a test 9 Battery Icon 10 Time To display the time at 11 Code is displayed 12 Blood Drop Icon Fl...

Page 7: ...t strip can be used only ONCE The test strip consists of 1 the test strip 2 To confirm that sufficient blood has been applied to the target area 3 Contact Bar The end of the test strip inserted into t...

Page 8: ...7 Do not use expired test strips as this may cause inaccurate results the vial replace the vial cap immediately and close it tightly Test Strip Vial Label Test Strip Vial...

Page 9: ...eplacing Batteries 1 From the back of the meter gently slide and remove the battery cover Fig 1 2 ends matching indication marks on the battery compartment 3 Slide battery cover back into batteries to...

Page 10: ...irm Fig 2 3 appear and flash Press or to adjust and press to confirm Fig 3 4 appear and flash Press or to adjust and press to confirm Fig 4 5 appear and flash Press or to adjust and press to confirm F...

Page 11: ...Fig 10 1 is inserted Fig 11 2 a flashing animal icon Press or to select a desired animal type Fig 12 3 make sure the code exactly matches the test strip vial label Then press to confirm and Fig 13 4 P...

Page 12: ...ds or longer to enter setting 2 appear on the display Fig 14 3 Press or to select ON or OFF If OFF is chosen and pressed next reminder alarm setting If ON is chosen and pressed Fig 15 the number of ho...

Page 13: ...this setting Fig 18 19 3 To change the alarm setting press or until you reach your desired HI setting and then press to confirm Fig 20 The HI alarm value range is 100 400mg dL 5 5 22 0mmol L and the d...

Page 14: ...n beyond the expiration date printed on the package since this may cause inaccurate results Store your test strips and the meter in a cool dry place between 39 F and 86 F 4 C and 30 C Temperatures bey...

Page 15: ...n the screen Fig 26 and then turn off automatically after 2 minutes You may not proceed to do any testing unless the meter is coded Reminder Make sure that the code number on the display matches the c...

Page 16: ...gainst the animal paw or marginal ear vein and press the release button to obtain a blood sample Removing the lancet from the lancing device 1 After use twist off the lancing device cap containing the...

Page 17: ...tely filled the confirmation be automatically stored into the meter memory Fig 30 3 if there is no further test the the test remove the used test strip by pushing the strip ejector Discard the test st...

Page 18: ...t Results The meter displays results in either mg dL or mmol L The unit of measure is preset You cannot change this setting The meter displays results from 20 600 mg dL 1 1 33 3 mmol L indicate a pote...

Page 19: ...ted using a new test strip to confirm the result again The control solution is to ensure that iPet PRO is working properly and the user is performing a test correctly When to perform a control solutio...

Page 20: ...mode will appear on the display If button is pressed again for 2 seconds the meter will switch back to the normal testing mode 6 Discard the first drop of the control solution and squeeze a small dro...

Page 21: ...y be caused by Incorrect steps of performing the test The control solution temperature is lower than 59 F 15 C or higher than 95 F 35 C Expired or contaminated control solution Expired or contaminated...

Page 22: ...d the month day and time will then be displayed Fig 40 The most recent memory results will be displayed first 4 You can press or to scroll forwards and backwards through the results 5 Press button to...

Page 23: ...l change to view stored test results in memory Note 1 The consecutive 7 14 30 day average is calculated from the test results obtained during the last consecutive 7 14 30 day periods 2 A result with a...

Page 24: ...lease avoid using alcohol or organic solvents in cleaning Do not immerse the meter in water when cleaning Do not allow water or cleaning fluids into the meter or test port Care and Storage Please hand...

Page 25: ...od sample Apply a blood sample This message is displayed when your meter has NOT been coded Please code the meter according to page 10 appears when the result is HIGHER than the HI alert setting The d...

Page 26: ...page 12 Test result is HIGHER than 600 mg dL 33 3 mmol L Repeat the test by using a new test strip If the same message displays again the result is confirmed to be higher than the meter operating ran...

Page 27: ...high or low temperature Move to a different environment 50 F 104 F or 10 C 40 C and wait for 30 minutes before retesting Temperature is TOO LOW during the test procedure The preset alarm is ringing to...

Page 28: ...27 Display Messages continued DISPLAY DESCRIPTION ACTION Battery power is LOW Meter will only provide approximately 10 more measurements Replace with 2 AAA batteries...

Page 29: ...ion temperature is HIGHER than permitted for analysis Move to a different environment 50 F 104 F or 10 C 40 C and wait for 30 minutes before retesting The control solution temperature is LOWER than pe...

Page 30: ...a different environment 50 F 104 F or 10 C 40 C and wait for 30 minutes before retesting Battery power is too depleted for any further usage Replace with 2 AAA batteries immediately An error message i...

Page 31: ...again with a new test strip If the problem persists contact customer service An error message indicates a problem with the test strip or meter An error message indicates a problem with the meter Remov...

Page 32: ...s contact customer service An error message indicates a problem with the meter Remove batteries and wait for 1 minute then reinstall batteries to see if meter is working properly If the problem persis...

Page 33: ...r more than 2 minutes before testing Meter will automatically turn off Reinsert a test strip into the test port LCD display on the meter is blank when trying to perform a test Check batteries and if p...

Page 34: ...mmol L Measuring Range 20 600 mg dL 1 1 33 3 mmol L Test Time 5 seconds countdown Memory Capacity 500 most recent results Average 7 14 30 days average Power Supply 2 AAA batteries Battery Life Approxi...

Page 35: ...34 Do not reuse Use by Batch Code Caution Do not use if package is damaged Icon Descriptions Temperature limitation Consult instructions for use Keep dry...

Page 36: ...performance of iPet PRO Blood Glucose iPet PRO meter UltiMed Inc offers a lifetime guarantee on this product Our company shall person for any incidental consequential or punitive damages arising from...

Page 37: ...36 Customer Service Customer Service Hotline 1 877 854 3434 Distributed by UltiMed Inc Telephone 1 877 854 3434 B05Z106058 REV 1 V002 2016 11...

Reviews: