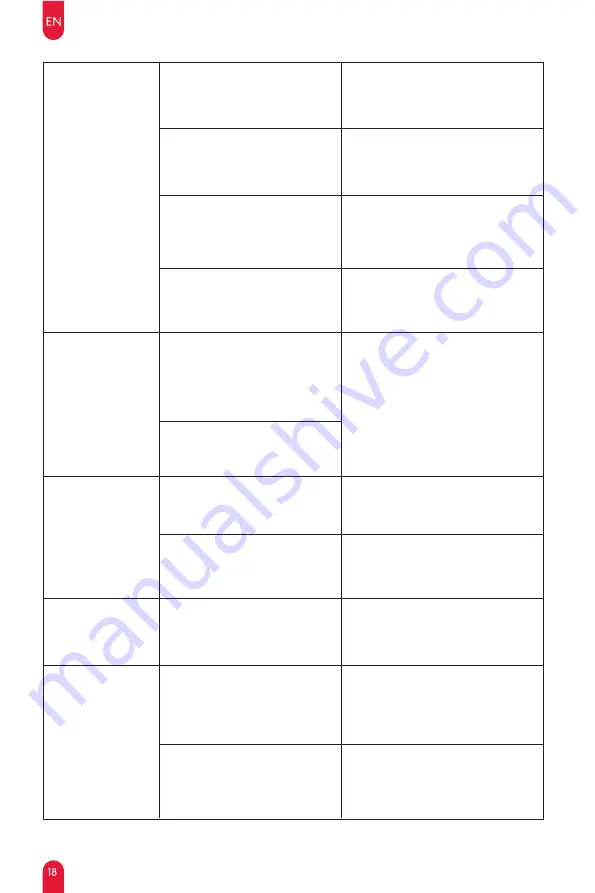
Ultenic T10 PRO User Manual Download Page 20

Can not recharge.

The robot became

stuck while operating.

The red light flashes

when the robot is

operating.

Excessive noise 

when operating.

The robot keeps

bumping into objects.

Please ensure the charging station 

has 2 feet of clear space on either 

side and 5 feet in front.

Too many obstacles near the 

charging station.

Please ensure the power cord is 

connected (reference: charging 

station indicator light)

The charging station is not 

connected to a power source.

If the battery is not used for a long 

period and if the battery can not be 

charged due to over-discharge, 

please contact Customer Service.

Prolonged inactivity, resulting in 

over-discharge of the battery.

Move the robot close to the charging 

station to re-establish the connection.

The robot will try various methods to 

disengage itself. If it fails, please 

manually untangle the robot.

The robot is out of the charging 

station range.

The robot is entangled or blocked 

by scattered wires on the ground, 

drooping curtains, carpet fringe, 

etc.

The robot may snag on a nearby 

piece of furniture.

Periodically wipe the sensors with a 

dry cloth.

The infrared obstacle avoidance 

sensor lenses are dirty.

Regularly check the omnidirectional 

wheel for entangled hair, wool, and 

other small objects.

The omnidirectional wheel are 

stuck.

Handle according to the robot

voice and app prompts.

Abnormal prompt sound from the 

robot.

Change to standard cleaning mode.

The robot entered ultra cleaning 

mode.

We recommend regularly cleaning 

and maintaining side brush, roller 

brush, dustbin, filter materials, etc.

Side/roller brushes are entangled, 

dustbin or filter materials are 

blocked, etc.

Summary of Contents for T10 PRO

Page 1: ...Model T10 PRO USER MANUAL...

Page 2: ......

Page 3: ...TABLE OF CONTENTS Safety Warning 02 Inside the Box 04 Product Description 05 Product Operation 08 Product Maintenance 13 Product Specifications 16 Troubleshooting 17...

Page 4: ...the robot battery charging station and user manual RESTRICTIONS This robot is for indoor use only Do not use it outside or in commercial and industrial environments Before using the robot remove frag...

Page 5: ...ed to ensure they do not play with the robot Further cleaning and maintenance must not be performed without adult supervision Do not place anything on the robot Please note the robot will move on its...

Page 6: ...USER MANUAL Model T10 PRO INSIDE THE BOX User Manual Cleaning Brush HEPA Filter Side Brush Rag Bracket 2 Mop 4 Remote Control Charging Station Robot Dust Bag...

Page 7: ...le Dustbin and Water Tank Charging Contacts Power Button Clean Button Speaker Mopping Modules Dustbin Release Button Infrared Sensors The Robot Reset Cliff Sensors Omnidirectional Wheel Side Brush Rig...

Page 8: ...s Point Dustbin Latch Water Inlet Cover Dust Collector Port Pads PRODUCT DESCRIPTION NOTE 1 One dust bag already pre installed in Charging Station 2 It is normal for the dust bag may appear deflated 3...

Page 9: ...rk configuration mode Blue breathing light power on upgrading firmware Steady blue light standby normal working state Blinking yellow light low battery Green breathing light charging Steady green ligh...

Page 10: ...flat hard surface at least 0 2 feet 6cm away from the wall Ensure that there is a clear space in front and on both sides so that your Robot can return to Station to recharge and empty Note The chargin...

Page 11: ...XXX 4 Go back to the Ultenic app and complete the wifi connection Bluetooth Connection 1 Turn on Bluetooth on your phone and scan for nearby Bluetooth devices 2 Select the robot s model number 3 Enter...

Page 12: ...echarge Navigation Keys Start Pause Quiet Mode Suction Power Designated Area Cleaning Mopping Mode Press the button on the robot to activate Note The robot control panel will stop lighting up after th...

Page 13: ...s 3 Empty the water tank after mopping is finished Dust Collection System Note The charging Station will not collect dust when the dust bag is removed 1 Open Cover 2 Pull up the dust bag from the hand...

Page 14: ...aces and in certain areas eg vents D Keep the robot away from wet areas E The Robot can climb over objects less than 0 59 in 15 mm in height Remove these objects if possible F Anti drop sensors can pr...

Page 15: ...robot off and unplug the charging station from the outlet 1 Remove the mop modules from the robot after each use 2 Thoroughly rinse the mop cloth and water tank with water and empty the tank 3 Sun dr...

Page 16: ...y the HEPA filter before next use 7 Put the HEPA filter back in the dustbin 8 Attaching the dustbin back to the robot 3 Remove the HEPA filter 4 Tap the HEPA filter and primary filter holder to remove...

Page 17: ...Side Brush If the Robgot dustbin is not emptied or the is solid white it may indicate that the charging station duct is blocked Refer to the image Unplug and turn over the charging station Remove the...

Page 18: ...gular Maintenance Parts Maintenance Frequency Replacement Frequency Mop Side Brush Roller Brush HEPA Filter Dustbin Primary filter holder Sensors omnidirectional wheel bumpers robot Wash mop after eac...

Page 19: ...refer to the manual for cleaning instructions The robot is not within the router s network coverage The robot is not in a pending configuration mode Failure to use a 2 4G network The wrong app may ha...

Page 20: ...to re establish the connection The robot will try various methods to disengage itself If it fails please manually untangle the robot The robot is out of the charging station range The robot is entangl...

Page 21: ...ly check the roller brush for obstructions Do not add other liquids such as disinfectant perfume etc to the water tank Wipe the sensor lens with a clean soft cloth or remove the blocked objects Please...

Page 22: ...with the limits for a Class B digital device pursuant to Part 15 of the FCC Rules These limits are designed to provide reasonable protection against harmful interference in a residential installation...

Reviews: