background image

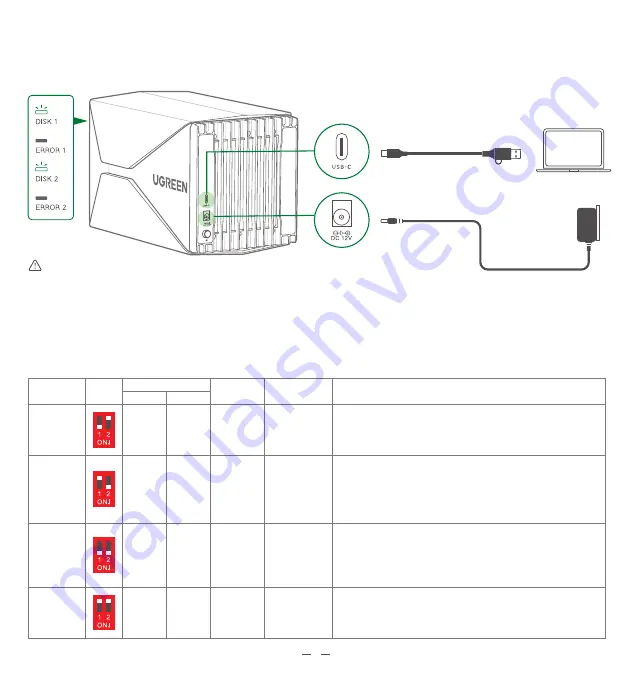
4 Plug The Device Into Power Outlet

DESIGNED BY UGREEN

1. Connect the enclosure to your PC / laptop via the provided cable, then connect to the power adapter. 

2. Power on the device, the power indicator turns solid white.

Non-standard or non-certified adapters are not allowed in case of the potential risks.

Warning

Supplied Accessory

Supplied Accessory

7

 1  RAID Modes & DIP Switch

DIP

Switch

DIP Switch Status

1

2

Description

Min. Drive

Number

Available

Capacity

RAID

Modes

Fastest read and write mode, largest capacity but low security.

When one of the hard drives fails, all of the data cannot be restored.

ON

OFF

2

Total hard drive

capacities

RAID 0

(Fast Mode)

High security, acceptable read and write with small capacity. 

When one hard drive fails, other drives work normally; then you'll 

have to replace the broken drive (greater than or equal to the 

capacity of the original capacity), all of your lost data will be 

recovered automatically.

OFF

ON

2

Min. hard drive

capacity

RAID 1

(Safe Mode)

Largest available capacity, average read and write speed, and 

low security.

All hard drives form a big drive, when one of them fails, all of your 

data will be unrecoverable.

ON

ON

Total hard drive

capacities

2

SPAN

Default factory setting mode, all disks work separately.

When one disk fails, all the others will not be affected.

OFF

OFF

Total hard drive

capacities

1

PM

IV  RAID Mode Setting and Connection

Summary of Contents for CM335

Page 1: ...y 3 5 RAID Hard Drive Enclosure This is the manual in English if DE IT ES FR JP RU CN version of this user manual is required please refer to our o cial website www ugreen com search CM335 to get the...

Page 2: ...English 01 10...

Page 3: ...e Out The Tray 2 Hard Drive Installation 2 1 3 5 inch Hard Drive 2 2 2 5 inch Hard Drive 3 Put Drive Tray Back Into the Enclosure 4 Plug the Device Into Power Outlet IV RAID Mode Setting and Connectio...

Page 4: ...efully before using Please back up all your data before using the product Formatting needed when switching RAID mode or partitioning drives please back up your data Please safely eject the hard drive...

Page 5: ...di erent RAID modes come di erent DIP combinations See RAID Modes DIP Switch for details USB C Data transfer port for connecting to PCs laptops Power Button Power ON OFF 1 2 1 2 2 Product Overview Na...

Page 6: ...Outer Shell Compatible Systems Windows macOS Linux Dimension L214 W135 H144 mm L8 4 W5 3 H5 6 in 3 LED Indicator Status ERROR Indicator No drive access Drive access normal Drive access abnormal Drive...

Page 7: ...drive face down 1 2 Remove the xing plates then put the hard drive on the drive tray Install back the xing plates and be careful of their direction Squeeze the tray handle then pull the tray out 1 Tak...

Page 8: ...les of hard drive align with those of the tray then screw the hard drive rmly As the following picture remove one of the plates rst Put the drive tray back into the enclosure then slowly push it to th...

Page 9: ...restored ON OFF 2 Total hard drive capacities RAID 0 Fast Mode High security acceptable read and write with small capacity When one hard drive fails other drives work normally then you ll have to rep...

Page 10: ...ing Windows Online drive and drive partitioning after switching RAID mode The formatting may di er depending on the di erent operating system please check your operating system for reference Online dr...

Page 11: ...NTFS as for macOS you must choose the ExFAT format Drive partitioning create a New Simple Volume and set its capacity Select the unallocated space and right click New Simple Volume then follow the pop...

Page 12: ...es 10 macOS Linux Step Other Disk Utility Erase choose the le format ExFAT then Erase Complete Your Mac can read the drive after formatting Step Applications Disks select the external drive and click...

Page 13: ...2 Bay 3 5 RAID Festplattengeh use Benutzerhandbuch...

Page 14: ...Deutsch 11 20...

Page 15: ...Festplatteninstallation 2 1 3 5 Zoll Festplatte 2 2 2 5 Zoll Festplatte 3 Einsetzen des Laufwerksfachs wieder in das Geh use 4 Stecken die Festplatte in die Steckdose IV Einstellung und Verbindung von...

Page 16: ...durch Vor dem Gebrauch sichern Sie alle Ihre Daten Formatierung erforderlich wenn Sie den RAID Modus wechseln oder Laufwerke partitionieren sichern Sie bitte zuerst Ihre Daten Bitte werfen Sie die Fes...

Page 17: ...dus haben unterschiedliche DIP Switch Schauen RAID Modus DIP Switch f r Details an USB C Daten bertragungsport f r eine Verbindung mit den PCs Laptops Power Taste Einschalten Ausschalten 1 2 1 2 2 Pro...

Page 18: ...5 H144 mm L8 4 W5 3 H5 6 in 3 LED Anzeigen Status ERROR Anzeigen Keine Festplatte zum Anschluss Laufwerkszugri normal Laufwerkszugri unnormal Bei Lesen und Schreibung des Laufwerks Laufwerk sicher ent...

Page 19: ...efestigungsplatten und legen dann die Festplatte auf den Laufwerktr ger Bringen Sie die Befestigungsplatten wieder an und achten Sie auf eine richtige Richtung 1 Tablett herausnehmen Pins Befestigungs...

Page 20: ...s bereinstimmen und schrauben dann die Festplatte fest Wie in der folgenden Abbildung gezeigt entfernen Sie zuerst eine der Platten Setzen Sie den Laufwerktr ger wieder in das Geh use ein und schieben...

Page 21: ...erheit akzeptables Lesen und Schreiben mit geringer Kapazit t Wenn eine Festplatte ausf llt funktionieren die anderen Laufwerke noch normal aber Sie m ssen das defekte Laufwerk die ganze Neue ersetzen...

Page 22: ...s und Laufwerkspartitionierung nach dem Wechsel des RAID Modus Die Formatierung kann je nach Betriebssystem unterschiedlich sein bitte berpr fen Sie Ihr Betriebssystem als Referenz Online Laufwerk ein...

Page 23: ...Sie das Format ExFAT w hlen Laufwerkspartitionierung Erstellen Sie ein New Simple Volume und legen seine Kapazit t fest W hlen Sie den nicht zugewiesenen Speicherplatz aus und klicken mit der rechten...

Page 24: ...latten Dienstprogramm L schen w hlen das Dateiformat ExFAT dann L schen Vollst ndig Ihr Mac kann das Laufwerk nach der Formatierung lesen Schritt Anwendungen Laufwek w hlen Sie das externe Laufwerk au...

Reviews: