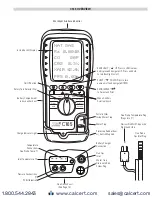
9
Switching ON the
Analyzer
Rotate the dial to the mode you want to use before switching on . This may eliminate the need for a full countdown in
some of the modes and save you time .
Press
button to switch the unit ON . This must be done in fresh air to ensure that the analyzer auto
calibrates its sensors properly .
When switched on, the analyzer beeps and briefly displays software version, date and time . Its bottom line counts down
until the sensors are ready to use . If the analyzer will not auto calibrate, its sensors need to be replaced or recalibrated
by an authorized repair center .
If an inlet temperature probe (optional) is connected into the T2 socket during its countdown, the measured temperature
from the inlet probe will be used as the inlet temperature .
If an inlet temperature probe is not connected to the analyzer during countdown the measured temperature from the flue
probe will be used as the inlet temperature .
If neither probe is connected during countdown the analyzer’s internal ambient temperature will be used as the inlet
temperature .
Switching OFF the
Analyzer
Press
& hold for 2 seconds to switch the analyzer OFF . The display counts down from 30 or less with the pump on
to clear the sensors with fresh air – If the probe is still connected, make sure analyzer and probe are in fresh air .
Press
if you want to stop the countdown and return to making measurements .
Note: The analyzer will not switch off unless the CO reading is below 40ppm.
Worklight
Press
to switch the worklight on and off .
NOTE: Use of the worklight significantly increases the current drain on the batteries.
Switching PUMP
on / off
The analyzer normally operates with the pump on .
Press
to switch the pump off and on .
When the pump is switched off “-PO-” is displayed instead of the O
2
, CO & CO
2
readings . The analyzer also displays
“PUMP OFF” on the top line approx . every 30 seconds .
NOTE: The pump will automatically switch itself off when the rotary switch is set to Menu,
Status, Pressure, Exchange or Differential Temperature.
Zeroing the pressure
sensor
To re-zero the pressure sensor when “PRS/TEMP” is selected on the dial, press and hold
until the top line display
shows CAL ZERO .
Always disconnect the pressure hose before zeroing .
Printing Data
Press and quickly release
to start the analyzer printing . The analyzer displays a series of bars until this is
completed . Press and release the key again to abort printing .
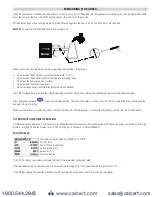
Make sure the printer is switched on, ready to accept data and its infrared receiver is in line with the analyzer’s emitter
(on top of the analyzer) .
Storing a set of
readings
Press and hold
for approx . 2 seconds .
The top line briefly displays the log number .
Note: This STORE function is inhibited in normal operation if the pump is switched off.
Using
◀
/
◀
/
Buttons
The function buttons below the symbols
◀
/
◀
/
are used to navigate through the menu when the rotary switch is set to
“MENU” – See USING THE MENU, Pg . 18 .
USING THE FOUR FUNCTION BUTTONS
www.calcert.com
1.800.544.2843
0
5
10
15
20
25
30


