UEC DSD 5000 User Manual Download Page 19

19

First Time Installation

First Time Installation

Once the STB hardware has been connected correctly and booted, you will be required to 
complete the 

FIRST TIME INSTALLATION

. This requires you to set your 

TV Resolution

 and 

your 

Time Zone, 

and 

scan for available channels. 

To view the STB on your TV, select the source input you connected your STB to. Some TVs 
have a long list of inputs and don’t make physical inputs easy to identify.  You may need to 
select a few different inputs initially.  Take care to note which one works.
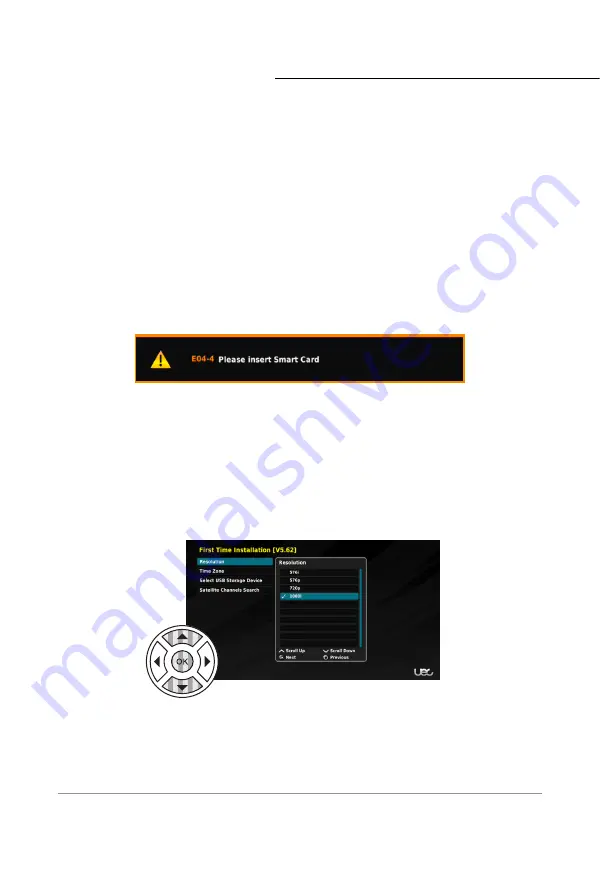
Step 1: Resolution

First you must set the appropriate display resolution. Your TV is likely to be either 720p or 
1080i, however 576i and 576p are provided if required. 

*

  To select the resolution use the RCU 

navigation buttons. 

The Up and Down arrows allow you to select the desired input.

Once the required resolution is highlighted, use the 

OK 

button confirm your selection. 

A popup window asks if you wish to 

KEEP

 or 

REVERT

 the resolution change. If the correct 

resolution is presented, select 

KEEP

 and press the 

OK 

button, otherwise select 

REVERT


and the display will return to the default resolution.  If you lose the picture after making a 
selection, the STB will automatically 

REVERT

 after a few moments. 

*If the incorrect resolution is selected, the image may flicker or not work at all. Resolution refers to the 
HDMI output.  The ‘Video’ output (yellow RCA) is always 576i or standard definition.  Some TVs HDMI input 
may not accept 576i.

After removing the smartcard, ensure the card is re-inserted correctly, with the chip facing 
down and the arrow facing inwards. If your smartcard is missing or not inserted correctly, you 
will see this error message. 

Summary of Contents for DSD 5000

Page 1: ...DSD 5000 USER MANUAL...

Page 2: ...2 Page is intentionally blank...

Page 3: ...tion Process 22 General Functions 23 Remote Control Functions 23 Live Satellite Television 24 Channel List 24 Information Banner 25 Main Menu 26 Settings 27 Installation 28 Satellite Channel Search 28...

Page 4: ...carries the RCM logo and is compliant with Electricity Consumer Safety Regulation 2015 Radio communications Electromagnetic Compatibility Standard 2008 Abbreviations terms NAS NAS Australia importer...

Page 5: ...ed to operate the STB is 12VDC at 2 amps MAINS SUPPLY 100 240V AC 50 60Hz to 12VDC A power pack referred to as a PSU is supplied with the STB Connect the power cable to the STB before connecting it to...

Page 6: ...nstallations cautions are observed Do not place on unstable surfaces where it can fall possibly causing injury or damage to the appliance When installing in a caravan or RV ensure the unit is properly...

Page 7: ...and could swallow them Leaking batteries can cause damage to the remote control Remove RCU batteries when the STB will not be used for a prolonged period Toxic substances in batteries can damage the...

Page 8: ...ill ensure many hours of enjoyable entertainment Becoming familiar with the STB front panel functions and those of the RCU will add to your enjoyment when using this equipment Identifying the STB IMPO...

Page 9: ...ed cabling Australian VAST certified Dual DVB S2 tuners PVR ready with optional external USB recording device HEVC MPEG 2 4 compliant Dolby Audio Pass Through supported Catch up streaming portal suppo...

Page 10: ...10 What s in the Box Set Top Box Remote Control Unit RCU HDMI Cable Smartcard inside STB Power Supply Unit 100 240VAC to 12VDC 2A DSD 5000...

Page 11: ...B will reboot 5 Smart card VAST smart card slot on right of STB Card must be correctly inserted to receive encrypted VAST TV channels 6 7 Segment display Information display showing various status mes...

Page 12: ...tal Audio to AV Home Theatre for digital audio and Dolby Digital Surround if available in the broadcast 7 Video L R Optional cable AV RCA cable connects audio and video to older style TVs VCRs and oth...

Page 13: ...Keypad Program Information Switch between TV and Radio View Recorded Programs View Electronic Program Guide Menu Navigation Buttons Select OK Button Launch MENU System Exit INFO MENU Volume UP DOWN Ch...

Page 14: ...until the required function is highlighted Press OK to select that item or INFO to see information about it TV programs MOST functions require the user to press OK before LEAVING the program or functi...

Page 15: ...nder Ethernet Port Cat5 or Cat6 USB Port Manual Software Updates HDD for PVR Functionality HDMI Port Connect Power Supply Unit Connection SmartCard Port SPDIF Port for Home Theatre Amplifier RCA Cable...

Page 16: ...pear if the smart card cannot be read by the STB See VAST Registration Process on page 22 for instructions on registering you Smartcard Underside of Card Topside of Card Connect the cable for your sat...

Page 17: ...log video connection sometimes CVBS Composite or AV please use a Yellow Red and White RCA cable and match the colours If only one audio mono cable is required it is usually the white Left Mono cable U...

Page 18: ...e not provided connect one end of the cable into the Ethernet port of the STB then plug the other end into a LAN port of your internet router See Internet Setup on page 30 Plug the PSU DC Jack Connect...

Page 19: ...gation buttons The Up and Down arrows allow you to select the desired input Once the required resolution is highlighted use the OK button confirm your selection A popup window asks if you wish to KEEP...

Page 20: ...4 Satellite Channels Search Finally the STB needs to search for available channels Using the NAV buttons select the SATELLITE CHANNELS SEARCH option and press the OK button Once in the SATELLITE CHANN...

Page 21: ...0 Channel 800 is the landing page for VAST devices and it provides helpful information about VAST Before you can begin watching Satellite Television you must register your smart card with VAST See VAS...

Page 22: ...If you cannot see the VAST information screen on channel 800 the smart card activation will not be successful In this case consult the troubleshooting pages contact your installer or the UEC help line...

Page 23: ...ly according to the numerical logical channel numbers LCN assigned by the broadcasters to their respective channels CH UP moves forward to the next available channel in the list and CH DOWN moves back...

Page 24: ...to activate the SEARCH function The Search function enables you to search through your available channels presents a search bar and an upper case QWERTY Keyboard BACKSPACE Within the SEARCH Function...

Page 25: ...nal and quality levels and a progress bar The info banner will automatically collapse after an elected period of time you can adjust the on screen time in SETTINGS Press the Info button again before t...

Page 26: ...ain menu UEC STREAMING PORTAL This portal gives access to the five On demand services of the Australian national broadcasters See page 46 SCHEDULER Schedule recordings view scheduled recordings and se...

Page 27: ...For your convenience settings that could cause errors or problems have label in this manual Many of the potentially troublesome settings are configured during the First Time Setup and therefore not to...

Page 28: ...during FIRST TIME SETUP Dish Installation configured during FIRST TIME SETUP Internet Setup and Factory Reset Satellite Channel Search To conduct a Satellite Channel Search enter the INSTALLATION men...

Page 29: ...e North If you use a magnetic compass you may need to correct Magnetic Declination See http www ga gov au webtemp image_cache GA17167 gif Dish Installation To connect a satellite dish enter the INSTAL...

Page 30: ...an IP address automatically DHCP which will also provide the other settings required to get access to the internet from your router If your Set Top Box is not connecting to the internet once a wired...

Page 31: ...et with System Reboot restart To perform a Factory Reset you must enter the INSTALLATION settings menu Use the NAV buttons to highlight the Factory Reset function Press the OK button A popup will appe...

Page 32: ...solution the audio output and language settings Within this menu you have access to Recording Video Audio Subtitles Time Zone Banner Display Duration Virtual Keyboard Default and Languages Recording D...

Page 33: ...ing By default the End Delay is set to 30min but it can be set between 0min 120min TIME SHIFT LENGTH As mentioned in Understanding Time Shift Ability this feature sets the time of which live TV is rec...

Page 34: ...tivated by the Remote Control by pressing the SUB button TIME ZONE You can set the Time Zone according to the Australian States and Territories BANNER DISPLAY DURATION Set the duration of time in whic...

Page 35: ...ol PIN Code is required to access blocked programs and recordings Parental Control Incorrect PIN Code The user has 3 opportunities to input the correct parental control PIN code If the incorrect PIN i...

Page 36: ...are Smart Card Status Softcell Service Status and Loader Status SOFTWARE UPDATES Typically SOFTWARE UPDATES are performed automatically Over the Air OTA If an update is required it will be initiated o...

Page 37: ...the Toshiba 1TB Canvio HDD Portable Hard Drive Step 1 Connect External Storage Plug the external drive into the USB port on the back of the Set Top Box Ensure the cable is connected to the External H...

Page 38: ...lect SETUP RECORDING DEVICE and press the OK button Select the External HDD you connected and press the OK button Select the File Format which is EXT4 Linux and press the OK button Next you will need...

Page 39: ...UIDE menu While in the EPG you can navigate the previewed programs using the NAV buttons While navigating the highlighted program is selected To view the scheduled programs for the next 8 days use the...

Page 40: ...e desired program is highlighted to set the recording or reminder Select the desired action and follow the on screen prompts EVENT SEARCH The event search allows you to see a list of upcoming episodes...

Page 41: ...eature allows you to view and manage your pending and upcoming recordings Only recordings that have been scheduled or are currently recording will appear in this menu Completed recordings are not acce...

Page 42: ...ime and Total Duration mins of the program you wish to record You also have the ability to set a Custom Title for your Recording and for series recordings you can set whether the event will repeat The...

Page 43: ...button to add a new recording or reminder CHANGE TIMER Press the Yellow 3rd from left button to edit the Timer HELP Press the Blue 4th from left button to get help To close this function press the EX...

Page 44: ...multaneously This multiple watch record feature depends on the broadcaster s allocation of channels on the satellite This functionality will vary by region All recordings past and current are listed i...

Page 45: ...ing the Yellow 3rd from left button while in the MY RECORDINGS menu allows you to select the order of which your recordings are displayed PVR SEARCH Pressing the Blue 4th from left button while viewin...

Page 46: ...for channel 9 may require a free independent account to be set up prior to logging in through the portal This can be achieved through an internet browser on a computer or smart phone After creating a...

Page 47: ...cture Check if TV and STB are ON not in standby mode Check that all of the cable connections to the STB and TV are secure Check that the TV has the correct input source selected TV AV1 AV2 HDMI No sou...

Page 48: ...his DSD 5000 PVR Set Top Box will be able to run all available services in future DIY Installations Disclaimer Due to the many potential configurations in each home and the variety of equipment availa...

Page 49: ...property rights of the DSD 5000 PVR Set Top Box are owned by NAS Australia Pirating or circumventing of the conditional access system or facilitating anyone else doing so is STRICTLY PROHIBITED Failur...

Page 50: ...DSD 5000 Website uec com au UEC Service Centre 07 3015 8790 Dolby Dolby Audio and the double D symbol are trademarks of Dolby Laboratories...

Reviews: