UBI EasyCoder 401 Linerless – Installation Instructions
5
POWER ON
BW
FW
LTS
LSS
R-END
P-6
P-607
P-606
WR-602
PAPER CUTTER KIT, cont'd.
Installation, cont'd.
1
/. The photoelectric sensors in the
cutter's LTS have a different sensitivity
than those in the front-fitted LTS. It is
important that the jumper on P-607 is
disconnected when upgrading an EC
401 LLT or when replacing the CPU
board in an EC 401 LLC.
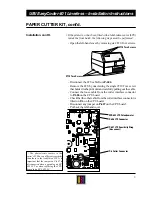
• If the printer is, or has been, fitted with a label-taken sensor (LTS)
inside the front hatch, the following steps must be performed:
- Open the left-hand cover by removing six #T10 Torx screws.
- Disconnect the LTS cable from P-606.
- Remove the LTS by unscrewing the single #T10 Torx screw
that holds it to the print unit and carefully pulling out the cable.
- Connect the loose cable from the cutter interface connector
to P-606 on the CPU board.
- Check that the other cable from the cutter interface connector is
fitted on P-6 on the CPU board.
- Disconnect any jumper on P-607 on the CPU board
1
.
- Put back the left-hand cover.
EasyCoder 401
Power
Ready
Error
#T10 Torx Screws
#T10 Torx Screws
P-607 LTS Sensitivity Strap
(disconnect)
P-6 Cutter Connector
P-606 LTS Connector
WR-602 LTS Potentiometer


