background image

QUICK START GUIDE

10

u-line.com

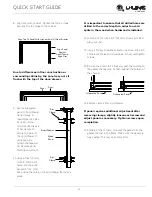
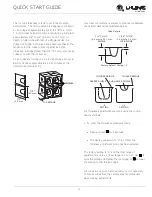
8. Align door with cabinet. Tighten the top 3 screws, 

securing the top hinge to the cabinet. 

Due to differences in floor construction or 
surrounding cabinetry, the panel may not sit 
flush with the top of the door/drawer.

9. Secure integrated 

panel to door/drawer 
using clamps. A 
robust tape may also 
be used. U-Line 
recommends the use 
of bar clamps to 
secure the panel to 
the door/drawer. If 
using tape, be 
certain the tape will 
not damage panel 
finish upon removal.

10.Using a 7/64" (3 mm) 

drill bit, drill 6 pilot 
holes into the wood 
panel 1/2" (12 mm) 
deep using the holes in the door/drawer frame as a 
guide.

It is important to ensure that all drilled holes are 
drilled to the correct depth in order to avoid 
splits in the wood when hardwood is installed.

11.Locate 6 of the #6x 1-1/4" (32 mm) screws provided 

with your unit.

12.Using a Phillips screwdriver, place one screw into each 

of the 6 pilot holes and screw down. Do not overtighten 
screws.

13.Be sure the screws force their way past the opening on 

the gasket channel and sit flush against the bottom of 
the channel.

14.Remove clamps from door/drawer.

If panel requires additional adjustment after 
removing clamps, slightly loosen each screw and 
adjust panel as necessary. Tighten screws upon 
completion.

15.Starting at the corners, re-install the gasket into the 

gasket channel in the frame. Make sure the gasket is 
fully seated. This may take some force.

Align Panel

Against

Door/Drawe

Edge First

Align Top Of Panel With Highest Point Of Door/Drawer

Door

Panel

Wood

Panel

Door/Drawer

Bar 

Clamp

Bar 

Clamp

Integrated Panel

Integrated Panel

Summary of Contents for U-CLR1215S-40B

Page 1: ...QUICK START GUIDE 1000 Series CLR1215 115 V 60 Hz...

Page 2: ...to you PRODUCT INFORMATION Looking for additional information on your product User Guides Quick Reference Guides CAD Drawings Compliance Documentation and Product Warranty information are all availab...

Page 3: ...1 Model List 2 Safety and Warning 2 Environmental Requirements 3 Electrical 3 Water Hookup 7 Drain 8 Door Swing 9 General Installation 9 Integrated Panel Installation 11 Control Operation 11 First Us...

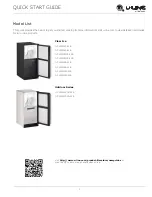
Page 4: ...view detailed User Guides for all U Line products Clear Ice U CLR1215S 00B U CLR1215S 40B U CLR1215INT 00B U CLR1215INT 40B U CLR1215B 00B U CLR1215B 40B U CLR1215W 00B U CLR1215W 40B Outdoor Series U...

Page 5: ...igned to operate between 50 F 10 C and 100 F 38 C Higher ambient temperatures may reduce the unit s ability to reach low temperatures and or reduce ice production on applicable models For best perform...

Page 6: ...ces and is not recommended for your unit because it could be prone to nuisance tripping However be sure to consult your local codes Water Hookup INDOOR MODELS PREPARE PLUMBING Please use the braided s...

Page 7: ...r harm flooding or void the product warranty CAUTION Turn off water supply and disconnect electrical supply to unit prior to installation 1 Turn off water supply and disconnect electrical supply to pr...

Page 8: ...s product contact a licensed plumber Water Supply Connection WARNING Connect to potable water supply only CAUTION Review obey and understand the local plumbing codes before you install your unit Conne...

Page 9: ...Normal operation creates some vibration A water supply line contacting an internal component or cabinet wall can cause excessive noise during operation or damage to the line 4 On the back panel break...

Page 10: ...be located directly below the unit Unit has a solid base that will not allow the unit to drain below itself There is a possibility that hose connections may have loosened during shipment Verify all co...

Page 11: ...or Swing Units have a zero clearance for the door to open 90 when installed adjacent to cabinets Stainless Steel and black and white models require 2 1 8 54 mm door clearance to accommodate the handle...

Page 12: ...cord 2 Gently push the unit into position Be careful not to entangle the cord or water and drain lines 3 Re check the leveling from front to back and side to side Make any necessary adjustments The u...

Page 13: ...ct depth in order to avoid splits in the wood when hardwood is installed 11 Locate 6 of the 6x 1 1 4 32 mm screws provided with your unit 12 Using a Phillips screwdriver place one screw into each of t...

Page 14: ...on to stabilize for 24 hours before rechecking ice thickness Ice is produced in layers resulting in a clear cube Ice in bin may develop surface frost which disappears when cube is placed in liquid Ice...

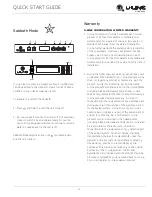
Page 15: ...ur clear ice machine is pre set to produce ice between the optimal dimensions illustrated below Ice thickness adjustments are made using the control panel as follows 1 To enter the thickness adjustmen...

Page 16: ...nty period two years on Modular 3000 Series for all U Line products U Line shall 1 repair any product or replace any part of a product and 2 for all Marine RV and Domestic U Line products sold and ser...

Page 17: ...y come into contact with rain by virtue of outdoor use Exposure to other sources of water shall also cause this warranty to be void including flooding of the area in proximity of the unit greater than...

Reviews: