


QUICK START GUIDE
7
u-line.com
CAUTION
!
Failure to connect water supply or drain line
connections properly can result in personal
injury and property damage. Gravity drain
connections must be routed downward from the
rest of the unit at the rate of 1/4" per foot (1 cm
per 50 cm).
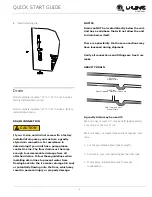
FACTORY INSTALLED DRAIN PUMP
If your drain line will run up to a stand pipe, disposal or
spigot assembly, or does not otherwise meet the
requirements for a gravity drain, you may have ordered a
pre-installed U-Line P60 drain pump.
If you need to install a P60 drain pump into your unit, see
DRAIN PUMP section in the User Manual.
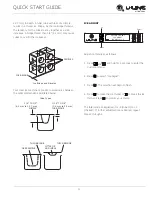
See below for typical installations requiring a drain pump.
NOTICE
The maximum lift for the P60 drain pump is
10 feet. This must be done as close to the rear of
the unit as possible.
Cold
Water
Hot
Water
Waste
Waste
6KXW2ɞ
Valve
Stand Pipe
P60 Pump Required
Air Gap
(Optional Hook-Up)
Cold
Water
Hot
Water
Waste
6KXW2ɞ
Valve
Disposal Assembly
P60 Pump Required
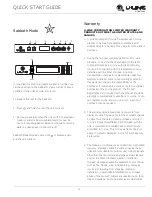
Waste
Cold
Water
6KXW2ɞ
Valve
Hot
Water
Air Gap
(Optional Hook-Up)
Y-Branch Tailpiece
P60 Pump Required


