background image

PAGE 11 OF 19 

1015 IH-2812

OPERATION CONTINUED

LANGUAGE

This setting is available if you select "Month," "Day of the 

Week," or "Comment" in previous "PRINT ORDER."

Example:

 Change the print language to French.

1.  Press 

SELECT

 until the


is beside the "LANGUAGE" mark.

2.  The flashing digit indicates "Print Language Options." 

(See Figure 29)

3.  In this example, press 

CHANGE

 until the option is "

2

(French). Refer to Language Options table below.

4.  Press 

SET

. (See Figure 30)

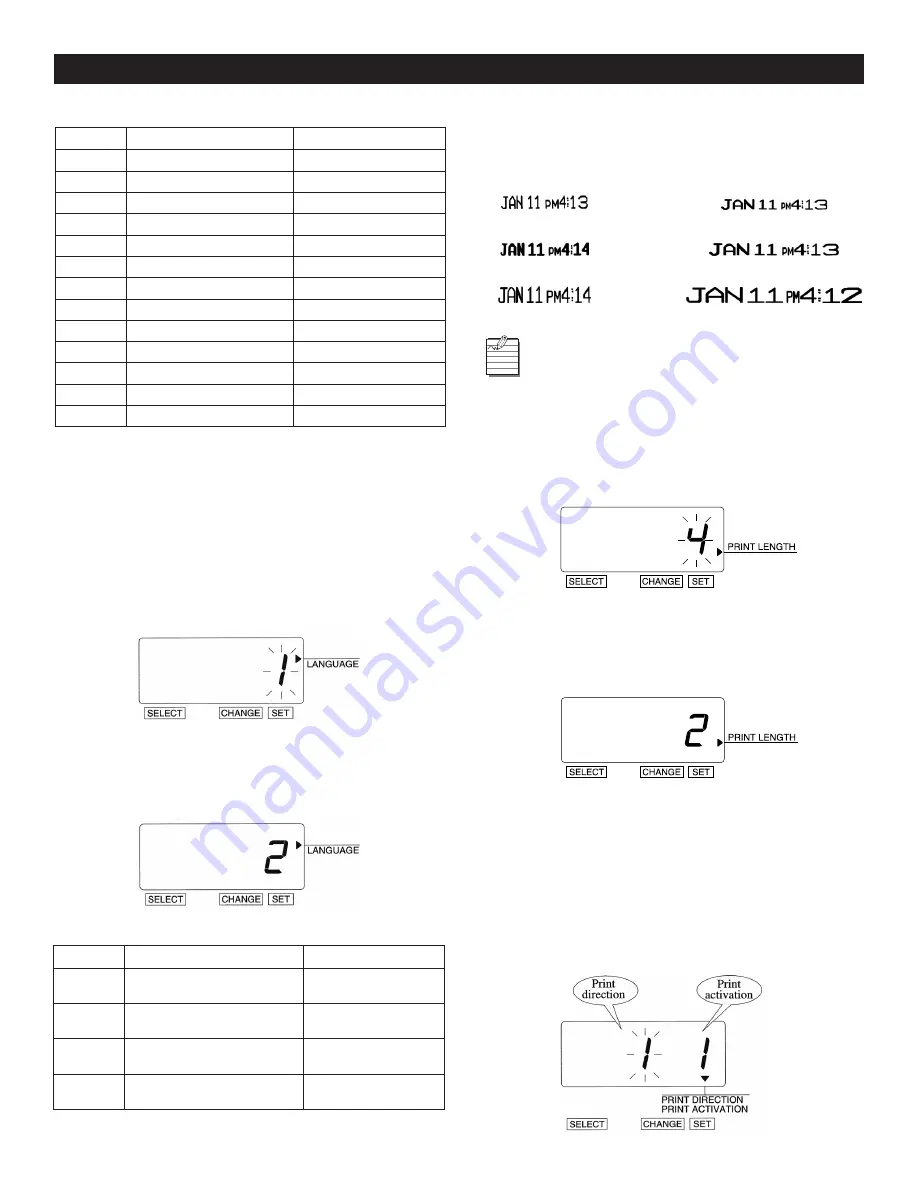
PRINT LENGTH

The print length default is 4. You may select from six (1-6) 

font sizes (refer to Print Length Examples 1-6 below).

If the font size is too large to print, the font will 

revert to a smaller size before printing correctly.

Example:

 Change the print length from 4 to 2.

1.  Press 

SELECT

 until the


is beside the "PRINT LENGTH" mark.

2.  The flashing digit indicates "Print Length Options." 

(See Figure 31)

3.  In this example, press 

CHANGE

 until the option is "

2

." 

Refer to Print Length Examples 1-6 above.

4.  Press 

SET

. (See Figure 32)

PRINT METHOD

Example: Change the print direction to "Left" and the 

print activation to "Manual."

1.  Press 

SELECT

 until the


q


is above the "PRINT 

DIRECTION/PRINT ACTIVATION" mark.

2.  The flashing digit indicates "Print Direction Options." 

(See Figure 33)

PRESET COMMENT OPTIONS

OPTION

COMMENT OPTIONS

PRINT EXAMPLE

1

RCVD (Received)

JAN 31 '08 RCVD

2

SENT

JAN 31 '08 SENT

3

IN

JAN 31 '08 IN

4

OUT

JAN 31 '08 OUT

5

CFMD (Confirmed)

JAN 31 '08 CFMD

6

FILED

JAN 31 '08 FILED

7

PAID

JAN 31 '08 PAID

8

USED

JAN 31 '08 USED

9

FAXED

JAN 31 '08 FAXED

10

VOID

JAN 31 '08 VOID

11

ORIGN (Original)

JAN 31 '08 ORIGN

12

APR’D (Approved)

JAN 31 '08 APR’D

13

CMPL’D (Completed)

JAN 31 '08 CMPL’D

LANGUAGE OPTIONS

OPTION

PRINT LANGUAGE OPTIONS

PRINT EXAMPLE

1

ENGLISH

TH 25 DEC '08  

OUT 31 10:00

2

FRENCH

JE, 25 DEC '08  

SORT 31 10:00

3

SPANISH

JU, 25 DIC '08  

SAL 31 10:00

4

PORTUGUESE

QI, 25 DEZ '08  

SAIDA 31 10:00

Figure 29

Figure 30

1

2

3

4

5

6

Figure 31

Figure 32

Figure 33

Summary of Contents for H-2812

Page 1: ... 5 ES700 4 Open and Close Unit 5 Power the Unit Print Positioning 5 Important Things to Remember When Using The ES700 6 Quick Start 6 Atomic Synchronization 6 Set Time Zone 5 EST 6 CST 7 MST 8 PST 6 Automatically Receive Atomic Signal 6 Turn DST OFF 6 Program the Time Recorder 7 Settings 7 15 Time 7 Date 8 12 24 Hour Format 8 Print Order 9 Year Digit 9 Hour Minute 9 10 Leading Zero 10 Preset Comme...

Page 2: ...at failure to take or avoid a specific action might result in physical harm to you or to the hardware Alerts you to stop immediately Failure to do so will result in physical harm to you or to the hardware Alerts you that improper handling may cause electrical shock resulting in serious injury or death Alerts you not to disassemble or modify the unit Alerts you to remove power cord from wall outlet...

Page 3: ...nvironment This may result in a fire or electric shock Do not place the unit near a kitchen counter or humidifier Oil smoke or steam generating from them may cause fire or electric shock Do not yank the power cord to disconnect from the outlet Hold the plug with your hand to do so or the cord may be damaged This may lead to a fire or electric shock Do not insert or drop any other time card than sp...

Page 4: ...ll job cost recorder or time stamp Atomic Synchronization sets time and date automatically Quartz Time Recorder Digital LCD Date Hour Minute Day of the Week Perpetual Calendar Dot Matrix Printer Automatic Daylight Saving Time DST Automatic Date Month Year Change to 2099 3 way Print Activation a Automatic b Semi Automatic c Manual Durable Snap in Ribbon Cartridge Adjustable Print Positions Prints i...

Page 5: ...ee Figure 2 2 Remove protective pad and cardboard insert Plug AC adapter into unit See Figure 2 CLOSE UNIT Replace the cover Insert the key into the lock on the cover of the unit Turn the key in the counter clockwise position to lock the unit Refer to Close Unit below See Figure 3 POWER THE UNIT PRINT POSITIONING Plug the transformer into the AC outlet Insert a card to get a sample print Refer to ...

Page 6: ...to AUTOMATIC If you are in the EST Time Zone and observe DST the Atomic Synchronization should work automatically after the AC cord has been plugged into the AC outlet overnight SET TIME ZONE 5 EST 6 CST 7 MST 8 PST 1 Press SELECT until the arrow points to Time Zone 2 Press CHANGE until your Time Zone appears See Time Zones on page 8 3 Press SET AUTOMATICALLY RECEIVE ATOMIC SIGNAL 1 Plug the trans...

Page 7: ...nder the TIME mark 2 Hour flashes See Figure 9 CHANGE HOUR 1 Press CHANGE until the Hour is 10 2 Press SET 3 The flashing changes from Hour to Minute See Figure 10 CHANGE MINUTE 1 Press CHANGE until the Minute is 09 2 Press SET 3 The Second starts to run from 00 See Figure 11 6 i GPMi 6CA F1 1 28A18 15 Figure 8 Figure 9 Figure 10 Figure 11 TIME RECORDER FUNCTION BUTTONS CONTROL FUNCTION SELECT Pre...

Page 8: ...until the Date is 21 2 Press SET See Figure 15 12 24 HOUR FORMAT Example Change the hour format from 12 hour format to 24 hour format 1 Press SELECT until the p is under the HOUR mark 2 The flashing digit indicates Hour Display Format Options See Figure 16 CHANGE HOUR 1 In this example press CHANGE until the option is 2 24 Hour Format Refer to Hour Display Options below See Figure 17 2 Press SET O...

Page 9: ...nd Minute to 24 Hour and 1 100 Min 1 Press SELECT until the p is under the HOUR MIN mark 2 The flashing digit indicates Type of Hour See Figure 22 OPERATION CONTINUED Figure 18 PRINT ORDER SELECT CHANGE SET Figure 19 PRINT ORDER SELECT CHANGE SET LEGEND Y Year H Hour M Month Min Minute D Date S Second DOW Day of the Week C Comment PRINT ORDER OPTIONS OPTION PRINT ORDER OPTIONS PRINT EXAMPLE 1 M D ...

Page 10: ...t Comments refer to Print Order Options on page 9 to ensure that you have set up the print order options to allow Preset Comments Options 12 through 18 allow Preset Comments Example Change the comment to SENT 1 Press SELECT until the p is under the COMMENT mark 2 The flashing digit indicates Comment Options See Figure 27 CHANGE COMMENT OPTIONS 1 In this example press CHANGE until the option is 2 S...

Page 11: ...e 31 3 In this example press CHANGE until the option is 2 Refer to Print Length Examples 1 6 above 4 Press SET See Figure 32 PRINT METHOD Example Change the print direction to Left and the print activation to Manual 1 Press SELECT until the q is above the PRINT DIRECTION PRINT ACTIVATION mark 2 The flashing digit indicates Print Direction Options See Figure 33 PRESET COMMENT OPTIONS OPTION COMMENT...

Page 12: ...IRECTION OPTIONS 1 Right Hand Margin Form 2 Left Hand Margin Form Push Bar Press Push Bar Figure 36 PRINT ACTIVATION OPTIONS OPTION PRINT METHOD OPTIONS 1 Automatic Allows you to print by inserting a card or piece of paper 2 Semi Automatic Allows you to print by pressing the push bar only when a card or piece of paper is inserted prints only if the card or form reaches the sensor Refer to Press Pu...

Page 13: ... being changed Refer to DST on page 12 2 Press SET See Figure 39 3 The flashing changes from Year to Month See Figure 40 CHANGE THE MONTH 1 In this example press CHANGE until the month is 3 March Refer to DST on page 12 2 Press SET See Figure 41 3 The flashing changes from Month to Date See Figure 42 CHANGE THE DATE 1 In this example press CHANGE until the date 09 Refer to DST on page 12 2 Press S...

Page 14: ...on page 12 2 Press SET 3 The Ending Date of the display changes from flashing to steady and the p mark is displayed under SU See Figure 47 SET PASSWORD Once the password is set you must enter it before changing any settings Refer to Enter Password on page 15 You may choose any 4 digit number from 0001 to 9998 Numbers 0000 and 9999 are not valid passwords All settings must be reset if you forget th...

Page 15: ...mple press CHANGE until the first two digits are 12 2 Press SET 3 The flashing changes to the last two digits See Figure 52 SET THE LAST TWO DIGITS 1 In this example press CHANGE until the last two digits are 34 See Figure 53 2 Press SET twice CANCEL THE PASSWORD The code 0000 must be entered to cancel password activation RESET FACTORY DEFAULT SETTINGS Press the reset switch with a pointed object ...

Page 16: ...Default 1 automatic Daylight Savings Time Default 1 automatic Time Zone 05 Eastern Standard Time Password Default 0000 OPERATION CONTINUED FACTORY DEFAULT SETTINGS WALL MOUNTING The ES700 should be mounted on 1 2 drywall using two ST 4 x 20 screws and fasteners 1 Install the supplied wall mount screws by using the template Refer to Install Wall Mount Screws below Be sure to keep about 1 4 6mm of t...

Page 17: ...te may make installation easier See Figure 59 Install the ribbon cassette so that the ribbon is between the print head and the ribbon mask Printing will not function properly if the ribbon is placed behind the ribbon mask Refer to Install Ribbon Cassette Between Print Head and Ribbon Mask below See Figure 60 5 Turn the knob of the ribbon cassette in the direction of the arrow to tighten the ribbon...

Page 18: ...ress the push bar E 40 Incorrect password Enter the correct password again E 41 DST setting mistake Confirm the correct starting and ending dates of daylight saving time and enter again E 49 Setting data you entered is not usable Refer to your manual on the page related to the item you want to set and enter correct setting data ERROR CORRECTIVE ACTION Unit does not operate Ensure the power cord is...

Page 19: ...sation The unit operates normally at temperatures of 5 C 25 F or below but the print density and reaction of the liquid crystal display are inferior to those at normal temperature operation Dimensions 6 45 w x 5 63 h x 6 77 d 164mm w x 143mm h x 172mm d Weight Approx 4 4 lbs with AC Adapter 2 0 kg with AC Adapter Rating AC Adapter I P 120 VAC 60 Hz O P 15 V 1300 mA π CHICAGO ATLANTA DALLAS LOS ANG...

Reviews: