U-Line 2175DWRWC Installation Manual Download Page 14

www.U-LineService.com

14

06/2006

2175DWRWC — Drawer Model Wine Captain

®

To display actual temperature of each drawer, press the 

” and “

” touch sensors simultaneously for three 

seconds. The display indicates the actual temperature. 
After approximately 10 seconds, the set point 
temperature displays.

To adjust the temperature set point, touch and hold 
either the “

” or “

” for that drawer for three 

seconds. When the LED displays “SP,” lift your finger from 
the controller and the corresponding LED will begin to 
flash the set point. Touch the “

” or “

” until the 

desired set point displays. Wait 10 seconds for the new set 
point to be saved. Wait 24 hours for the temperature to 
stabilize before checking the actual temperature again. 
Each wine compartment can be set to 40°F to 60°F.

Note: 

A flashing indicator light (LED dot) indicates a 

thermistor error in that drawer. Call for service.

Other Settings

Other settings for the unit are factory preset. No adjustments 
should be necessary at this time. See the Use and Care Guide 
for information on:

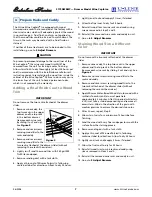
• Adjusting the interior lighting

• Removing the lower drawer’s wine caddy

• Using or disabling the cascade feature

Start-Up Troubleshooting

Problem

Q:

Unit does not appear to turn on when plugged in. 
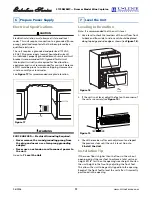
Solution

A:

Make sure outlet has power (circuit breaker has not 
tripped).

IMPORTANT

See the Use and Care Guide’s 

Troubleshooting Guide

 for 

more solutions.

Summary of Contents for 2175DWRWC

Page 1: ...rvice com Phone 414 354 0300 FAX 414 354 7905 Service Parts Tech Lines Phone 800 779 2547 FAX 414 354 5696 OnlineService U Line com 2006 U Line Corporation 06 2006 2175DWRWC Wine Captain Drawer Instal...

Page 2: ...READ all instructions completely before attempting to install or operate the unit This unit requires connection to a grounded three prong polarized receptacle that has been placed by a qualified elec...

Page 3: ...place for future reference Your unit is Black or Stainless Steel Black units have drawers with black glass fronts sculpted handles and black vinyl clad cabinets Stainless Steel units have drawers wit...

Page 4: ...cleaners that are not specifically intended for stainless steel on stainless steel surfaces this includes glass tile and counter cleaners If any surface discolors or rusting appears clean it quickly w...

Page 5: ...nstalled in a wall or under a counter top to allow for the installation of the Anti Tip Kit see Page 12 WARNING The Anti Tip Kit must be installed on this unit before it is used Never use the drawers...

Page 6: ...ial considerations include the following The units are designed to operate between 50 F 10 C and 110 F 40 C High ambient temperatures 110 F 40 C or higher may reduce the unit s ability to reach low te...

Page 7: ...thin coat of Minwax Polycrylic following container label for directions Allow to dry 24 hours 7 Lightly sand tack and reapply 2 times if desired 8 Allow the final coat to dry for 24 hours 9 Reinstall...

Page 8: ...removal adjustment and re installation Drawer Removal 1 Confirm that the unit is unplugged from wall outlet 2 Unplug the drawer s connection wiring top drawer only 3 Remove the mounting screws See Fig...

Page 9: ...side the drawer front is cocked forward or back This is caused by the front slide mountings not being level with the rear slide mountings Minor Adjustment Note The mounting holes on the slide are sli...

Page 10: ...used 1 Remove one slide s mounting screws 2 Reposition the slide so it is the same distance from the bottom of the liner as the other slide Measure to confirm 3 Mark new drilling holes using different...

Page 11: ...prong grounding adapter Never use an extension cord to connect power to the unit Go on to 7 Level the Unit Leveling Information Note It is recommended that the unit is level 1 Use a level to check the...

Page 12: ...t the unit from tipping Make sure the mounting screws attaching the unit to the counter cabinet or wall are deep enough into the mounting surface to support the weight of the drawers and the items tha...

Page 13: ...emains open unless it is pushed closed Solution A The drawer should be self closing when it is open approximately 8 If it is not re check leveling from front to back of the unit and readjust if necess...

Page 14: ...or the new set point to be saved Wait 24 hours for the temperature to stabilize before checking the actual temperature again Each wine compartment can be set to 40 F to 60 F Note A flashing indicator...

Page 15: ...itself as the leader in built in undercounter ice making refrigeration and wine storage appliances Who to Call Service Information If the need for service arises call the U Line Customer Care Center...

Reviews: