background image

TYPHOON HDD DIGITAL JUKEBOX PLAYER 

Article number: 83073 


Version 2.0 

All specifications and information are subject to changes without further notice 

14 


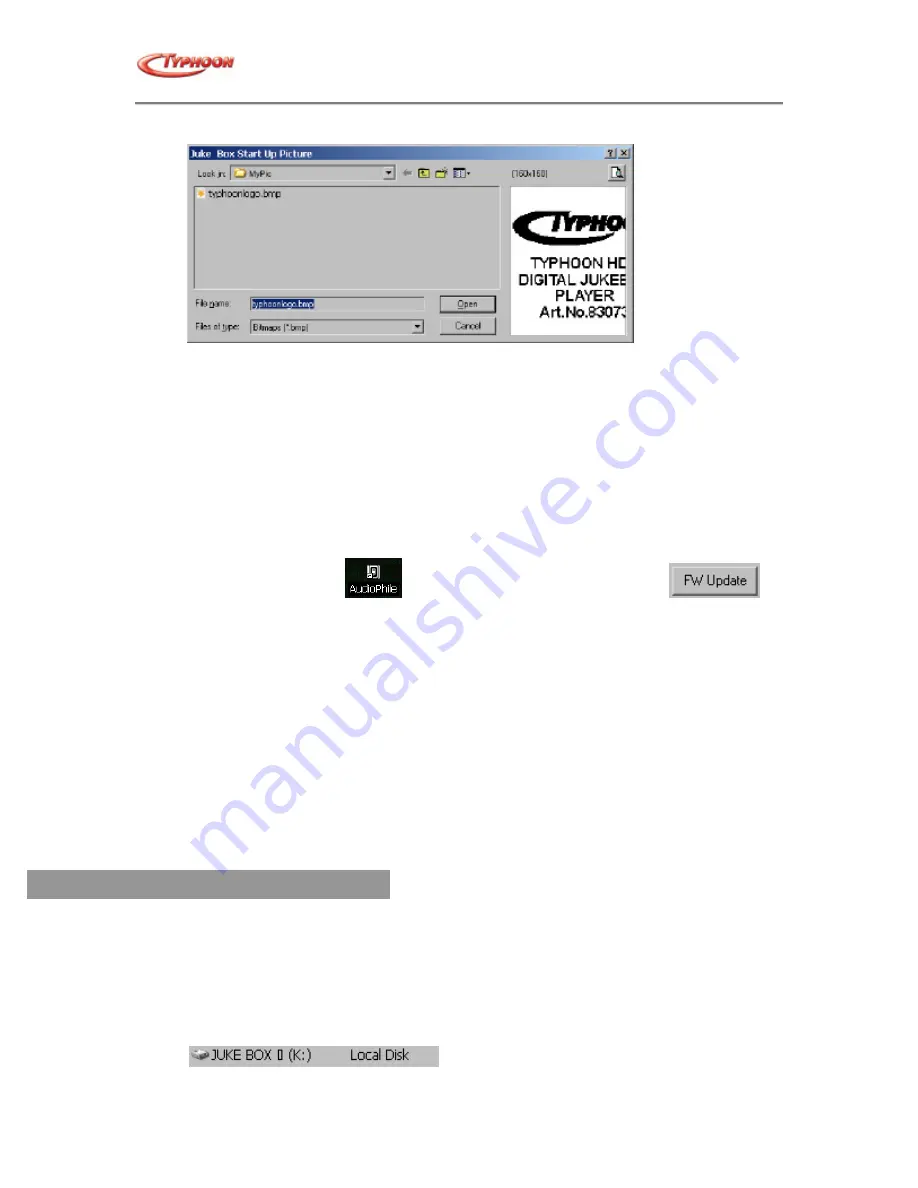
1.  Select the folder in which your favorite images are stored, and then select the preferred 

image. The Image is then previewed on the right box. Please note the image must be in 
bmp file format with monochrome (black & white: 1bit) setting. The size must be of 160 
(W) x 240mm (L) or 160 x 160 pixels. 

2.  Just click on the "OPEN" button to complete the setup.  
 

g.  

Upgrade the firmware  

 
1.  It is easy for you to get the firmware from our web site. 
2.  Download and save the updated firmware to your computer.  
3.  Be sure your MP3 player is connected to the computer in advance with the supplied USB 

cable. 

4.  Launch the Audiophile, 

 and then click the "F/W update" button, 

5.  Browse the folder in which your  firmware upgrade file is located, select and open the 

specified file. 

6.  If the firmware update is complete, unplugged the USB cable and reboot the MP3 player.  
7.  The progress bar of the firmware upgrade will display the status of firmware upgrade. 
8.  The player will automatically power off after the firmware upgrade is completed. 
9.  Restart the player to enjoy your music.  

h. 

To rebuild the database  

While selecting song(s) for playback, if the Jukebox system kept displaying " file missing" 
message, please use the "rebuild the database" function. However, please note that after 
performing this function, all music file(s) in "my collections" box will disappear. We only 
recommend this for recovering the HDD Jukebox Player only. 


Note: 
If the song is downloaded through Audiophile, it must be deleted from Audiophile. 


Using as a Computer Disk Drive 

 
To use the Typhoon HDD Digital Jukebox Player as a system disk drive, please use the steps 
below.   

1. 

Connect the HDD Digital Jukebox to your Desktop or Notebook's USB port with the 
supplied USB cable. 

2. 

Click on the My Computer applet, you will find a new removable drive such as “E” or “F” 
drive. For Windows® 98 operation system, please revert back to page 1 install the driver 
for the HDD Digital Jukebox Player first.  


Summary of Contents for HDD Digital Jukebox 83073

Page 1: ...TYPHOON MP3 DIGITAL JUKEBOX MyDj 1 8 20GB HDD MP3 PLAYER PLUS PIM Instruction Manual Article Number 83073 Version 2 0 http www typhoonline com...

Page 2: ...sions of the Electromagnetic Compatibility EMC Directive 89 336 EEC For EMC EN55022 1998 Class B EN61000 3 2 2001 EN61000 3 3 1995 A1 2001 EN55024 1998 EN61000 4 2 1995 A1 1998 A2 2000 EN61000 4 3 200...

Page 3: ...Hard Disk drive while connected to the desktop or notebook Additionally it has a built in microphone to record meetings conferences and other valuable events Enjoy CD quality music with the Typhoon H...

Page 4: ...give a copy to someone else you are distributing or duplicating the music and it is no longer for your personal use you need to obtain a license to do this first Precautions The supplier holds no liab...

Page 5: ...s and information are subject to changes without further notice 3 Illustrations Note the SEL joystick works in 2 modes 1 Pushing the sides to go in 4 directions as in a joystick to move the onscreen s...

Page 6: ...uded power adapter and charged up to 3 hours INSTALLING the 1 HDD Jukebox Audiophile and 2 Musicmatch Jukebox This section describes the PC System Requirements installation steps and detailed introduc...

Page 7: ...ukebox Management Tool Setup welcome screen will appear click on Next to begin d Click on Next button to use the default path or click on Browse to assign your preferred path e Click on Next button to...

Page 8: ...ng the Musicmatch Jukebox Software a From the Main menu click on the Musicmatch Jukebox button b Click on the Next button in the Welcome window c Read the License Agreement and Click on Yes button to...

Page 9: ...s and information are subject to changes without further notice 7 g Choose the Destination folder for the installation or click on Next button for the default folder h Next set up the Radio Cache for...

Page 10: ...ssign the following music file types that you want the Musicmatch software to associate with Click on Next button to begin l The installation will proceed click on the Cancel button if you want to ter...

Page 11: ...l Jukebox and the computer Launch the Audiophile software from the AudioPhile applet in the desktop or via Windows Program menu Jukebox Management tool and click on AudioPhile a Transfer audio files t...

Page 12: ...progress bar will indicate the progress status of the upload to both the software and the HDD Digital Jukebox LCD panel c Manage and Organize music files i From My Collection tab you can easily manag...

Page 13: ...utton to delete the selected song from the music list 2 next to my collection box c Click the Add Delete or Rename button to change the original setting d Click the search for button to fill in title...

Page 14: ...ransfer to the Digital Jukebox player ii Vcard Contact Data Press the New button and the FormCardEdit dialog box appears as below On the FormCardEdit dialog box You can fill in your personal informati...

Page 15: ...n HDD Jukebox Digital Player and read while on the move i Press the Open icon to open a new file and fill the words in the blank section on the right column If the file is a Text file the entire text...

Page 16: ...unplugged the USB cable and reboot the MP3 player 7 The progress bar of the firmware upgrade will display the status of firmware upgrade 8 The player will automatically power off after the firmware u...

Page 17: ...disconnection or abrupt disruption between the player and computer may cause the system to halt while transmitting data This may cause data error in the HDD due to disruptive read write If necessary...

Page 18: ...s 3 1 Scroll up for item selection 2 Increase under specific settings 4 1 Scroll down for item selection 2 Decrease under specific settings 5 SEL Select item 6 7 1 Press to skip to previous song 2 Pre...

Page 19: ...o confirm lock all buttons 3 To unlock the hold setting repeat same process as step 1 Press MENU for more than two seconds and the Player will prompt to press to unlock all buttons 4 Press to confirm...

Page 20: ...ce 18 Playing Play Lists 1 Scroll or to Play Lists then press SEL button My Music Menu Idle 2 Choose the favorite play list using or to move up or down the list then press SEL to choose between FM Rec...

Page 21: ...Line In or FM sources Please refer to Recording section for further information List Manager Scroll with or to Play My Music then press SEL Scroll with or to List Manager then press SEL to go into the...

Page 22: ...d tune 3 2 Delete Music Under Select Function dialog box scroll to Delete Music and then press SEL to enter the Title list display Select and delete any song you want to delete 4 Rename Scroll or to R...

Page 23: ...alphabet or numerical sorting order preferred then press SEL to confirm Note the first box icon sort the entire list in alphabet and numerical order 3 Scroll to favorite title or press SEL or to playb...

Page 24: ...eful tips for searching 1 Select as wildcard to replace other characters while searching For example typing a c string to search all available titles which match the first and third characters of a an...

Page 25: ...ss SEL to confirm 3 If the Equalizer has been set as Genre mode scroll down and press SEL and scroll or to successive item for high or lower frequency settings 4 Press MENU to return A B Mode 1 Scroll...

Page 26: ...to confirm or MENU to cancel FM Record 1 Scroll or to FM Record then press SEL 2 Scroll or to Pause and press SEL to pause recording During pause recording scroll to Resume and press SEL or press to r...

Page 27: ...equency Sleep Timer 1 Scroll or to Sleep Timer then press SEL 2 Press to change the settings Scroll or to change the default sleep timer then press SEL to confirm or MENU to exit Recording Voice Recor...

Page 28: ...to Pause and press SEL to pause recording During pause scroll to Resume and press SEL or press to resume recording 4 While recording is underway scroll to Volume and press SEL to adjust earphone outp...

Page 29: ...the filename connect MyDj to the system and launch the Audiophile application and go to My Collections tab and select the Recorded Songs folder in the lower left box 10 The list of recorded files in...

Page 30: ...s SEL 2 Scroll or to select and press the SEL to read 3 Press MENU to exit Calendar 1 Scroll or to Calendar then press SEL 2 Scroll or to adjust year day settings Set year day in the initiate setting...

Page 31: ...en press SEL 2 Press or and scroll to adjust the level and speed 3 Scroll to Key Setup then press SEL to the Keys Define display 4 Press SEL to start or Menu to exit Othello 1 Scroll or to Othello the...

Page 32: ...level when powered on then press SEL to confirm or MENU to cancel Timer Scroll or to Timer then press SEL 1 Backlight Timer 1 1 Scroll or to Backlight Timer then press SEL 1 2 Press SEL and scroll or...

Page 33: ...leting the Music Information setting the player system will let you enter the Menu Language display to set the Menu Language options including English German Spanish French Italian Portuguese Nederlan...

Page 34: ...ssful installation in Windows 4 If you do not see this it could mean the installation was not successful Please update Windows 2000 operating system to SP4 version For Windows XP operating system plea...

Page 35: ...r Win XP you need to adopt the following steps to solve this problem Click My Computer Control panel Regional options to go into the Regional options setting Click the General tag and hit the Set defa...

Page 36: ...freezes or hangs during usage press and hold these buttons at the same time PLAY MENU and SEL Hold these buttons for 5 seconds and the system will reset 11 How do I charge the MyDj battery Use the inc...

Page 37: ...previous MyDj drivers and remove from the Hard Disk Then reboot and reinstall again Ensure that your Windows are fully updated in Microsoft web site first as the MyDj uses the Microsoft USB Mass Stor...

Page 38: ...TYPHOON HDD DIGITAL JUKEBOX PLAYER Article number 83073 Version 2 0 All specifications and information are subject to changes without further notice 36 Warranty Card...

Reviews: