background image

TYPHOON TV/FM PCI Capture Card 

Article number: 50575


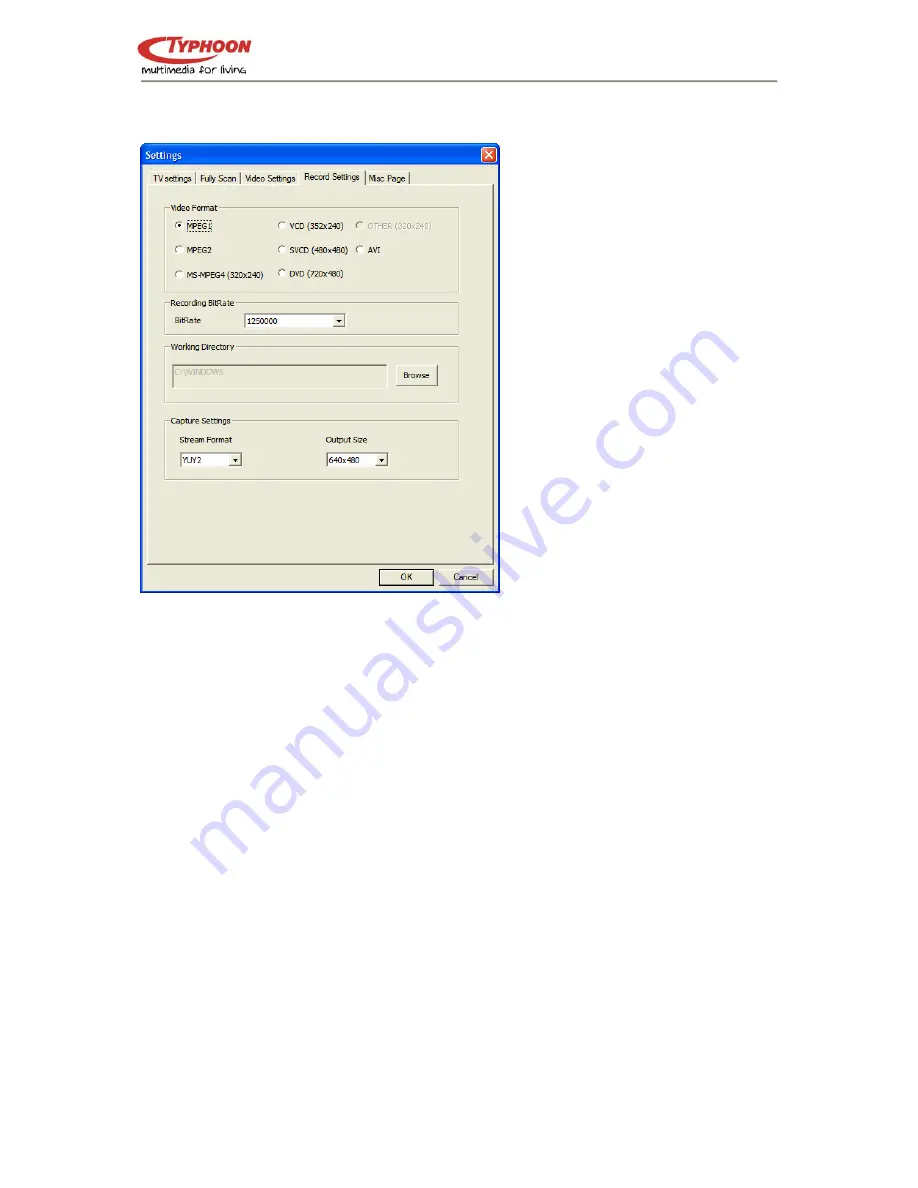
5.4. Record Settings Dialog Box  


The Record Setting dialog box 
allows you to select the format you 
want to record your files, which 
mode you want to use for that, and 
in which directory the files should 
be saved on your computer. 
 

1.  Video Format:  

Here you can choose whether 
your movies will be recorded as 
AVI, MPEG-1/2, or VCD, SVCD, 
DVD Format. 


When you have MPEG-4 
codecs installed in your system, 
you are also able to record in 
these formats, otherwise these 
options are grayed out.


2. Recording BitRate 

Choose here the BitRate of your 
recordings depending which file 
format you choose.


Note: 

YUY2 = Overlay Mode


A higher bitrate improves the 


RGB555 = Preview Mode 

quality of the recorded files. 


3.  Working Directory:  

Choose here the location where your movies / pictures are saved on your PC. 


4.  Capture Settings:  

Choose here the output size of your recorded movies. This affects also your Video 
settings.  


Version 1.5 

All specifications are subject to changes without further notice 

15


Summary of Contents for 50575

Page 1: ...TV FM PCI Capture Card Instruction Manual Article Number 50575 Version 1 5 http www typhoonline com...

Page 2: ...such revision or change In no event shall ANUBIS Electronic GmbH be liable to you or any third party for any consequential incidental direct indirect special punitive or other damages including witho...

Page 3: ...romagnetic Compatibility Directive 89 336 EEC Amended by 92 31 EEC 93 68 EEC 98 13 EC For the evaluation regarding the Electromagnetic Compatibility 89 336 EEC Amended by 92 31 EEC 93 68 EEC 98 13 EC...

Page 4: ...5 Driver Installation for Windows 2000 Windows XP 9 3 6 Settings for Sound Card Owners 10 4 The Typhoon TV Software 11 4 1 Installation of the Typhoon TV Application 11 4 2 Launching the Typhoon TV A...

Page 5: ...hifting 22 7 1 The Record Button 22 7 2 The Time Shift Function 23 8 The Remote Control 24 8 1 Accelerator Keys Summary 25 9 The Gallery 26 9 1 The Function Buttons 26 9 2 FM Radio only for FM Models...

Page 6: ...reo TV experience directly on your computer monitor 1 2 Features Philips 713X Chipset Plug Play compliant PCI card 125 channel cable antenna ready TV tuner Composite video and S Video input Multiple C...

Page 7: ...with available busmaster capable PCI slot v 2 1 Pentium III 500 MHz or faster PC MPEG 1 real time encoding PIII 800MHz or AMD Athlon 800 or higher MPEG 2 real time encoding P4 1 6GHz or AMD Athlon 1...

Page 8: ...ble to connect to your sound card This is not necessary when you capture the sound internal by the PCI Bus Please refer to Chapter 6 6 3 S Video In To connect external devices like VCR or Camera 4 Aud...

Page 9: ...our motherboard manual 5 Carefully remove the card from its packaging and pick it up by the edges with one hand while your other hand is touching a metal part of the PC This will ensure that your body...

Page 10: ...ware component in the system and tells you so in an Add new Hardware Wizard window If you have not already done so place the TV Tuner Installation CD into your CD ROM drive and click Next in the windo...

Page 11: ...n click Next Once Windows finds the driver you will see a message Simply click Next to continue After installing the driver Windows informs you that it has done so successfully Click Finish This compl...

Page 12: ...ndows ME automatically detects the presence of a new hardware component in the system and tells you so in an Add new Hardware Wizard window If you have not already done so place the TV Tuner Installat...

Page 13: ...nd the drivers on the TV Tuner Installation CD and install them automatically After installing the driver Windows informs you that it has done so successfully Click Finish This completes the installat...

Page 14: ...d show you the Installation Screen Here please select TV Tuner Driver If the Autostart program does not appear automatically when you insert your Installation CD go to Start Run and type D Setup exe i...

Page 15: ...Set the Adjust volume for option to Recording Confirm your choice by clicking OK 5 Now enable the check box below the Line In slider and move the slider itself to its middle position By checking the c...

Page 16: ...ally when you insert your Installation CD start it manually by running the InstallCD exe file located on the Installation CD 4 2 Launching the Typhoon TV Application When starting your TV application...

Page 17: ...e on the channel numbers to switch to different channels The Buttons are a quick and easy way to add or delete a current tuned in channel to your channel list Alternatively you can use the num block o...

Page 18: ...able according to the country of your residence In minor cases it is necessary to set the TV Standard manually by click on the button Video Standard and here select the TV Standard of your country 4 F...

Page 19: ...o you can add manually the needed frequencies 5 3 Video Settings Dialog Box The Video Setting dialog box allows the user to adjust the TV display characteristics including brightness contrast hue and...

Page 20: ...4 codecs installed in your system you are also able to record in these formats otherwise these options are grayed out 2 Recording BitRate Choose here the BitRate of your recordings depending which fi...

Page 21: ...Video CD consists from MPEG 2 file PAL 480 x 576 pixels with 25 Frames per Second NTSC 480 x 480 pixels with 29 97 Frames per Second DVD Format High Quality Video Standard CD consists from MPEG 2 fil...

Page 22: ...you can here define the resolution of the time shifted recordings Snapshot Settings Here you can define how much snapshots are taken when you click the Snapshot Button see Page 18 for additional descr...

Page 23: ...is for programming recurring TV shows which are broadcasted every day or every week at the same time Give the file a specific name choose the source and in which file format you want to record and co...

Page 24: ...aken from the current frame of the TV Picture and saved in your Gallery The Gallery is a shortcut to the directory on your HD which you have defined before in the Record Settings in Chapter 5 4 i e C...

Page 25: ...cable is in this case not needed anymore By clicking on the button 713X Chip Audio Settings you access the properties of the audio settings Here you define whether you want to receive the TV Program...

Page 26: ...d you have already scanned and stored channels you will now see the Teletext information offered by the corresponding TV station Surfing through the pages is conveniently easy thanks to the preloaded...

Page 27: ...e the possibility to record the current TV Program while watching it By clicking again the recording will stop You will find the recorded file in your Gallery in the format you have selected in the Re...

Page 28: ...the recorded program just simple click back button and you see the recorded files while in the background the TV program is still recorded So you won t miss the rest of your program These additional T...

Page 29: ...input source 6 Full Screen Click this button to switch between Full Screen and the previous size 7 Stereo Select between Stereo and Mono reception 8 Mute Press this button to mute the sound 9 Numeric...

Page 30: ...ass Treble Arrow Down Vol Volume Down or Video Setting Brightness Hue Contrast Saturation or Audio Setting Balance Bass Treble Spacebar Enter Snapshot R Recall Recall Previous Channel I AV source Inpu...

Page 31: ...button will close the Gallery 9 1 The Function Buttons Closes the Gallery again Opens your Email program and sends your file as attachment Changes the view from Thumbnails to List and Details Opens Mi...

Page 32: ...m an Auto Scan for the available FM Channels After the channel search is finished you can listen to FM Stereo on your computer A new feature is the possibility to make here FM Recording in the wav fil...

Page 33: ...ME 2000 and XP If you seek other operating system drivers please see our website Q What can I do when I get horizontal lines on my screen when watching TV A This could have to do with the bandwidth on...

Page 34: ...king on the speaker icon next to the clock in the bottom right hand corner of the screen Make sure all the appropriate levels are set about 3 4 the way to the top You can also click on Options Propert...

Page 35: ...o requires more bandwidth on the PCI bus and some graphics boards show distortions of the video display especially when using 32 bits per pixel color depth And finally a menu or other window covering...

Reviews: