


12/2010
KASTOR OY
TYLÖ MEGA – LINE SUPER 10
Sivu 8/22
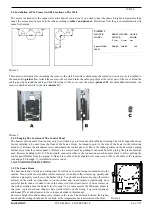
A sufficient distance from bench to ceiling is about 110-120 cm. We recommend
locating the heater as low as possible (within safety limits). The sizes of sauna rooms
are given in
table 2
.
Mi
n 5
00
a
e
b
3.2. Correct Air Circulation
Sufficient air exchange in the sauna is very important. A suitable amount for a
family sauna would be about 6 times the sauna's volume per hour. Air removal
happens either through gravity (= traditional, “natural circulation”) or mechanically,
through an air removal fan.
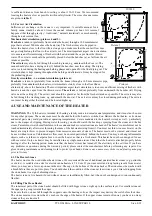
Mechanical air circulation (pictures 4 and 5):
f
b
e
d
a
Fresh air
is taken in (preferably from outside the house) through a 100 mm diameter
pipe that is at least 500 mm above the heater (
a
). The fresh air may also be piped in
Picture 5
below the heater, close to the floor (
b
), as long as you make sure that the cool air flow does
not go straight along the floor to the exit air vent. The most important aspect in air circulation
is to ensure an efficient mixing of fresh air with heated air and the vapor from the thrown
water. The exit air vent should be preferably placed below the benches (
c
), as far from the air
intake as possible.
The exit air
may also be fed through the washing room, e.g. underneath the door (e). The
sauna should also have a drying valve (f) behind the benches, near the ceiling. The drying
valve is closed during the heating and bathing phases and opened for the final drying out. The
circulation fan is kept running throughout the bathing and afterwards. It may be stopped for
the preheating phase.
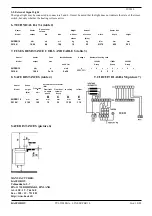
Gravity circulation – i.e. natural circulation (picture 6):
Fresh air
is taken in (preferably from outside the house) through a 100 mm diameter pipe,
preferably from underneath the heater or its immediate vicinity close to the floor
(b)
or, Picture6
alternatively, above the heater
(a).
The most important aspect in air circulation is to ensure an efficient mixing of fresh air with
heated air and the vapor from the thrown water.
The exit air
is fed out preferably from underneath the benches (
d
). Drying
valve near the ceiling (
f
). The exit air vent should be placed as far from the fresh air intake as possible. The exit air may also
be fed through the washing room, e.g. underneath the door (
e
). The exit air vent may be closed during preheating. The exit air
vent must be larger that the intake and be located higher up.
4. USE AND MAINTENANCE OF THE HEATER
WARNINGS:
The Tylö heater is intended for heating a family sauna to normal sauna temperatures, and it must not be used
for any other purpose. The sauna room must be checked before the heater is switched on. Beware the hot heater, as its stones
and metal parts may scald your skin at operating temperatures. Care is mandated in the heater's vicinity as well – particularly
due to the danger of slipping. During water throwing, you should watch the hot drops spraying from the stones and the hot
steam. Parents must watch small children in the sauna and make sure instructions are heeded. The heater's controls must not be
touched immediately after water throwing (because of the hot steam rising from it). You must not throw too much water on the
heater at a single throw to prevent dangers from excessive amounts of steam. The heater must not be covered and it must not
be used without stones. Unhindered air flow must be ensured particularly behind the heater. You may not hang inflammable
objects such as clothes or carpets above or near the heater, as that is a fire hazard. This heater has not been designed for use
with sea water. Only one heater may be installed in any single sauna room. Check that the heater is attached properly before
heating it. after the heating period, make sure that the heater's timer has turned off the electricity at the set time. If you have
any problems or questions during the warranty period, please contact the manufacturer before performing any repairs. Use
gloves during maintenance and cleaning work to protect your hands.
Remove any unnecessary stickers and plastic packaging
prior to first use!
4.1. The Heater Stones
The heater must not be used without heater stones. We recommend the use of traditional quarried heater stones (e.g. peridotite
or olivine). A suitable stone size for electric sauna heaters is 5-10 cm. If you want moist and long lasting results from a water
throw, you may use a few soap stones in the mix. These go to the bottom of the stone basket. The stones must be washed with
a brush before they are put into place. You should check the condition of the stones at least twice a year. Gravel dropping from
the stone basket is a sign of abrading stones.
The heater is not a fire hazard if used without stones or insufficiently filled, but it has not been designed to run continuously
like that.
4.2. Filling The Stone Basket
The innermost part of the stone basket should be filled with bigger stones, right up to the surface layer. Use smaller stones at
the upper part, going towards the edges.
Take care that no stones fall through the supports onto the heating coils, as the impact may destroy the coils before their time.
The stones must not rise more than 1 cm above the edge of the heater. If the upper stones remain often wet, you have too many
stones or they are too small.


