background image

Digital 

Video 

Recorder 


User 

Manual 


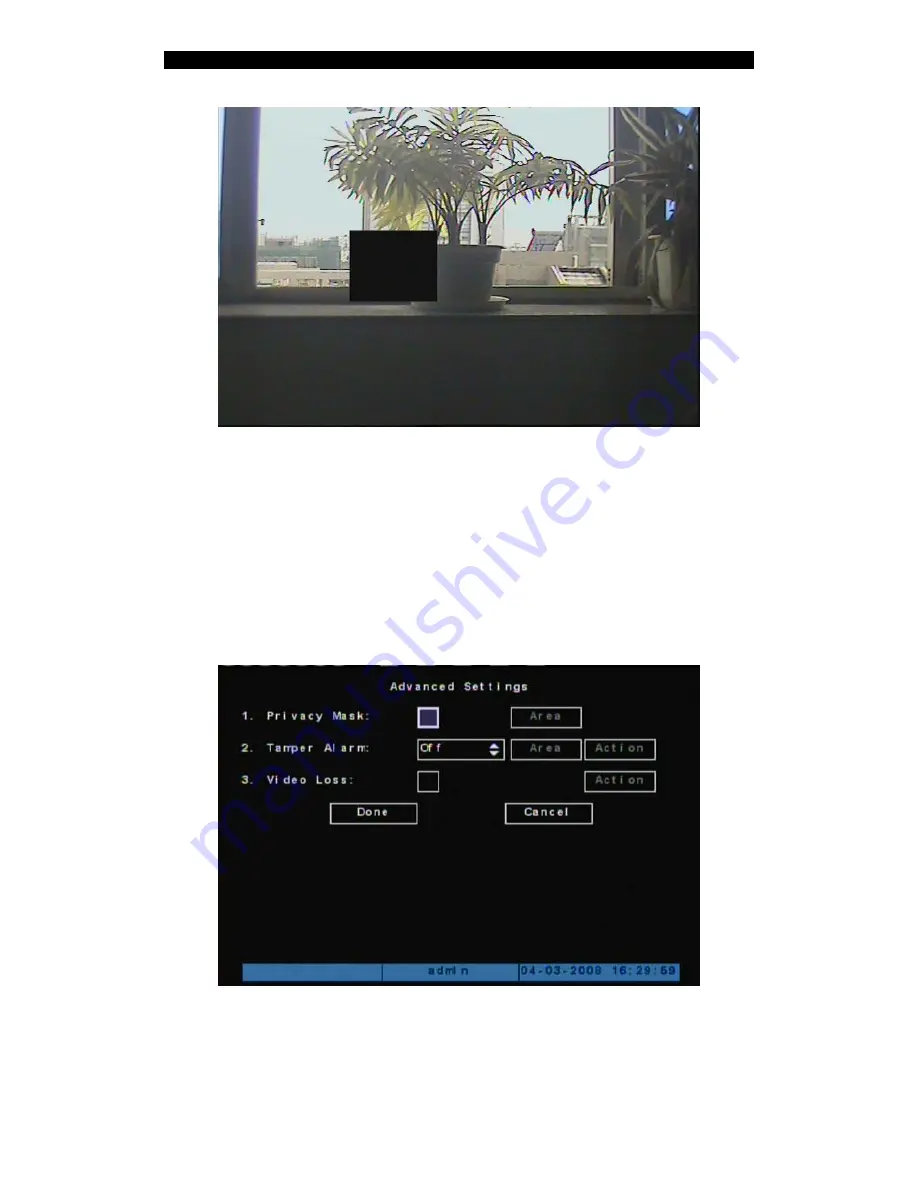
5.7 View Tampering Alarm 

5.7.1


Enable Tamper Alarm


Step 1: 

Enter into “Camera” menu.


Step 2:

 Select camera: use [

È

] [

Ç

] keys to select one camera.   

Step 3:

 Enter into “Advanced settings” setup menu.


Step 4: 

Select sensitivity.


Move to the drop-down list to select the sensitivity for Tampering Alarm, you can use 

[

È

[

Ç

keys to select the sensitivity. (Low, Normal, High) Choose one of the sensitivity and 


47

Summary of Contents for ADEMD4B000TV

Page 1: ...ADEMD4B Series Net DVR User Manual Model ADEMD4B000TV ADEMD4B000TVS V 1 0...

Page 2: ...1 Power on 22 4 2 Live Preview 22 4 3 Login 24 4 4 PTZ Control 24 4 5 Manual Record 26 4 6 Playback 27 4 7 Backup Recorded Files 30 4 8 Turn off DVR 31 4 9 Video spot output 32 Chapter5 Advanced Opera...

Page 3: ...DHCP 66 5 14 PTZ Setup 67 5 14 1 Typical PTZ Connection 67 5 14 2 PTZ Settings 68 5 14 3 PTZ Control 70 5 14 4 Preset Setup 70 5 14 5 Sequence Setup 71 5 14 6 Pattern Setup 73 5 15 Exceptions Setup 74...

Page 4: ...ed plug has two blades with one wider than the other A grounding type plug has two blades and a third grounding prong The wider blade and the third prong are provided for your safety If the provided p...

Page 5: ...of any kind on the unit 17 Replacement Parts When replacement parts are required be sure the service technician has used replacement parts specified by the manufacturer or have the same characteristi...

Page 6: ...have been damaged in shipment notify the shipping company Unpack carefully This is electronic equipment and should be handled with care to prevent damage to the unit Do not attempt to use the unit if...

Page 7: ...It is an ideal solution for numerous applications e g bank telecommunication transportation government infrastructures resident areas warehouses hydraulic facilities etc 1 2 Features Compression z Su...

Page 8: ...pports BNC analog monitor and VGA output available on ADEMD4B000TVS z Supports multiple preview modes 1 4 z Supports area mask function1 z Supports camera tamper alarm z Supports 1 ch playback z Suppo...

Page 9: ...real time preview via TCP UDP RTP broadcast z Alarm information can be sent to remote host z Network control PTZ z Network record the real time stream z Network download and playback of recorded files...

Page 10: ...e it permanently 1 Before installation of the HDD switch the recorder off and unplug the power cable 2 Place the recorder on a flat table and make sure you take proper ESD precautions Wear an ESD brac...

Page 11: ...s are detected by the DVR and if the capacity is OK Choose Format and select All to format all hard disks When all disks are formatted a confirmation message will be shown on the screen Check if all i...

Page 12: ...2 3 DVR Rear Panel ADEMD4B000TVS Rear panel Video in USB interface Video out Audio in VGA interface Audio out Alarm out UTP interface RS485 T T R R Alarm in Power switch DC12V power supply ADEMD4B000T...

Page 13: ...rm In Out Connection Alarm inputs Alarm input port dry contact G GND Connect the GND of sensor 1 4 Alarm input support normally open normally close Alarm output 1G 1 relay output Alarm output connecti...

Page 14: ...s enabled Twinkle Data transmitting Numeric Keys Input number lower case upper case character and symbols 3 Function Keys MENU ESC EDIT PLAY REC PTZ PREV A Switch of preview mode and menu mode Cancel...

Page 15: ...ide the channel status bar Switch between numeric keys and function keys 4 Control Keys Direction Keys ENTER Composed of and 1 Menu mode use select to edit 2 PTZ direction control 3 Playback speed con...

Page 16: ...channel entry password 4 EDIT Same as EDIT key on front panel 5 A Switching character input method 6 REC Same as REC key on front panel 7 PLAY Same as PLAY key on front panel 8 INFO Reserved 9 VOIP Re...

Page 17: ...ote controller Press DEV key again the remote controller is disconnected from the DVR Please note there is no audible warning given by this unit You may switch the DVR ID to 255 thus the remote contro...

Page 18: ...verwrite Stop recording Stream type Resolution Frame rate Bit rate Record schedule PreRecord time PostRecord time Network DVR IP address DNS IP Multicast IP address Remote host IP and port NAS IP and...

Page 19: ...and password The default user name is admin and password is 12345 1 Main Menu Description The main menu interface is shown in below There is one small rectangle frame named Active Frame It can be move...

Page 20: ...put characters Press EDIT key to enter into edit mode you can input characters as following Press A key on the remote controller to select input method number upper case lower case or symbols Use and...

Page 21: ...camera name edit box at the bottom of screen the input status is appeared Here you can press numeric keys to input digital number Press A key to change input methods You can select number Uppercase Lo...

Page 22: ...screen will shown as below If POWER lamp is off please do as following Step1 Connect AC cable correctly Step2 Switch on the power button on the rear panel Note If HDD is not installed or not detected...

Page 23: ...ideo Recorder User Manual Press EDIT key to manually switch to the next camera You can set the preview mode in the menu Press Enter key to pause start sequence display Press key to switch multi screen...

Page 24: ...select one user press key to enter into Password edit box input corresponding password press ENTER key to exit edit box Press Done to confirm and enter the main menu If there is a beeper alarm it mean...

Page 25: ...nel When a dome camera is selected you may use the multi function keys to control PTZ PTZ control key assignment Direction control ZOOM ZOOM ZOOM on remote controller FOCUS FOCUS FOCUS on remote contr...

Page 26: ...annel List the available channels on the DVR Status There are four available statuses idle Green Recording Red Network transmission Orange Recording and network transmission Start Stop 9 Start recordi...

Page 27: ...keys to input the desired time Search Search the matched recorded files and display them in the list window If there is no matched file found a corresponding dialog box will be popped up Play by Time...

Page 28: ...Search button and press ENTER key DVR will search and list the matched files One channel search If the matched files are more than 8 you can use Page No to select page use numeric keys or keys to sele...

Page 29: ...the playback z Display Hide information bar MENU z Open Close sound PLAY z Adjust play progress Backward Forward The unit is z Adjust play speed Normal speed is 1x Use to increase play speed 2X 4X 8X...

Page 30: ...ack interface select the channel and record type input the time period move Active Frame to Search button press ENTER key DVR will start to find and list the matched files Step 2 Select the files that...

Page 31: ...T again to stop selecting The segment is selected Step 3 You can repeat step 2 to select as many as 30 segments Step 4 After you select all segments press ESC key a message window will pop up If you p...

Page 32: ...y damage the HDD and the DVR permanently 4 9 Video spot output Make sure the numeric button is in function mode the status lamp is off You may press shift button to switch between numeric mode and fun...

Page 33: ...VR to make the new parameters effective Modifications on other parameters do not require reboot z Any network parameters in Network menu z Stream type resolution and record schedule in Recording menu...

Page 34: ...default administrator from the manufacturer The default usename is admin and password is 12345 The administrator s name can not be changed you may change the password after initial login Move Active F...

Page 35: ...5 1 1 Add User Step 1 Enter into User Management menu Step 2 Add new user name Move to Add button and press ENTER in the pop up menu input the new user name press ENTER and return to User Management...

Page 36: ...s to move the Active Frame to Password press Edit to go into the edit mode enter your password twice and press Done to confirm 5 1 2 Delete User You can use keys to select one user then use move Activ...

Page 37: ...s to select one user and use key to move Active Frame to password edit box and press EDIT key to enter into edit mode Press numeric keys to input the new password The password should be Max 16 digits...

Page 38: ...fault rights include local playback remote playback and view log If you want to define the specific rights for a user move Active Frame to Set Privileges button and press ENTER to enter into the windo...

Page 39: ...PTZ Control Remote control PTZ Record Remote manual start stop recording Playback Remote playback download the recorded files on DVR Parameters Setup Remote setup the DVR parameters Log Remote view th...

Page 40: ...the setting and back to the previous menu 5 3 Video Format and VGA Resolution Video Format You can modify video standard to match video input In Display menu move to Video Format use key to select PA...

Page 41: ...der User Manual Press Done button to save or press Cancel to abort 5 4 Date and Time Setup 5 4 1 Date and Time Setting In Display menu you can setup DVR system date and time Date Time setting window i...

Page 42: ...lay format position and format And you can copy the properties of one camera to the others In Image Setup menu as following select one camera Display mode There are several display modes Opaque Steady...

Page 43: ...aving Time Setup DST means Daylight Saving Time select the check box to enable the function and you can set DST start time and end time in your region 5 5 Camera Setting 5 5 1 Camera Title In Camera S...

Page 44: ...you do not want to display camera name just disable the check box Position below Then the disable flag is If you enable the check box you can setup the display position Position setting can be copied...

Page 45: ...lease use keys to select one camera Step 3 Click Color setup button and enter into sub menu Adjust brightness contrast Tone and saturation to get the best image quality Step 4 Press Done to save the s...

Page 46: ...ter into mask setup window Step 5 Setup mask area Setup the masks as prompted on screen Step 6 Save mask area Repeat step2 4 to setup mask area for other cameras In Advanced Setting menu press Done to...

Page 47: ...Camera menu Step 2 Select camera use keys to select one camera Step 3 Enter into Advanced settings setup menu Step 4 Select sensitivity Move to the drop down list to select the sensitivity for Tamperi...

Page 48: ...m is enabled 5 7 2 Select tampering area Step 1 Enter the Area setting window Step 2 Select tamper area as prompt on screen Only one tamper area can be setup 5 7 3 Alarm handling Step 1 Press Action t...

Page 49: ...ress Cancel 5 7 4 Temple Alarm schedule Step 1 Enter Event Schedule Step 2 Set schedule as desired Max 4 time periods allowed for one day Schedule can be copied from one day to the others In case of t...

Page 50: ...e is enabled Please follow the steps in below to setup the video loss alarm Step 1 Follow the Step1 3 as described in chapter 5 7 1 Step 2 enable check box next to Video Loss Step 3 Enter Action Step...

Page 51: ...Video Recorder User Manual Step 5 Set the alarm handling Step 6 Save alarm setup Press Done to return to Advanced Setting menu or press Cancel to abort DO REMEMBER to press Done again to save your set...

Page 52: ...a motion detected DVR will make alarm Step 1 Enter Camera menu Step 2 Select camera Use key to select one camera Step 3 Enter Motion Detection Step 4 Select motion detection sensitivity range from 0 5...

Page 53: ...n Motion Alarm Handle menu you can select one or more record channels Please use ENTER or EDIT key to check the box as needed Note In order to make motion alarm recording take effect you must set the...

Page 54: ...ra are assigned DVR will pop up the live image in sequence with a interval of 10 seconds When the motion alarm is disappeared DVR will go back to preview mode Step 10 Save motion alarm setup Press Don...

Page 55: ...for sequence enable disable audio preview and preview layout etc Preview mode For preview mode item you can use key to select one mode Display interval Set the interval for sequence display For Main C...

Page 56: ...r you can select X to covert this camera Save setting Press Done to save your setting or press Cancel to abort 5 11 Recording Setup You may enter the Recording Setting windows from main menu Recording...

Page 57: ...TSC 30FPS 20 16 12 10 8 6 4 2 1 1 2 1 4 1 8 1 16 For lower frame rate you may select low bit rate size PreRecord Time When the alarm recording is enabled you may set the prerecord time at here The ava...

Page 58: ...ode only one record type can be selected Step 4 Copy to other days You can repeat step2 and step3 to setup for other days Or you can copy the current day to others Step 5 Save setting Press Done and e...

Page 59: ...ped Step 4 Copy to other days You can repeat step2 and step3 to setup for other days Or you can copy the current day to others Step 5 Save Press Done and exit to the Recording menu Press Done again to...

Page 60: ...press ENTER key to enter into alarms setting page External alarm input setup Step 1 Select alarm input Use keys to select one alarm input Step 2 Select input type Select from N O or N C Step 3 Alarm...

Page 61: ...Step 5 Schedule for alarm inputs You may set the schedule for alarm inputs DVR will automatically set the inputs into Arm disarm according to the schedule and take action according to the alarm handl...

Page 62: ...efer to chapter 5 14 for sequence setup z Pattern Check the Enable Pattern box to enable recall pattern Only pattern 1 will be recalled Please refer to chapter 5 14 for cruise setup Press Done to save...

Page 63: ...and the delay time Step 3 Enter into alarm out schedule You can set the schedule to make alarm output into effective Step 4 Copy one alarm output parameters to other alarm output In Alarms menu you ca...

Page 64: ...ch the DHCP server and get one dynamic IP address This box will display the dynamic IP address If DVR uses PPPoE function it can dialup into internet and this box will display the dynamic internet IP...

Page 65: ...tion and used to resolve DVR dynamic IP Multicast IP It is one D class IP address among 224 0 0 0 239 255 255 255 If you do not use multicast function you do not need to set the Multicast IP Remote Ho...

Page 66: ...work menu to save the setting Reboot DVR to make parameters into effect In reboot process DVR will start dialup using PPPoE parameters If DVR dialup internet successfully DVR will display the dynamic...

Page 67: ...lowing figure illustrate the typical window of the IP server software You may develop your own IP server SW to fit your particular project needs based on the DVR SDK 5 14 PTZ Setup The RS 485 port at...

Page 68: ...485 parameters setting is match to the PTZ protocol1 In main menu move Active Frame to PTZ and press ENTER key you can see the PTZ setting windows as below PTZ menu description Select channel Select...

Page 69: ...Panasonic infinova YouLi LinLin 1016 LinLin 820 DM DynaColor HD600 JC 4116 Pelco d WX VCOM VC 2000 NetStreamer SAE YAAN Kalatel 312 CELOTEX TLPelco p TLHHX 2000 BBV RM110 KC3360S ACES ALSON INV3609HD...

Page 70: ...gh RS 485 port 5 14 4 Preset Setup1 Preset is using one number to represent the camera s position zoom focus and iris Move Active Frame to PTZ Advanced Setting Preset press ENTER key to enter into pre...

Page 71: ...ings Delete preset number In Preset setup menu input one preset number press Delete button and you ve deleted this preset number After deleting press Return button to PTZ menu In PTZ menu press Done b...

Page 72: ...SpeedDome you should go to SpeedDome menu to set the Sequence and only SpeedDome Ultra 7 and later version supports recall on Sequence After you finish setup the sequence press StartSeq to check the...

Page 73: ...an start controlling PTZ to record the pattern press ENTER to save the track and return to Cruise setup menu Press Start Pat button to repeat the PTZ track until you press Stop button Note Only TYCO_A...

Page 74: ...r into DVR Alarms menu move active frame to Exceptions and press Enter to enter into exception menu In case of exceptional alarm you can set the handling methods in below Upload to Center Send excepti...

Page 75: ...Utilities Utilities menu provides many useful features of the DVR The Utilities setting window is shown in below 6 1 Restore Parameters Restore factory default parameters for DVR Please note the IP a...

Page 76: ...Digital Video Recorder User Manual 76...

Page 77: ...play the Hard Disk Capacity Free space Idle status Format HDD Please make sure you stop all recording before run the format Reboot the unit after format 6 3 Clear Alarm Out Reset the alarm output manu...

Page 78: ...enter into Log menu If you want to view the log based on default option just press ENTER key DVR will list all matched information You may also search the log files by different criteria and time peri...

Page 79: ...ke sure that firmware file is placed in USB FLASH root directory and USB FLASH should be FAT32 file system Press USB button DVR will search corresponding firmware file from connected USB FLASH and upd...

Page 80: ...e menu choose Log Options in the sub menu and make selection as following Step 3 Select Users rights under Security menu item The following dialog box will be pop up Step 4 Create new user Click new u...

Page 81: ...ity Dialog select User Name as target In Home Directory edit box input the path where the firmware file digicap dav is placed Then press Done to exit 7 2 2 Use DVR FTP Upgrade Function Select FTP func...

Page 82: ...Digital Video Recorder User Manual Upgrading will start and prompt to reboot the device once the process is done 82...

Page 83: ...e client software to upgrade please refer to user manual of client software for how to configure the DVR and some other configurations then enter the menu configuration remote config others press expl...

Page 84: ...ording Time use the Formula 2 to calculate the storage capacity in unit Mbyte i m i m 2 i q i h i D In the formula i h Recording time for each day hour i D Number of days for which the video shall be...

Page 85: ...uction Pin definition To make the connect cable according the follows T T TXD TXD R R RXD RXD 2 UTP Network Connection Pin definition To make the network cable according to the actual situation there...

Page 86: ...Digital Video Recorder User Manual Ethernet Crossover Cable 86...

Page 87: ...ch RCA Electrical Level 2 0Vp p Resistance 1000 Audio output 1 ch RCA Linear Electrical Level Resistance 600 Stream type Video Video Audio Max bit rate 32Kbps 2Mbps self define HDD IDE interface 1 SAT...

Page 88: ...Digital Video Recorder User Manual Size 315mm x 230mm x 45mm 88...

Page 89: ...ew mode Monitor and VGA display 1 screen 4 screen preview mode Auto switch or manual switch 5 10 PTZ control Control pan tilt zoom focus and iris Setup and adjust preset sequence and cruise 4 4 5 14 M...

Page 90: ...he recorded files in DVR Download Download recorded files in DVR Remote upgrade Remote upgrade firmware Web Using IE to access DVR OSD OSD setup 5 4 5 5 LOGO Logo setup 5 4 5 5 View log View log 6 6 U...

Page 91: ...l 3 Failure on main board Cannot find the hard disk in reboot process 1 Hard disk cable is connected or broken 2 Power cable of hard disk is not connected or broken 3 Hard disk is broken DVR can not c...

Reviews: