Seite/
Page
6
AMP ERGOCRIMP Matrize
AMP ERGOCRIMP Die
411-18223
Rev A
4. Position the contact so that the mating end of the
contact is on the locator side of the tool, and that
the open "U" of the wire and insulation barrels face
the top of the tool. Place the contact up into the
nest so that the locator blade drops into the slot
in the contact.
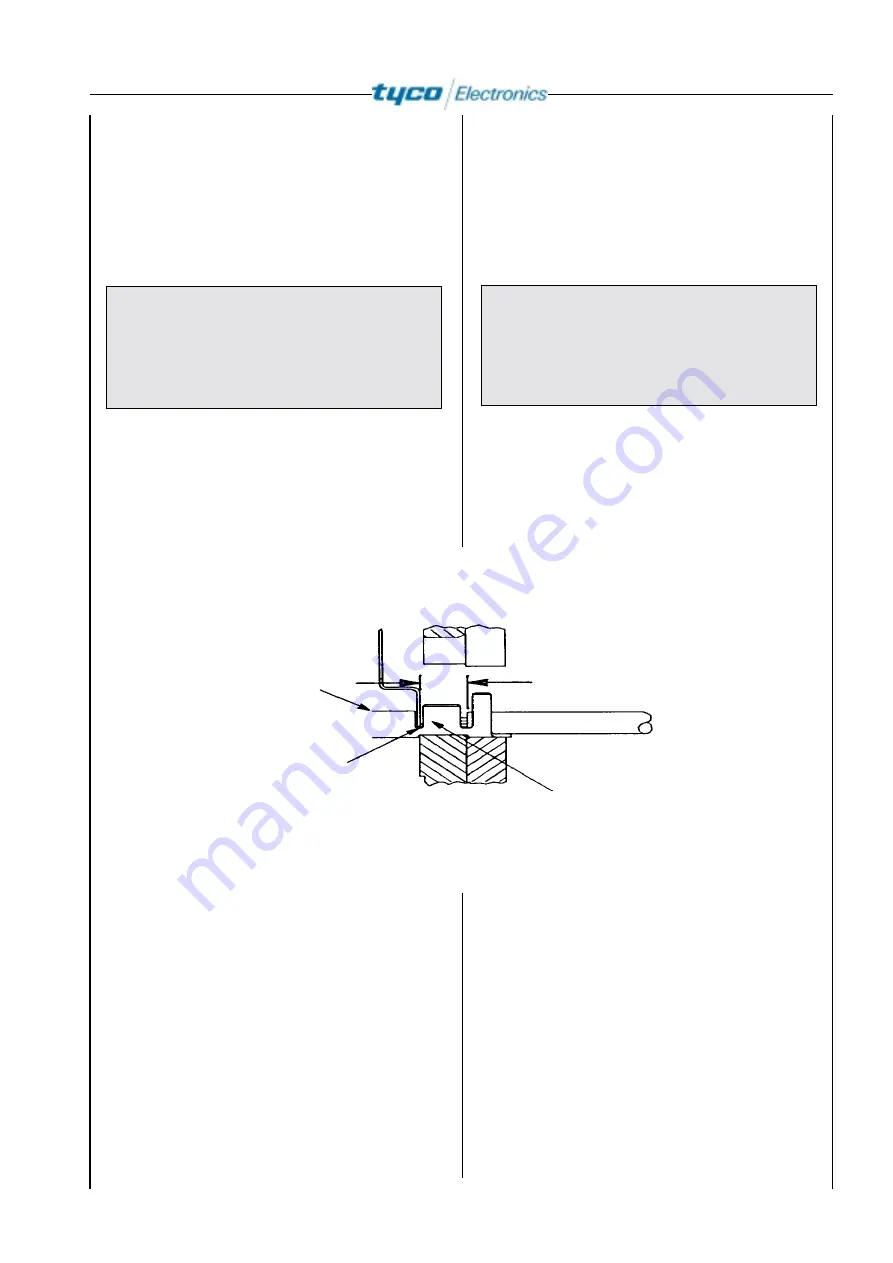
(Illustration 3.)
CAUTION
Make sure that both crimpflanks of the
insulation barrel are started evenly into the
crimping section. Do NOT attempt to crimp an
improperly positioned contact.
5. Closing the Locator blade and fixing you the
contact which can be crimped by you the knurled
thumb screw of the Locators turn.
4. Positionieren Sie den Kontakt so, daß sich der
Kontaktierbereich des Kontaktes auf der Seite
des Locators befindet und die Crimpflanken (U-
Form) des Draht- und Isolationscrimps nach oben
gerichtet sind. Plazieren Sie den Kontakt so in der
Aufnahme, daß das Locatorblech in den Schlitz
zwischen Kontaktierbereich und Drahtcrimphülse
eintauchten kann.(Bild 3)
VORSICHT
Stellen Sie sicher, daß die beiden Crimp-
flanken des Isolationscrimps im Crimpbereich
gleichmäßig geführt werden. Versuchen Sie
NICHT, einen ungenau positionierten Kontakt
zu crimpen.
5. Schliessen Sie das Locatorblech und fixieren Sie
den zu crimpenden Kontakt indem Sie die Rändel-
schraube des Locators drehen.
Zangenvorderseite
Front of Tool
Zangenrückseite
Back of Tool
Abisolierlänge
Strip lenght
Kontakt (typ.)
Contact (Typ)
Positionierung in
Drahtanschlag-
Schlitz
Locator in Wire stop slot
Leitung bis auf Anschlag
eingeführt
Wire inserted to stop
Bild / Illustration 3
6. Halten Sie den Kontakt in Position und drücken
Sie die Zangengriffe soweit zusammen, bis der
Ratschenmechanismus entsprechend verriegelt
und der Kontakt in der Zange gehalten wird.
Achten Sie darauf, daß Sie die Isolations- und
Drahtcrimpflanken NICHT deformieren.
7. Führen Sie die abisolierte Leitung bis zum An-
schlag (Positionierung) in die Isolations- und
Drahtcrimphülse (Bild 3).
8. Halten Sie die Leitung in dieser Stellung und
drücken Sie die Zangengriffe zusammen, bis der
Ratschenmechanismus auslöst bzw. öffnet. Las-
sen Sie die Zange vollständig öffnen und entneh-
men Sie den gecrimpten Kontakt.
6. Hold the contact in position and squeeze the tool
handles together until ratchet engages sufficiently
to hold the contact in position. Do NOT deform
insulation barrel or wire barrel.
7. Insert stripped wire into contact insulation and
wire barrel until it is butted against the wire stop.
(Illustration 3.)
8. Holding the wire in place, squeeze tool handles
together until ratchet releases. Allow tool handles
to open and remove crimped contact.


