S/
NO 120
700 0 0 3 3
S/
NO 120
700 0 0 3 3
S/
NO 120
700 0 0 3 3
rear door
record
stop
record switch
192º rotating lens
dual alignment lasers
TRail™ mounting system
power indicator
serial number
charging indicator
battery slot
microSD
card slot
USB
power button
memory indicator
charging indicator
USB connection
record
stop
rear
press and hold
until lights
come on
front
push until
lights
come on
a, f
c
b
b
press and hold
for (1) second
attach leash
before using
after detaching, rotate
vertically to align and then
reattach firmly into mount
attach and adjust camera according to your riding position
(it’s no fun watching videos of the ground)
press and hold
for (1) second
rotate lens to align
lasers horizontally
Battery Status
Green light
Yellow light
Red light
No lights
Memory card status
Green light
Yellow light
Red light
Flashing Red
Power off
More than 66% full
Between 33% and 66% full
Less than 33% - time to recharge
Recharge your VholdR or power up again
More than 66% free recording space
Between 33% and 66% free recording space
Less than 33% - time to swap out cards or download
Your memory card is full, you are missing a card, or
your card has an error and needs to be formatted
(see Tips & Troubleshooting to format your MicroSD Card)
Press and hold rear button for 3 seconds or until all
lights turn off
aim lasers
record
stop
hold base of
mount firmly
against
surface as
you pull
camera
away
from
velcro
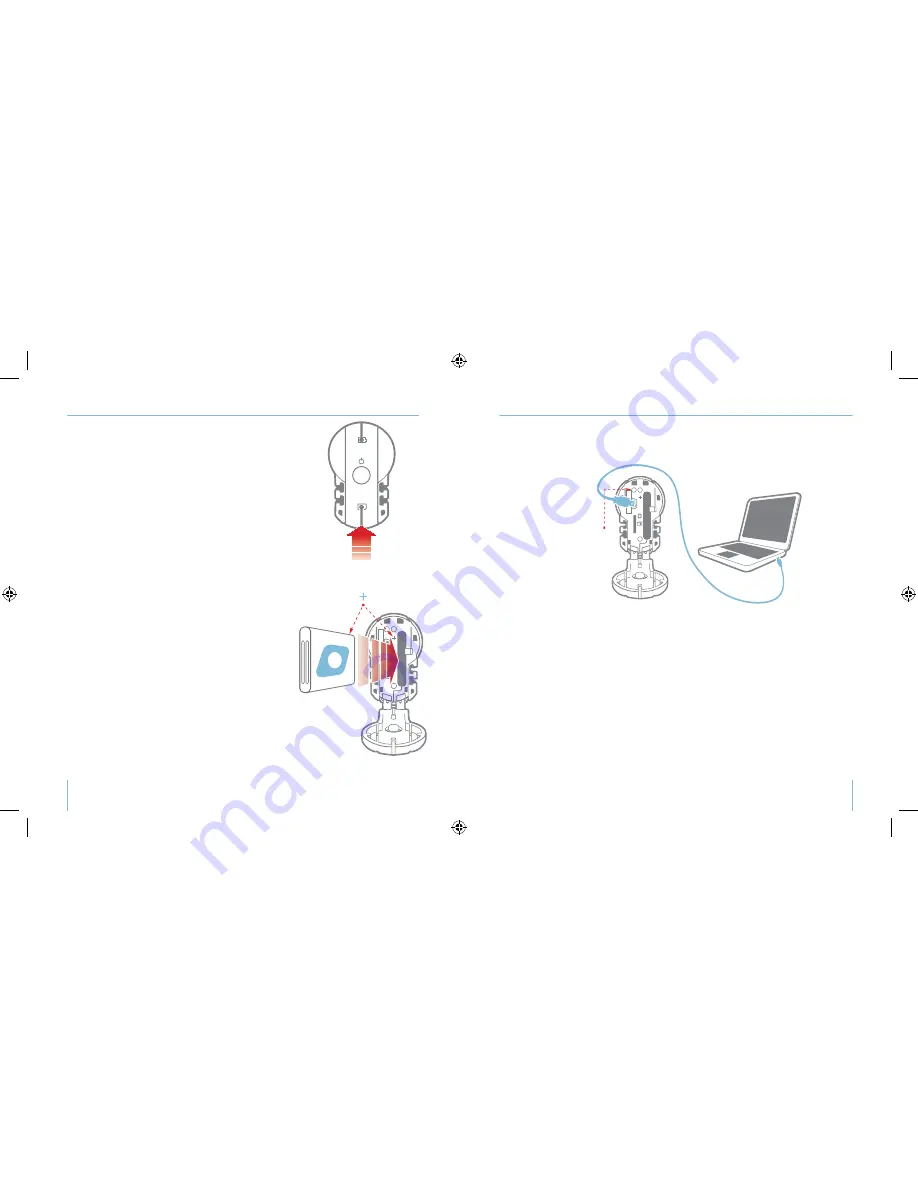
Your VholdR battery will have some juice out of the box, but we recommend a fresh
charge before recording your first adventure. VholdR is designed to charge directly from
your computer via the included USB cable.
Open VholdR’s back door and connect the USB cable.
Connect the other end of the USB cable to your computer.
USB input: 5V 500mA
Note: The VholdR will charge fastest while not powered on.
VholdR’s charging indicator light (located inside the back door) will be red when the bat-
tery is charging.
The battery indicator light will turn green once the VholdR is full charged provided the
VholdR is powered off while charging. The battery will take about 4 hours to full charge.
Your VholdR uses a rechargeable Lithium-Ion, 3.7V, 900mAh battery. Do not use batteries
other than those specifically designed for the VholdR. Use of any other battery may
present a risk of fire or explosion.
Note: A VholdR wall charger is available as an accessory at www.vholdr.com
To open VholdR’s back door, place your thumb at the
bottom of the door and gently push upwards.
Your MicroSD memory card is already in place. press on
the card until you hear a gentle click and the top of the
card has ejected.
Note: VholdR only supports up to a 2GB MicroSD card
(non-HC format)
To insert the battery, align the plus sign (+) on the
camera with the plus sign (+) on the battery and insert
the gold contacts first. Hold the battery tab away from
the opening to allow enough space for the battery to
slide into place. Slide the tab over the top of the battery
and ensure it is resting in one of the grooves on top of
the battery.
Note: It is important that the battery clip is firmly engaged to
secure the battery in place.
Close the back door by aligning it slightly above the
body of the camera and then sliding downward until it
locks into place.
S/
NO 120
700 0 0 3 3
S/
NO 120
700 0 0 3 3
S/
NO 120
700 0 0 3 3
rear door
record
stop
record switch
192º rotating lens
dual alignment lasers
TRail™ mounting system
power indicator
serial number
charging indicator
battery slot
microSD
card slot
USB
power button
memory indicator
charging indicator
USB connection
record
stop
rear
press and hold
until lights
come on
front
push until
lights
come on
a, f
c
b
b
press and hold
for (1) second
attach leash
before using
after detaching, rotate
vertically to align and then
reattach firmly into mount
attach and adjust camera according to your riding position
(it’s no fun watching videos of the ground)
press and hold
for (1) second
rotate lens to align
lasers horizontally
Battery Status
Green light
Yellow light
Red light
No lights
Memory card status
Green light
Yellow light
Red light
Flashing Red
Power off
More than 66% full
Between 33% and 66% full
Less than 33% - time to recharge
Recharge your VholdR or power up again
More than 66% free recording space
Between 33% and 66% free recording space
Less than 33% - time to swap out cards or download
Your memory card is full, you are missing a card, or
your card has an error and needs to be formatted
(see Tips & Troubleshooting to format your MicroSD Card)
Press and hold rear button for 3 seconds or until all
lights turn off
aim lasers
record
stop
hold base of
mount firmly
against
surface as
you pull
camera
away
from
velcro
1
2
3
1
2
3
4
5
4
8
9
MicroSD Card & Battery
Charging the Battery
MicroSD Card & Battery
Charging the Battery
Summary of Contents for VholdR 1102
Page 1: ...WELCOME TO USER MANUAL...
Page 17: ......


