background image

 Multi Format LCD Monitor   41

100%

   75%


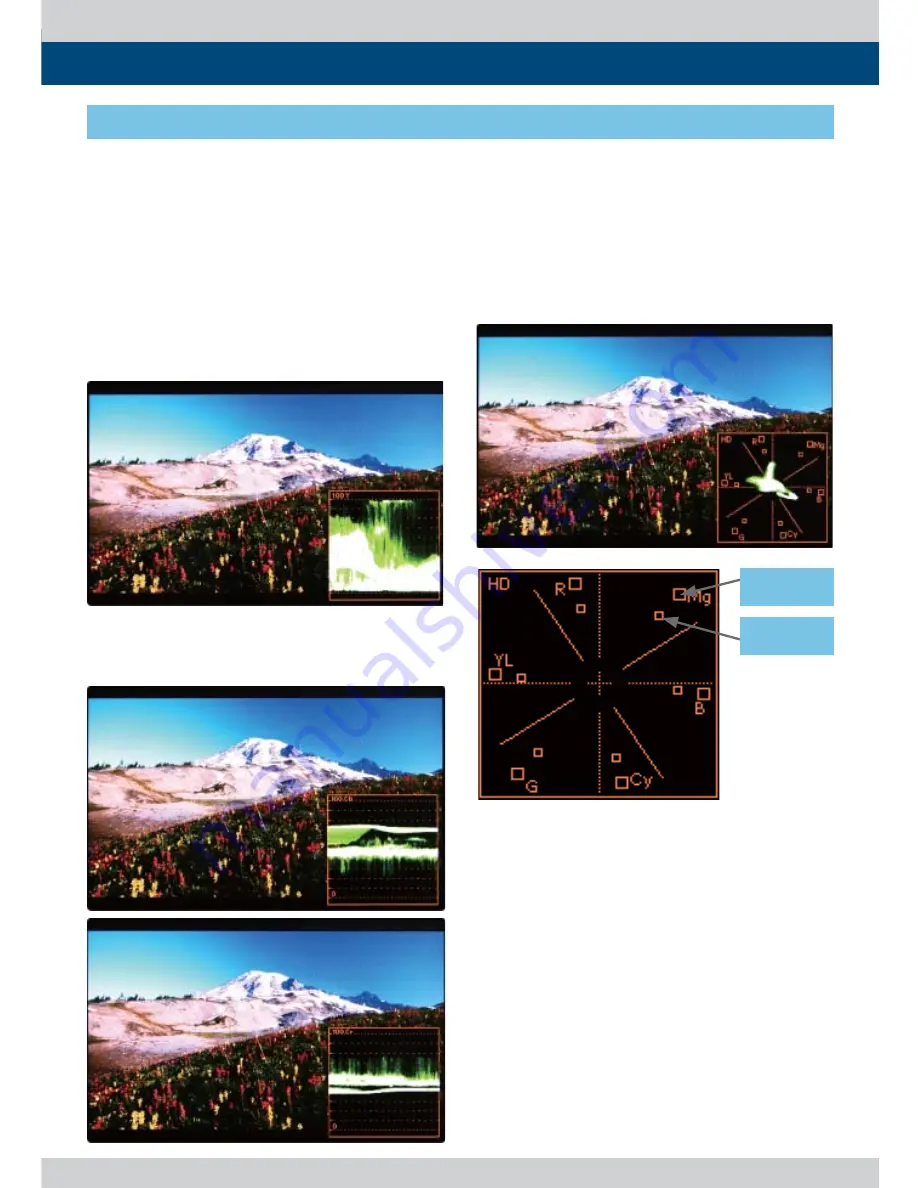
Waveform Y 

- Displays the Luma(Y’) component of the    
  input signal into waveform.


Waveform / Vector

- This function sets the Waveform and  


 Vectorscope. 
- Activates in order Off , Waveform,  


  Vectorscope, Waveform wide, Waveform    
  YCbCr, Wave_Vector, Vector_YCbCr, Full    
  waveform(Y) and Full VectorScope.


VectorScope

- Displays the color components ‘B-Y’ and ‘R-Y’ 
  of the input signals onto the X-Y axis.
- Two diff erent types of Vetorscopes are 
  displayed according to SD or HD input  


 signals. 
- 100% and 75% scales are indicated on the
 Vetorscope.

* Wave_Vector : Displays the Waveform(Y’)   
   and the Vectorscope  simultaneously.
* Vector_YCbCr : Displays the Vectorscope and  
   the Waveform(Y,Cb,Cr) simultaneously.
* Full waveform(Y) : Displays the Waveform(Y)  
   to full screen.
* Full Vectorscope : Displays the Vectorscope  
   to full screen.


Waveform Cb, Cr 

  - Displays the Cb, Cr components of the input 
    signal into waveform.

[3] WAVEFORM / VECTORSCOPE

8. Other Functions

Summary of Contents for LVM-170A

Page 1: ...MultiFormatBroadcast LCD Monitor Operation Manual_v1 6 LVM 170A LVM 171A ...

Page 2: ......

Page 3: ...ance with the instruction manual may cause harmful interference to radio communications Operation of this equipment in a residential to correct the interference at his own expense CAUTION Change or modifications not expressly approved by the manufacturer responsible for compliance could void the user s authority to operate the equipment Disposal of Old Electrical Electronic Equipment Applicable in...

Page 4: ... can cause electric shock and or short internal parts For the same reason do not spill water or liquid on the product Do not attempt to service the product yourself Removing covers can expose you to high voltage and other dangerous conditions Request a qualified service person to perform servicing If any of the following conditions occurs unplug the power cord from the AC outlet and request a qual...

Page 5: ...re to follow the manufacturer s instruction Use only the mounting hardware recommended by the manufacturer When relocating the product placed on a cart it must be moved with the utmost care Sudden stops excessive force and uneven floor surface can cause the product to fall from the cart The vents and other openings in the cabinet are designed for ventilation Do not cover or block these vents and o...

Page 6: ...udio in Stereo audio out using phone jack external audio in Knob Control Easy to adjust user configuration using the control knobs BLUE ONLY MONO Focus Assist H V delay Internal pattern generator 0 100 Gray Colorbar Pluge Varied Markers Safety Areas Center Marker Safety Area Marker Aspect Marker Display Size Scan Wide screen compatible Wide screen for 16 9 aspect monitoring AC DC Compatible Basica...

Page 7: ...trols Functions F1 F2 F3 F4 F5 SDI B SDI A DIGITAL ANALOG USB INFO BLUE ONLY H V DELAY MARKER ASPECT SCAN ENTER UP DOWN POWER PHONE JACK MENU EXIT HDMI CVBS DVI I SDI A IN SDI B IN SDI OUT LAN OUT LAN IN AUDIO IN REMOTE RS 422 OUT RS 422 IN AC IN POWER S W DC IN ...

Page 8: ... the Digital input menu selection then use the Knob to select desired input Please refer to 7 Button Functions 2 DIGITAL for more information SDI A Button Lamp Used to select SDI A input SDI B Button Lamp Used to select SDI B input F1 F5 Button Lamp Performs the function that the user set as hot keys The selectable the hot key menu comes up when you hold the keys You can select the hot key functio...

Page 9: ...ALOG DVI DIGITAL HDMI modes INFO Button Displays the current function and setting of the monitor MENU EXIT Button Lamp Activates OSD menu ENTER UP DOWN Knob Used to confirm a chosen value Used to move the cursor in OSD menu POWER Button Lamp Turns on or off the monitor power OPERATE Lamp Indicates the status of power connection and monitor operation The LED is off with power off The LED is red whe...

Page 10: ... RS422 IN OUT RJ 45 Controls the monitor by a protocol provided by TVLogic or supports TSL protocol AC IN 100 240V AC 50 60Hz DC 12V 24 IN 12V 24V DC WARNING When using the product make sure to ground whenever possible before connecting the input signal cable in order to prevent any possible damage to the product or connected devices The damage may include signal noise malfunction of main board or...

Page 11: ...171A FRONT LVM 171A REAR 3 Controls Functions SCAN ASPECT MARKER F1 F2 F3 MENU EXIT UP DOWN ENTER USB AUDIO OUT POWER SOURCE CVBS DVI I SDI A IN SDI B IN SDI OUT HDMI AC IN DC 12V IN RS 422 IN RS 422 OUT AUDIO IN LAN OUT REMOTE LAN IN ...

Page 12: ... the internal speaker or the phone jack TALLY Lamp Tally lamp that can be toggled in Green or Red using the REMOTE RJ 45 port or TVLogic s control program Observer USB Used to update the firmware USB Memory Stick Used to connect the probe for the color calibration SOURCE Button Used to select the desired input source Press the SOURCE button to active the input select menu and use the UP DOWN Knob ...

Page 13: ...duct or connected devices The damage may include signal noise malfunction of main board or display panel And the connected devices such as camera or video source player may also be influenced through signal cable Please check if the AC power source and the power extender or power distributor is grounded DVI I DVI I Signal input terminal for DVI ANALOG or DVI DIGITAL signal HDMI HDCP HDMI Signal in...

Page 14: ...een 2 Display the desired sub menu with the UP DOWN button 3 After selecting a sub menu press ENTER to select an item with the UP DOWN button 4 Press ENTER to select the desired item verified by highlighted field text turning red 5 Press ENTER to save the new value after adjusting the value with UP DOWN button Verified by highlighted field returning to default black color 6 Press MENU to remove OS...

Page 15: ...y using a control knob on the front of the monitor Phase The item controls phase value Hue between 180 180 If functions only with analog video input signal Aperture The item controls the picture sharpness between 0 24 Sharpness can be adjusted by using a control knob on the front of the monitor NTSC Setup The item sets NTSC IRE value for 0 Zero setup or 7 5 IRE It is activated in COMPOSITE 1 2 3 o...

Page 16: ... If phase is not set correctly the image may display artifacts and out of focus Clocks Line The item adjusts timing for signal sync If the signal sync is not set correctly the image may display flickering and dropping Auto Adjustment The item adjusts the input signal automatically Phase Clocks Line and Image Position are also adjusted If the image does not display correctly after the Auto Adjustme...

Page 17: ...red green blue gain value between 256 255 Only in User1 2 3 it is activated Bias Red Green Blue The item controls red green blue bias Offset Black Level value between 100 100 Only in User1 2 3 it is activated Color Copy The item is used to copy pre stored color temperature settings into a USER1 2 3 mode In USER mode find and select the color temperature to be used as a starting point of custom col...

Page 18: ...0 Only in User1 2 3 it is activated Color Copy The item is used to copy pre stored color temperature settings into a USER1 2 3 mode In USER mode find and select the color temperature to be used as a starting point of custom color temperature Only in USER1 2 3 it is activated Gamma Used to set the Gamma value Settable values are 2 2 and 2 4 Camera LUT Used to change the output Log video from the ca...

Page 19: ... ACTION 4 3 EBU GRAPHIC 4 3 The function operates only after activating the MARKER function by pressing the MARKER button on the front of the monitor 5 Menu Operations Fit Marker The item activates the FIT MARKER function With FIT MARKER On the safety area is displayed relative to the marker in use With FIT MARKER Off the safety area is displayed relative to the incoming source FIT MARKER acts as ...

Page 20: ...Marker H2 The item controls the position of the second user defined horizontal marker line Marker option USER needs to be selected USER Marker V1 The item controls the position of the first user defined vertical marker line Marker option USER needs to be selected USER Marker V2 The item controls the position of the second user defined vertical marker line Marker option USER needs to be selected ...

Page 21: ...button and UP DOWN button to set the desired function 4 GPI UMD 5 Menu Operations REMOTE RJ 45 1 Pin1 2 Pin2 3 Pin3 4 Pin4 5 Pin5 6 Pin6 7 Pin7 8 GND 1 8 Menu Classifi cation Settable Values PIN 1 6 NONE ANALOG CHANNEL HDMI CHANNEL SDI A B CHANNEL TALLY RED TALLY GREEN BLUE ONLY ASPECT HVDELAY 16 9 MARKER 15 9 MARKER 14 9 MARKER 13 9 MARKER 4 3 MARKER 4 3 ON AIR MARKER 1 85 1 MARKER 2 35 1 MARKER ...

Page 22: ...up ID The item is used to control many monitors in each group when control the monitors by the protocol Tvlogic provides with RS 422 485 communication or network Monitor ID The item sets the ID of each monitor for the TVLogic control protocol or DYNAMIC UMD using RS 422 485 communication RS422 baud rate The items sets the monitor control program that TVLogic provides and Baud rate UMD Display The ...

Page 23: ...d color The operation is same as Default User tally Sets the color the user wants receiving the signal from byte0 byte1 in TSL Protocol Control BYTE and shows tally Off W hite Red Green Blue Yellow Cyan Magenta User char Shows tally in letter color The method is same as user tally one User B G Show tally in letter background color The method is same as User tally one Tally1 Color Tally4 Color Each...

Page 24: ... CONTROL BYTE bit 0 Tally 1 1 on 0 off bit 1 Tally 2 1 on 0 off bit 2 Tally 3 1 on 0 off bit 3 Tally 4 1 on 0 off bit 4 bright data Not used bit 5 bright data Not used bit 6 reserved Not used bit 7 cleared to 0 Not used DISPLAY DATA 16 displayable ASCII characters HEADER 1 BYTE CONTROL BYTE 1 BYTE DISPLAY DATA 16 BYTE Tally1 CHANNEL1 Tally2 Tally3 CHANNEL1 Tally4 ...

Page 25: ...1 CHANNEL1 1 0 CHANNEL1 CHANNEL1 1 1 CHANNEL1 CHANNEL1 The following appearance of UMD DISPLAY is set as D UMD D 8C D UMD TALLY TYPE and TALLY1 TALLY4 COLOR D UMD TALLY TYPE USER COLOR TALLY1 COLOR RED TALLY2 COLOR GREEN TALLY3 COLOR RED TALLY4 COLOR YELLOW CHANNEL1 CHANNEL1 Tally Type Default S 8C Single 8 Character S 16C Single 16 Character D UMD TALLY TPYE USER COLOR Color selections between TA...

Page 26: ...isplayed as RGB Wave Vector Displays Waveform Y and VectorScope at the same time Waveform Wide Displays stretched luminance components of the input signal to fit width of the screen on the bottom of the monitor Waveform Intensity The item controls the brightness of the WAVEFORM VECTOR display Available values are between 1 63 The higher the number the brighter the waveform will be Waveform Trans T...

Page 27: ...eck Analyzes Luma Y of input signal and displays the analyzed area on the screen There are Color Pattern and Zebra Pattern methods to display it After every pixel Y level analyzing it is displayed with a certain color or diagonal line in right index of the screen When the pixel Y level is under 0 16 it is displayed by green color green diagonal line whenitisabove100 235 itisdisplayed by red color ...

Page 28: ...ng the set value is displayed by red in Waveform and by blinking on the screen Y Min Sets the min value of Luma Y between 0 255 The part exceeding the set value is displayed by red in Waveform and by blinking on the screen C Max Sets the max value of Chroma C between 0 255 The part exceeding the set value is displayed by red in Waveform and by blinking on the screen C Min Sets the min value of Chr...

Page 29: ...displayed horizontally 4CH on the top left and the other 4CH on the top right of the screen 8CH Side It is displayed horizontally 8CH on the top right 4CH It is displayed horizontally 2CH on the top left and the other 2CH on the top right of the screen 4CH Side It is displayed horizontally 4CH on the top right Level Meter Group Used to set the level meter group Available modes are as below 8CH 8CH...

Page 30: ...e unit is same as original dB and the LKFS range is from 6 to 60 ITU R BS 1770 3 When the standard is ATSC 24dB is 0 and the LKFS range is from 30 to 36 ATSC A 85 When the standard is EBU 23dB is 0 and the LU range is from 29 to 37 LU EBU R 128 Loudness log time Used to set the log time Activates in the order 8 Minute 16 Minute 32 Minute 1 Hour 2 Hour 4 Hour 8 Hour 24 Hour Sets the time period of ...

Page 31: ...Y AREA MARKER MAT MARKER COLOR in MARKER 1 2 and BRIGHT CONTRAST CHROMA PHASE APERTURE in PICTURE 1 3 OSD position The item sets OSD menu position Available setting is CENTER R T R B L B L T R B and L B are not available when WAVEFORM VECTOR is set Key LED The item turns on off LED in front of the monitor Even though you turn off KEY LED when you press LED button in front of the monitor the LED is...

Page 32: ...d BRIGHT CONTRAST CHROMA PHASE APERTURE in PICTURE 1 3 OSD position The item sets OSD menu position Available setting is CENTER R T R B L B L T R B and L B are not available when WAVEFORM VECTOR is set Key LED The item turns on off LED in front of the monitor Even though you turn off KEY LED when you press LED button in front of the monitor the LED is on and after 5 sec the LED is off H Flip Allow...

Page 33: ... ANC 608 CEA 608 B 708 CEA 708 C standards display only TimeCode Enable The item sets timecode Available modes are OFF VITC and LTC Focus Assist The item makes you check which point your camera s focus is on easily by showing a color on focused area Available value changes in order of Mono On Color On and Off Mono On Shows edge of focused area in a designated color and the other area in black whit...

Page 34: ... Monitor 7 DISPLAY SET 5 Menu Operations S W upgrade firmware updates with USB memory stick Thumb drive S W upgrade start When S W upgrade is On the monitor detects USB memory stick and update is available it is activated ...

Page 35: ... correctly S W upgrade start is activated if the item is not activated please disconnect and connect the USB memory stick again After 5 sec do the same procedure The monitor searchs USB memory stick Select Yes in S W upgrade start and proceed the firmware update During the update the monitor screen is off and nothing functions After the update TVLogic logo shows up on the screen and the monitor in...

Page 36: ...our connection is not lose or disconnected Warning When using ANALOG mode always check the input method and modify the setting as needed for optimized output results 1 ANALOG LVM 170A LVM 170A monitor supports HDMI DVI digital input signal 1 Press HDMI in front of the monitor and activate OSD menu as the left photo Select input you would like to use by Knob or UP DOWN KEY and press the knob 2 Ther...

Page 37: ...s various SDI signals HD SD 3G SDI Digital signals HDMI DVI Digital and Analog signals DVI Analog Composite 1 Press the Source button on the front of the monitor and activate the OSD menu as shown on the left Use the UP DOWN knob to select desired input source then press the knob to confirm 2 Input resolution displays on the bottom of the OSD screen 3 Press the Source button again to remove the OS...

Page 38: ...1 F5 in front of the monitor for more than 2 sec and activate OSD menu as the left photo 2 Select input you would like to use by Knob and press the knob 3 Afterward F1 F5 perform the designated functions 4 FUNCTION KEY SET 7 Button Functions LVM 171A LVM 170A ...

Page 39: ... types of scan mode When a scan mode is selected display skips the next mode if its required condition is not met 1 1 Scan Displays the original image in 1 1 ratio on the screen OVER SCAN Zooms in out of the image to 96 of its original size without changing the aspect ratio of ZERO SCAN Zooms in out of the image without changing the aspect ratio User Aspect Selects Width Height in User Aspect OSD ...

Page 40: ... get ready for controlling Adjust the ratio using the Knob Control range for width Min 100 Max 1920 Control range for height Min 100 Max 1080 The size adjusted picture always stay in the center of the screen To adjust the 16 9 aspect ratio of 1920X1080 resolution into 2 35 1 aspect ratio adjust the width and height as 1920X817 8 Other Functions ...

Page 41: ... R Y of the input signals onto the X Y axis Two different types of Vetorscopes are displayed according to SD or HD input signals 100 and 75 scales are indicated on the Vetorscope Wave_Vector Displays the Waveform Y and the Vectorscope simultaneously Vector_YCbCr Displays the Vectorscope and the Waveform Y Cb Cr simultaneously Full waveform Y Displays the Waveform Y to full screen Full Vectorscope ...

Page 42: ...esolution of the input SDI signal shows in active line PAL Min 17 Max 522 NTSC Min 23 Max 623 720p Min 26 Max 750 1080i Min 21 Max 1123 1080p Min 42 Max 1121 Control range for HDMI Analog signal varies according to the output resolution of the signal Min 0 Max 1080 Selected line is indicated on the screen 4 LINE SELECT Waveform Vectorscope 5 ZOOM Used to magnify the input signal from 0 to 90 Suppo...

Page 43: ...r is assigned to pixels with Y level from 75 to 85 and Cyan from 60 to 70 This function is designed for better performance in setting the exposure of lighting when shooting with vDSLR cameras Zebra Pattern Type Displays the pixels with designated Luma Y levels with zebra pattern Y 100 Pixels with Y level over 100 turn to red diagonal line Y 0 Pixels with Y level under 0 turn to green diagonal line...

Page 44: ...y shooting with shallow depth of field Available types are Mono and Color types Mono Background image is mono type Color Background image is original color type Pixels with Y or C levels exceeding the designated levels of Y MAX Y MIN C MAX and C MIN shall blink Analyzes the input signal s Luma Y and chroma information C and if the input signal exceeds the designated minimum value and maximum value...

Page 45: ...t status and function setting of the monitor It displays when you press Info in front of the monitor 1 Format Current input signal 2 Color Temp Current color temperature 3 F1 F2 F3 F4 F5 Current hot key setting status 4 Scan Current scan setting status 5 Aspect Current aspect ratio setting status 6 Waveform 7 Audio level meter 8 User config 9 Time code 10 Focus Assist 11 Closed caption 12 UMD Disp...

Page 46: ...DNESS 8 Other Functions CH Channel stereo or 5 1 ch I Integrated loudness Average loudness for program time S Short term loudness 3 second average loudness Smax Short term Maximum loudness M Momentary loudness 0 4 second average loudness Mmax Momentary Maximum loudness LRA Loudness range Variation in a time varying loudness high Loudness upper value low Loudness lower value Time Time for measured ...

Page 47: ...must be selected for normal function If the input image is in non wide mode press ASPECT button to change to wide display Resolution Frequency 640 X 480 60Hz 75Hz 720 X 400 70Hz 800 X 600 60Hz 72Hz 75Hz 1024 X 768 60Hz 70Hz 75Hz 1366 X 768 60Hz 75Hz 1280 X 1024 60Hz 75Hz 1600 X 1200 60Hz 1920 X 1080 60Hz Resolution Frequency 640 X 480 60Hz 75Hz 800 X 600 60Hz 72Hz 75Hz 1024 X 768 60Hz 70Hz 75Hz 13...

Page 48: ...9 97 25 24 23 98 30sF 29 97sF 25sF 24sF 23 98sF 1080i 60 59 94 50 SMPTE 274M 1080i 60 59 94 50 1080p 30 29 97 25 24 24sF 23 98 23 98sF SMPTE 296M 720p 60 59 94 50 SMPTE 260M 1035i 60 59 94 SMPTE 125M 480i 59 94 ITU R BT 656 576i 50 Audio In Embedded Audio Analog Stereo Phone Jack Audio Out Analog Stereo Phone Jack Speaker Mixed Mono Power AC 100 240V 50 60Hz Power Consumption Approx 60 Watts Max 5...

Page 49: ...8 30sF 29 97sF 25sF 24sF 23 98sF 1080i 60 59 94 50 SMPTE 274M 1080i 60 59 94 50 1080p 30 29 97 25 24 24sF 23 98 23 98sF SMPTE 296M 720p 60 59 94 50 SMPTE 260M 1035i 60 59 94 SMPTE 125M 480i 59 94 ITU R BT 656 576i 50 Audio In Embedded Audio Analog Stereo Phone Jack Audio Out Analog Stereo Phone Jack Speaker Mixed Mono Power AC 100 240V 50 60Hz Power Consumption Approx 32 Watts Operating Temperatur...

Page 50: ...50 Multi Format LCD Monitor 11 Optional Accessories RACK MOUNT ANY DISPLAY UP TO 24 9 inc h 7 inch 8 4 inch 24 inch 17 inch 21 inch 15 inch ...

Page 51: ......

Page 52: ...FOR MORE INFORMATION PLEASE VISIT http www tvlogic tv 12F ACE HIGH END 8 84 Gasan digital 1 ro Geumcheon gu Seoul 08590 KOREA TEL 82 70 8668 6611 FAX 82 2 6123 3201 E mail sales tvlogic co kr ...

Reviews: