background image

11

12

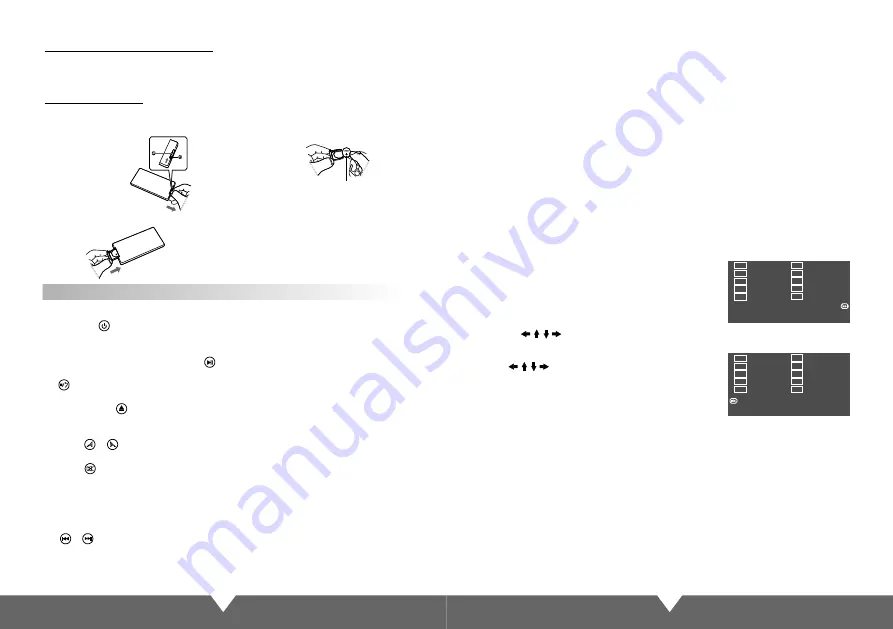
Replacing The Battery

1. Insert your finger nails into A and B on the diagram 
    below, press A according to the direction, then pull 
    out the battery holder.

2. Remove the old battery, then insert the new 
    battery into the battery holder with the + side 
    facing upwards.

3. Fit the battery holder back to its place.

Lithium battery(Cr2025)

Note:

To prevent leakage of fluid from the lithium 
 battery, remove the battery when not using 
the remote control unit for long periods of 
time(one month or more), If the battery leaks 
fluid, carefully wipe it out of the battery case, 
then change to a new lithium battery.

Basic Operation

Remote Control Unit Operating Range

Horizontal: ±30 degree
Vertical: ±30 degree
Distance:  6M

1. Power on /off


 Press the “      ” button on remote control, enter into power on condition, press this button 


 again to turn off the unit.

2. PLAY/PAUSE


 On normal play disc mode, press this “      ” button to pause. Press this button again to 


 continue playing.

3.        STOP


 In play mode, press it to stop playing, press “PLAY” button to resume playing.

4. DISC IN /OUT


 Press to eject the disc. The disc into the disc slot, will inhale automatically.  

5. Adjust panel angle


 Press “      ” “      ” button on remote control, can adjust the panel angle.

6. MUTE control


 Press “      ” button on remote control to turn off the sound. Press it again will resume the 


 previous volume level.


 Note: there are some functions no work when mute.

7. Function mode switch


 Press “MODE” button on remote control to switch the mode. But if the unit without disc/SD/

    USB inside, can’t enter to DVD/SD/USB mode.
8. “      ” “      ”


 In DVD mode, short-press for previous/next item, long-press for fast forward/fast back; 


 In FM mode, short-press for adjust radio frequency, long-press for manual search forward 


 up/down; In TV mode, short-press for previous / next channel, long-press for fine-tuned. 

26

26

10.Select the subtitle
11. Press “Sub-T” to select different subtitles inherent in DVD disc. 
12. Press ZOOM key for times, the picture will change in order of  2X, 3X  4X,1/2,1/3 and 1/4 of
 normal size. (Note: When playing MP3/USB/SD, this button is invalid.)
13.


Press SLOW on the remote control to slow playing. Change the playing speed to 1/2, 1/4, 

1/8,  and 1/16 through pressing SLOW button. 
14.During playback press the "AUDIO" voice key, can be included on the DVD disc in a variety 
   of audio languages to choose.
15

.

 “GOTO” chooses play button, Press it, the play information will show on screen, use cursor

 button on the remote control to choose disctitle, chapter or time and  then press “enter” button 
to play.  
16. Press ANGLE to select the play angle when the main unit is in play mode for DVD disc, 


 there is no function for other disc. It will be no working if the disc not have this function.

17. The main unit may auto play the list according to the order of title, chapter or set list; 


 Press ST/PROG, the menu will shown on the screen.

9. ODD:
         Press the OSD remote control key, the screen will display elapsed time, remaining time,
         title,chapter, time, section time, time remaining chapters, show off

NOTE:
(1). The program list will be cancel when the main unit is power off or eject the disc.
(2). There is no program function for some disc.
(3). The unit can not play the list if you select the item that does not exist in the disc.

Hint: TT is for Title, CH is for Chapter of DVD disc. DVD disc 
is divided into several parts called Title. Then title is divided 
into chapter; Normally one movie only corresponding to one 
title. CD disc is divided into several items. For KARAOKE disc
one music corresponding to one title.

Use                   move cursors to “play”, press “enter” button, 
the unit starts playing on the program list. Press “Play/Pause” 
button or choose "Exit" button, press “enter” to exit.

Use the                   and number button, to input the corresponding title, chapter, same as 
the picture showing:

1

2

3

4

5

6

7

8

9

10

TT

:     

CH

:

TT

:     

CH

:

TT

:     

CH

:

TT

:     

CH

:

TT

:     

CH

:

TT

:     

CH

:

TT

:     

CH

:

TT

:     

CH

:

TT

:     

CH

:

TT

:     

CH

:

EXIT

Next

11

12

13

14

15

16

17

18

19

20

TT

:     

CH

:

TT

:     

CH

:

TT

:     

CH

:

TT

:     

CH

:

TT

:     

CH

:

TT

:     

CH

:

TT

:     

CH

:

TT

:     

CH

:

TT

:     

CH

:

TT

:     

CH

:

EXIT

Previous

Summary of Contents for D76TSB

Page 1: ...ial QUALITY 100g wood free printed paper Size A6 D76TSB 7 Widescreen Color LCD Monitor With DVD Player Please read the manual in detail before using this product This product is made of precision components keep it away from moisture ...

Page 2: ...VD Mode Menu Interface Radio Function Interface Function Index Sign Instruction for install and uninstall face panel 5 User Introduction 6 Wiring Diagram 7 Unit Rear Side Connection 8 Remote Control Operation 10 Bluetooth system settings 13 14 15 Audio Video Menu Setup 16 Warning 19 Trouble Shooting 20 USB SD Operation 15 SYS System Settings 17 System Settings 17 19 ...

Page 3: ...ic shell debase the display quality and products quality Installation should be very tight and secured to prevent the fallen unit hurt people and damage the unit when moving on or a sudden brake Please install carefully to avoid damaging working platform Please clean the internal working platform and ensure sufficient space for installation Inner shell will be installed on the working platform The...

Page 4: ...move the hooks on both sides 2 Select a position where the screw holes of the mounting bracket supplied with the car and the screw holes of the main unit become aligned tighten the screws on each side and re mount the brackets with the factory hardware in the original location NOTE 1 and 10 are not used for installation method2 Tighten the screws to your car UNIT REMOVAL when installed using the s...

Page 5: ...step as the instruct if force to take out the face panel will be easy to broken the material and can not catch the head unit User Introduction 1 Please connect the signal cable with power cable according to Unit rear side connection to connect to power and signal 2 After connect to power Press the power button to switch on press again the power button the screen enter into the main interface 3 Whe...

Page 6: ...AKE CON GREEN BLACK FR GREEN FR PURPLE BLACK RL BLUE ANT CON YELLOW BATT Memory backup WHITE FL RED ACC PURPLE RL BROWN BACK CON 1 FUSE BLACK GND Unit Rear Side Connection Antenna control cable Manual brake switch Reverse mirror control cable connected to the car backing lamp FM NT A IN RA IO ANTENNA ADAP ER D T RED ACC RED ACC YELLOW BATT Memory backup YELLOW BATT Memory backup BATTERY BATTERY BL...

Page 7: ... the remote control unit within the specified operating range 1 3 2 19 27 28 29 17 24 23 22 21 25 11 8 15 5 4 6 20 9 12 7 13 16 10 14 26 18 25 ZOOM Press it can zoom or shrink picture displayed 26 Eject button press this button to eject or slot in the disc 27 Display panel slip out 28 Display panel retract 29 CLOSE press it the monitor will auto extend or return 1 2 3 4 5 6 7 8 9 9 9 9 9 9 10 11 1...

Page 8: ...nherent in DVD disc 12 Press ZOOM key for times the picture will change in order of 2X 3X 4X 1 2 1 3 and 1 4 of normal size Note When playing MP3 USB SD this button is invalid 13 Press SLOW on the remote control to slow playing Change the playing speed to 1 2 1 4 1 8 and 1 16 through pressing SLOW button 14 During playback press the AUDIO voice key can be included on the DVD disc in a variety of a...

Page 9: ...tch the bluetooth by presentation 3 Input 4 figures pass code 0000 this unit s bluetooth will be set up to the authorized equipment of the mobile phone If the match is successful the status of the bluetooth picture will show LINK OK Tips If it unable to match please starting up again After setting up the unit to authorized equipment the bluetooth will connect or enter into mobile phone bluetooth s...

Page 10: ...justment Touch the icon on the screen the alt volume will change BAS Bourdon volume adjust Touch the icon on the screen the bourdon volume will change FAD Front and Rear volume adjustment Touch the icon on the screen the front and Rear volume will change BAL Left and right track adjustment Touch the icon on the screen the left right track volume will change 9 JAZZ 10 POP 11 12 13 COL Color 14 15 1...

Page 11: ...enu choices SYS System Settings Language settings 1 2 Touch efficiency adjustment Touch efficiency adjustment follow the prompts to click on the center of sign if successfully adjust it will auto exit prompt Set the audio video and DVD menu when audio video mode operation the same 1 2 Back to the main interface English Portuguese After opening the machine Under the main menu screen on the touch sc...

Page 12: ...inet non professionals can not disassemble unit 10 Installation should be very tight and secure Preventing the fallen unit hurt people when moving on or a sudden brake Trouble Shooting Warning PROBLEM CAUSE SOLUTION Cannot power on After ignition switch off setting information all lose Remote control no function Poor performance of radio station Cannot play disk Cannot switch language subtitle No ...

Reviews: